Quantcast
Channel: Sprinkle Bakes
Viewing all 866 articles
Browse latest View live

Marshmallow-Candy Swirl Cake

$
0
0


I've been finding a lot of inspiration at the candy store lately. There's something so wonderful about all those bins of colorful candies - jawbreakers, gummybears and jelly beans (and etcetera) - just looking at them makes me feel happy and energetic. (Or maybe I'm just having a sugar rush. It's hard to say, really.)

My last trip yielded a giant tub of candy necklaces and an extra large package of strawberry-stripe marshmallows called Puffy Poles. The two looked so pretty when I held them together, I felt certain that they would live harmoniously on a candy-inspired cake.


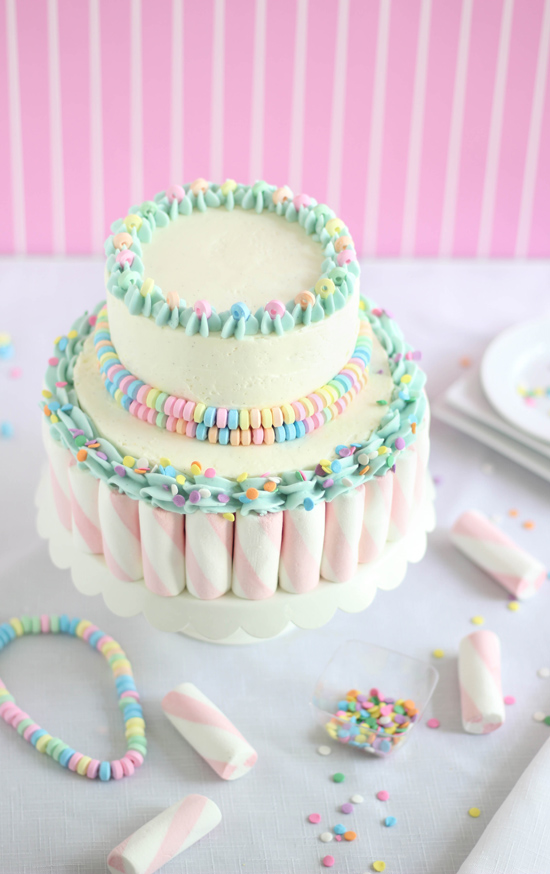
I already had a clear image of what I wanted the cake to look like, so it was just a matter of choosing a cake flavor and putting it all together. The Puffy Poles are really soft and delicious with a pronounced strawberry flavor, and I didn't want to take away from that. I ended up making a simple white cake swirled with pastel color. The frosting is Swiss meringue buttercream - it had to be. It doesn't crust like American buttercream frosting, so you can take your time applying the candies and marshmallows to the sides of the cake.


My method for accessorizing the cake with the candy necklaces is demonstrated in the picture above. I snipped the elastic string with scissors and then gently draped the necklace around the cake's top tier. It's good to have another person help you pat the candies gently into the icing while you hold the two ends in place. The elastic is so small and stretchy, it is very easy to let go of the two ends before it's completely anchored down. I'll say it again for emphasis - it is VERY easy to let go of the two ends, so it's a good idea to have a helper,otherwise you may end up with candy beads in spilled down one side of the cake. 

Once the beads are in place, you can pull out the elastic string! Viola!


I used two 6-inch springform pans for the bottom tier and one 4-inch pan for the top tier. It made for a dainty little cake, but with the added marshmallows, you'll still need a standard 8-9-inch cake stand.


I really love the scratch-made white cake recipe I've included below, but there's no reason you couldn't give any cake the Marshmallow-Candy Swirl treatment. You can find Puffy Poles marshmallow in every color here, and bulk candy necklaces here.

Enjoy!


Marshmallow-Candy Swirl Cake
[click for printable version]

Yield: 14 servings: One double layer 6-inch tier and one single layer 4-inch tier
Prep: 1 hour, total time about 2 hours 30 minutes

Cake
3 1/2 cups/287g cake flour (such as Swan's down, do not substitute homemade cake flour)
1 Tbsp plus 1 tsp baking powder
1/2 tsp salt
6 large egg whites, room temp
1 teaspoon vanilla extract
1 1/2 cups/12.75 oz whole milk, room temp
1 cup/113g unsalted butter, softened
1 1/2 cups/298g sugar
Pink, yellow and green food color 

Preheat oven to 350 degrees. Grease two 6-inch pans and one 4-inch pan; line with parchment. 
Sift together flour, baking powder, and salt; set aside. Whisk together egg whites and milk in a separate bowl; set aside.
Beat butter using the paddle attachment until soft and creamy. Add sugar gradually and beat until light and fluffy.  Scrape down the bowl as needed.  Beat in vanilla.
Add flour mixture alternately with the egg white/milk mixture.  Begin and end with flour mixture and beat until smooth on medium-low speed after each addition.
Divide batter between three bowls evenly; color each bowl of batter with a food color. Divide batter between pans, pouring in different colors into each pan and swirling them gently with a knife or skewer. Bake 6-inch cakes at 350 for about 25-30 minutes. Bake 4-inch layer for 20-22 minutes. Let cool  slightly in pan, then turn out and cool completely.

Buttercream and decors
6 egg whites
1 cup/198g sugar
Pinch of salt
1 pound unsalted butter, cubed, at room temperature
Seeds of 1 Tahitian vanilla bean
Blue food color
Confetti sprinkles for decorating
5 candy necklaces, multicolor
25 Puffy Poles strawberry marshmallows

Whisk together the egg whites, sugar, and salt in a large heatproof bowl. Set over the simmering water and whisk until the mixture is hot to the touch and the sugar has dissolved.
Transfer the mixture to the bowl of a stand mixer fitted with the whisk attachment.
Beat on low speed for 2 minutes. Increase to medium-high until stiff peaks are formed.
Continue beating at medium-high speed until the mixture is fluffy and has cooled (the mixing bowl should feel cool to the touch).
Turn the mixer off and switch from the whisk attachment to the paddle. Turn the mixer on medium-low and add the butter, a few cubes at a time, beating until well incorporated before the next addition. The egg whites will deflate and thin with the first few additions – don’t let this discourage you – keep going.  It may also look curdled, but don’t fret. Beat on high speed when all the butter has been added. The mixture will thicken and become smooth after several minutes of beating. Beat in the vanilla bean seeds. 
Transfer about 2/3 cup to a bowl and fold in one or two drops of blue food color. Transfer frosting to a piping bag fitted with a large closed star tip; set aside. 
Fill and frost the cake layers with the remaining frosting. Stack the smaller tier, centered, on top of  the larger tier. Place the marshmallows vertically around the entire bottom circumference of the large tier. Using the blue frosting in the piping bag, pipe decorative swirls along the tops of the marshmallows. Sprinkle the blue frosting with confetti sprinkles.
Snip the elastic on the candy necklaces and, while holding the two ends, drape it across the bottom of the smaller cake tier. Don't stretch the necklace! You want all of the beads to be perfectly lined up, and stretching will make them separate. Gently pat the necklaces into the frosting so they stick (I had to have a helper for this, it's not as easy as it sounds!). When all the beads are embedded into the frosting, gently pull the elastic string free and discard. If you need more beads to finish the line around the cake, snip another necklace and place the beads onto the cake with your fingers. Repeat the process with the remaining necklaces. You will have candies left over - but don't eat them! Safe them for the next step.
Pipe blue frosting stars around the top edge of the top cake tier. Place a candy bead on top of each piped star.
Serve cake to delighted guests.


Giant Skillet Cinnamon Roll and a Fair Trade Giveaway!

$
0
0

You guys. I'm so excited about today's post because there are so many good things to talk about!

First of all, Mother's Day is just around the corner, and I've teamed up with my friends at Fair Trade USA  (along with some other fabulous bloggers) for a virtual Mother's Day brunch. I developed this recipe especially for the occasion, and I have to tell you, I may never bake individual cinnamon rolls ever again. My favorite part of a cinnamon roll is the soft, flaky interior, and - guess what. You get more of that when you make one giant cinnamon roll! And you can slice it like cake! I really love how all those beautiful layers separate ever-so-slightly on the plate. It's irresistible when smothered with orange-zested cream cheese glaze (I swoon!).


Second, there's a giveaway involving some of the best stuff around - products that are really worth using! I buy Fair Trade whenever possible, not only because the products add quality to my baking, but also because it positively impacts the lives of Fair Trade workers. There are a great number of women who work for Fair Trade companies, including moms who are working to provide better lives for their families. This virtual brunch is our way of honoring them. And all moms, really!

Fair Trade certified, means the products come from workers that are justly compensated. Below are some of the best teas, coffees and snacky foods I've ever tasted, and we're giving the whole stash away to one lucky winner! You'll get the same delicious Fair Trade cinnamon and muscovado sugar that I used in this skillet cinnamon roll. And just take a look at this Prana embroidered scarf.  It's even prettier in person.

Giveaway is open to US residents.

a Rafflecopter giveaway


There's a friendly little competition going between the participating bloggers, too. So you can help me out by re-pinning my image here!

Now to even more good stuff - step-by-step instructions for the skillet cinnamon roll. You'll see my process below, and I hope it will serve as a helpful guide while you make your own!


The entire process is a little messy, but well worth the end result. The muscovado sugar really punches up the brown sugar flavor, so it's worth seeking out next time you're at the grocery store.


Just look at that landscape of swirly goodness up there. I can't wait to try out different versions of this skillet pastry. Maybe I'll hide some Guittard Fair Trade chocolate between the layers next time.

Giant Skillet Cinnamon Roll 
with Orange-Cream Cheese Glaze
[click for printable version]
Yield: One 12-inch skillet cinnamon roll
Source: My Mom's cinnamon roll recipe plus my original glaze recipe
Prep 2 hours; Total 2 hours 30 minutes

Dough
1 cup whole milk
1/2 cup sugar
1 1/2 teaspoons salt
4 1/2 teaspoons active dry yeast
1 teaspoon sugar
1 cup warm water (90-110°F)
2 eggs, room temperature
6 cups all purpose flour, sifted
4 tablespoons unsalted butter, melted

Filling
1/2 cup butter melted
1 cup sugar, 
1/2 cup moscovado sugar (or dark brown sugar) and 
3 teaspoons ground cinnamon mixed together

Glaze

4 oz. cream cheese, slightly melted4 tablespoons butter, melted
2 cups confectioners' sugar

2-4 tablespoons hot milk
2 teaspoons orange extract
Zest of one-half organic orange

  1. For the dough, heat milk, 1/2 cup sugar and salt in a saucepan over medium-high heat. Stir until sugar melts and a few small bubbles appear at the edges of the pan. Remove from heat and let cool while you prepare the other elements.
  2. Dissolve yeast and 1 teaspoon sugar in very warm water (90°F to 110°F) in the bowl of a standing mixer (or a large bowl if you don't have a stand mixer). Stir with the paddle attachment (or wooden spoon) until well blended. Let stand 10 minutes.
  3. Beat eggs into yeast mixture. Stir in cooled milk mixture (it should be lukewarm), switch to the dough hook then add in flour a little at a time until dough is elastic. Add melted butter and mix, then add in more flour until dough is elastic and pulls away from the sides of the mixer. Note: you may  not have to use all the flour. Do not add so much flour that  the dough does not stick to your hands. Set a timer and knead with the dough hook (or knead with hands on a floured surface) for 5 minutes. 
  4. Place dough in a buttered bowl and turn it over to coat the entire surface. Cover with plastic wrap and let rise in a warm place 1 hour or until doubled (mine took a little longer than an hour to double).
  5. Punch down dough and turnout onto a lightly floured surface. Knead a few times and cut into two pieces. Roll out each piece to 12x9-inch rectangles. 
  6. For the filling, brush the rolled dough pieces with the melted butter. Sprinkle each with half the cinnamon sugar mixture. 
  7. Cut the each dough piece into 5 even strip lengthwise. Roll one strip up as if you were making a regular cinnamon roll. When you get to the end, use another strip and continue rolling. When the dough spiral reaches about 6-inches in diameter, (3-4 strips-worth of spiraling) place it in the center of a  lightly greased 12-inch cast-iron skillet. Continue spiraling dough strips around the middle. This is a messy job, but just embrace the mess. It'll be well worth the end result.
  8. When all the dough has been used, cover and let rise about 45 minutes or until doubled.
  9. Preheat oven to 400°. Bake for 18-25 minutes, or until golden. Keep a close eye on it so it doesn't over-bake! 
  10. Whisk together glaze ingredients, adding additional milk as needed. Glaze pastry in the pan while it is still hot. Add additional orange zest if desired. Slice into pieces and serve while still warm.


Fair Trade prize package courtesy of :


Lavender Earl Grey Cupcakes for Better Homes and Gardens

$
0
0

Hi friends! This month I'll be sharing a few of my cake creations on the Better Homes and Gardens blog - starting with these tea-time inspired cupcakes! They're so easy to make, and perfect for a Mother's Day dessert.

Lavender and Earl Grey flavors have a natural affinity for each other, but you can use any tea you fancy. To get all the details (including how I made tea bag tags into cupcake toppers) click here!


Raspberry Rosé Cake for Better Homes and Gardens

$
0
0

Hi all! Today you can find me on the Better Homes and Gardens blog again, and this time I'm showing you how to make an easy celebration cake. Rosé champagne is used to flavor fluffy white cake layers, and then they're filled and frosted with pretty pale blue vanilla bean frosting. Add some fresh raspberries on top and you've got yourself a stunner for the dessert table!

It's easy to put your own spin on this cake with your favorite bubbly and berries. Get all the details here!


Chocolate Mojito Cupcakes

$
0
0

My third post for Better Homes and Gardens' Month of Cakes is a refreshing take on grasshopper cupcakes. Fluffy whipped cream is flavored with mint, lime zest and rum to give rich chocolate cupcakes a Mojito-inspired topping. I love this frosting so much I've even piled it on top of an ice cream sundae!

Ready to try them at home? Find all the details here!


Fresh Watermelon Cake

$
0
0

I'm not really sure who came up with the idea for this cake, but I love everything about it. I've seen a few versions floating around the web and with Memorial Day weekend coming up, I decided it was time to try it for myself.

The best part about it is that you only need three ingredients to make it (okay, four if I'm being picky). It's delicious, and even more so now because juicy watermelons are ripe and readily available at the grocery store. It is so easy to make and highly summer cookout appropriate. And if you're like me, you occasionally enjoy faking people out, especially at family gatherings. Leave the  melon balls of the top of the cake and no one will be the wiser!  


The frosting is heavy whipping cream beaten with granulated sugar. I added vanilla bean to the party because I knew it would be delicious. And it is. I've seen versions of this using tubs of frozen whipped topping, so you could use that too and make even shorter work of building the cake. I recommend the homemade whipped topping, though. Everything tastes so fresh and lovely.


Cutting the watermelon to shape was easier than I thought. Just cut the top and bottom of the melon off flat, and then carve the rind away. The shape doesn't have to be anywhere near perfect, just do the best you can. The whipped cream will camouflage an uneven surface.


You can make this cake as large or small as your party dictates (or that the available produce will allow), but you'll need to adjust your whipped cream topping accordingly. This watermelon was about 7 pounds before carving, and 2 1/2 cups of heavy whipping cream covered it well. It's actually better to have too much whipped cream than too little, since it is instrumental in smoothing an uneven carving job.

Hope you all have a happy Memorial Day weekend! 

Edit 5/25/14: I was talking to the cashier at Trader Joe's about this cake, and she makes it vegan with coconut whipped cream - great tip!

Fresh Watermelon Cake
[click for printable version]
Yields 12 servings
Prep: 30 minutes, total time about 45 minutes

7- 10 pound whole seedless watermelon
2 1/2 cups/580g heavy whipping cream
1/4 cup/50g sugar
Seeds from one vanilla bean
Mint sprigs for garnish (optional)
  1. Using a large sharp knife, cut the top and bottom off of the watermelon flat and save the ends for later use. Turn the watermelon upright and carve away the rind in downward strips until all of the green and white pith is removed and you're left with a red, ripe center. Carve away small pieces from the sides and top until the center is roughly cake-shaped.
  2. In a large mixing bowl, beat the heavy cream on high speed with an electric hand mixer until it begins to thicken. Add the sugar one tablespoon at a time, and then the vanilla bean seeds. Beat until the mixture is thick and spreadable, about 5 minutes.
  3. Transfer the watermelon to a cake stand or serving plate and pat the outside with paper towels to remove excess water. Spread the whipping cream over the entire surface of the watermelon. Use a melon baller to cut round pieces of melon from the two reserved ends. Place them on the top center of the cake and garnish with mint sprigs, if using.
  4. Store the cake in the refrigerator.


PS. The adorable little red bicycle is a cake topper and can be found at Hey Yo Yo!


Coffee Caramel Ice Cream Bombe for Better Homes and Gardens

$
0
0

Happy almost June, friends! It's hard to believe how fast this month has gone by, and it's been a sweet one for sure! Many, many thanks to BHG for having me on as their Month of Cakes contributor.

My final post combines so many of my favorite things - coffee ice cream, hot fudge, salty almonds, chocolate shavings - I don't think there is a craving it won't satisfy!

You can find all the instructions for this summertime-ready ice cream cake here - enjoy!


Rhubarb-Wrapped Pineapple Mousse Cake

$
0
0

Last summer I received a beautiful dessert magazine in the mail. It was titled Sweet Dreams, and the cover had a big glossy image of a cake on it. It was so striking, I couldn't wait to read every single page. I quickly found out it was written in German, so reading would have to wait for translation. Still, I sat leafing through the pictures and -surprise- a picture of me!  There I was, in the same magazine with esteemed pastry chefs and their gorgeous desserts -which was a real hoot,  if you ask me! On the opposite page (and more eye-catching than I could ever be) was a picture of fresh rhubarb, with stalks shaved paper-thin and curled into ribbons. I may have gasped, it was so beautiful.

Further into my reading (if you can call it that) I fell in love with a cake. At first glance I had no idea what was on the inside, nor did I care because the outside was so stunning. It was all wrapped up in strips of pink-red rhubarb. I wanted to make it immediately, but found myself questioning my own aptitude. Then I remembered something a smart baker once said: you shouldn't be afraid of cake, if anything, cake should be afraid of you because you're going to eat it. 

I decided to go forward on that thought.


Since the recipe was in German, I set to translating it, and gratefully I have a friend who is a German professor who helped me when I stumbled (dankeschön, Darlene!).

After the recipe was translated in full, I decided to use my own method for making pineapple mousse, mostly because the recipe called for gelatin sheets, and those aren't sold in grocery stores here. Other problems persisted - the local produce wasn't great, I could only find short stalks of rhubarb and I couldn't find any good tarragon (only bad tarragon), so a few things were changed and simplified along the way.

Despite all the tweaking, this cake is delicious. Dreamy. And, of course, the one thing I refused to compromise was the beautiful paper thin covering of rhubarb strips across the cake.


This recipe makes a standard 8-inch cake. Since my rhubarb stalks were so very short, and they wouldn't have wrapped very far around a cake that size, I ended up making one 5-inch cake and three 2-inch cakes. I must admit, it was kind of nice having my own little single serving cake.


The most complicated part of building this cake is the process of boiling the rhubarb strips in sugar syrup.You can't leave them in the boiling water for too long or they'll become rhubarb noodles. I found that a cooking time between 20 and 30 seconds was about right. It's a good idea to have extra rhubarb strips in case the first batch ends up being practice.

Decorating the mousse cake was so much fun, and it was easy! Just lay the strips across the top of a frozen mousse cake and trim the excess with a pair of kitchen scissors. The rhubarb pieces I used were varied in color, so I decided to create an ombre effect. After you're done with the top, start layering the strips around the edges. Layer the first pieces so that the rhubarb strips are flush with the top of the cake and hides any ragged edges you may have created while trimming the top.


This mousse cake is like a gift all wrapped in beautiful packaging with delicious things inside. The center is so sweet and mild with light pineapple flavor, it really strikes a balance with the slightly tart rhubarb covering. I'll definitely be making it again before fresh rhubarb disappears from the market shelves!


Rhubarb-Wrapped Pineapple Mousse Cake
[click for printable version]
Yields one 8 or 9 inch cake
Source: Mousse and crust recipe from the Sprinkle Bakes book,
Rhubarb wrap technique by pastry chef Bernd Siefert
Prep: 1 hour, total time with chilling about 4 hours

Crust
1 1/4 cups fine graham cracker crumbs
4 tablespoons unsalted butter
1/2 tablespoon sugar
Pinch of salt

Combine the ingredients in a large bowl. Mix well, making sure that all the crumbs are well coated with butter. Press evenly into the bottom of an unlined 8 or 9 inch springform pan. If making individual cakes, place 6 pastry rings on individual sheets of plastic wrap. Divide the crust mixture evenly among them and press tight with a flat-bottomed tumbler.

Pineapple mousse
2 tablespoons unflavored powdered gelatin
1/4 cup pineapple juice with pulp
2 cups pineapple puree
3/4 cup sugar
1 1/4 cups heavy whipping cream

In a small bowl, sprinkle the powdered gelatin over the pineapple juice. Let stand until the gelatin absorbs the water. Microwave for 10 seconds at full power or until the gelatin has melted into a clear liquid. Gelatin can also e melted in a saucepan on the stovetop over medium heat.
Combine the fruit puree and sugar; mix well. Pour in the liquid gelatin mixture. Let stand at room temperature until the mixture begins to thicken, about 20 minutes.
Whip the heavy cream until stiff peaks form. Stir the fruit puree mixture gently to loosen it. With a large rubber spatula, fold 2-3 tablespoons of whipped cream into the fruit puree to relax it. Fold in the remaining cream until blended and there are no longer steaks of fruit visible.
Pour the mixture over the crust in the spring form pan (or divide between pastry rings) and freeze until solid, about 2 hours.

Rhubarb strips
1 cup water
1/2 cup sugar
6-7 long stalks of rhubarb

Place the water and sugar in a small saucepan. Bring to a boil over medium-high heat and stir until the sugar is dissolved. Lower the heat to medium and let stand until the mixture is at a slow simmer. Lay out sheets of double thick paper towels on a large work surface or your kitchen counter.
With a vegetable peeler (Y-shaped or asparagus peeler-type) shave the rhubarb stalks into paper thin strips. Place two to three strips in the simmering water at a time, only allowing them to cook for 20-30 seconds. Lay the cooked rhubarb strips flat on the paper towels to drain. Repeat with remaining rhubarb strips. After you're done, the sugar syrup will be bright pink-red. Reserve the syrup for later use.
To decorate the cake, lay the strips on the top of the cake until the surface is completely covered. Trim away the excess with kitchen scissors. The strips should stick naturally, but if they do not, brush them with a little of the reserved sugar syrup. Wrap more stalks around the sides of the cake, beginning with the top so that the strips will cover any ragged edges created during trimming the top. Brush the entire cake with the reserved syrup. Place in the refrigerator to thaw. Cut with a very sharp knife - rhubarb can be very fibrous, so this is a very important step. You may also cut the cake into pieces while frozen and let the slices come to room temperature. Store the cake, covered, in the refrigerator or freezer.


Blondie Confetti Ice Cream Sandwiches and a Giveaway!

$
0
0

Hello June! The first day of summer is still three weeks away, but from where I'm standing -which is squarely in 80 degree weather- it feels like we're already there! I say we give this month a fitting kick-off with a chilly treat. I always associate ice cream sandwiches with summer. And if you ask me, they're made to be enjoyed while sitting outside on the front porch steps, watching the first fireflies.

To me, blondies taste like birthday cake but with a different texture. Chewier. So, these little ice cream sandwiches are like having your birthday cake and ice cream all rolled into one sweet. I can't tell you how many times I've made blondies over the years, but this is the first time I've made them for a blog post - can you believe it? I know! I deserve a proper scolding.


I love how these sandwiches are so uniform, and that's thanks to this super cute pan from Wilton. With it, you can basically turn any cake, brownie, or cookie recipe into shells for sandwiching ice cream. Because I love it so much, we're giving one away, along with a pretty ice cream scoop and a big bottle of multicolor sprinkles!


a Rafflecopter giveaway


This contest is open to US residents. 
Please read the terms and conditions on the widget for more information.


This pan is destined to get a workout in my kitchen this summer. I can't wait to try brownie ice cream sandwiches, or even a no-bake chocolate chip cookie dough version. There are so many possibilities! I'm rather fond of this blondie version, but Wilton has also included two recipes inside the pan's packaging to get you started!


Blondie Confetti Ice Cream Sandwiches
[click for printable version]
Source: Blondie recipe adapted from Williams-Sonoma
Yields: approximately 18-20 sandwiches

These sandwiches were made using the Wilton Ice Cream Sandwich pan. If you don't have this pan, instructions for using cookie cutters are included.

1/2 gallon vanilla ice cream, softened
1 cup/180g multicolor jimmies/sprinkles
2 1/2 cups/340g all-purpose flour
1/3 cup/60g multicolor jimmies/sprinkles
1 teaspoon baking soda
3/4 teaspoon salt
1 cup/216g unsalted butter, softened
1 cup/257g firmly packed light brown sugar
1/2 cup/114g granulated sugar
2 eggs
2 teaspoons vanilla extract
1/2 gallon ice cream of your choice

  1. Place the ice cream in a large bowl and fold in the multicolor jimmies. Line a 9x13 baking dish with parchment paper so that two sides of the paper overhang the edges. Pour the ice cream into the dish and freeze until solid, 3-4 hours or overnight.
  2. Preheat oven to 325F. Spray the Wilton ice cream sandwich pan with baking spray with flour (such as Wilton brand Bake Easy!), or spray a 13x9-inch jelly roll pan with cooking spray and line it with parchment paper, allowing the parchment to overhang two sides.
  3. Sift together the flour, baking soda and salt. Set aside.
  4. In the bowl of an electric mixer fitted with the paddle attachment, beat the butter on medium-low speed until smooth. Add the brown and granulated sugars, increase the speed to medium and beat until fluffy, about 2 minute, stopping to scrape down the sides occasionally.
  5. Add the eggs one at a time, beating well after each addition, then beat in the vanilla, stopping the mixer occasionally to scrape down the bowl.
  6. Reduce speed to low, gradually add the flour mixture and beat until just combined. Cover the bowl and refrigerate for two hours or until the dough is stiff.
  7. Press 1 1/2 tablespoons batter into each cavity of the ice cream sandwich pan using buttered fingers or a piece of parchment paper sprayed with cooking spray. If not using  the ice cream sandwich pan, evenly press the dough so that it just fits into the jelly roll pan. Bake for 13-15 minutes (check the Wilton ice cream sandwich pan at 13 minutes). Transfer the pan to a wire rack to cool. Place a sheet of parchment over a work surface and turn the individual ice cream shells out onto the paper. Allow them to cool completely. If using the 13x9 pan, lift the blondie out of the pan with the two overhanging pieces of parchment. Let cool completely. Cut shapes out of the large blondie sheet using cookie cutters.
  8. Remove the ice cream from the pan by lifting it with the two overhanging parchment edges. Working quickly, cut shapes from the ice cream using the same cutters used for the blondies. Sandwich like shapes together. If using the Wilton pan, use a blondie sandwich piece as a template to cut rectangles from the ice cream slab. Use a sharp knife and work quickly! Sandwich the ice cream rectangles between blondie shells.
  9. Store sandwiches individually wrapped in wax paper in the freezer.


Gentlemen's Chocolate Whiskey Cake

$
0
0

According to The Chocolate Bible, a Gentlemen's Torte is a many-layered Sachertorte that is soaked with booze. Other books on the subject say that almost any cake could be called a Gentlemen's Torte if it is doused with enough whiskey. In fairness, I think this type of cake could also be called a Whiskey Women's cake (a book I'm loving, by the way) but with Father's Day fast approaching I was inspired by the masculine title. There's nothing wrong with honoring our fine fellows with cake - as long as they share!

This sheet cake is generously brushed with whiskey and a covering of ganache helps retain a lovely damp crumb. When I spotted the "Décor Smoking" cake decoration tutorial in my new Patisseriebook there was no question it had to happen. It's as simple as cutting a triangle of fondant and folding in two edges - anyone can do it! I made a little video to show you exactly how easy it is, but I also wanted to show you how to transfer a cake like this from a drip rack to a cake board. Earlier this year someone had asked me how to transfer cakes easily, and here is my advice: chill the cakes before you try to move them and always use a cake lifter. The latter is a marvelous help, but due to it's oversized spatula head it's a pain to store. Believe me, I have two of them and even with the uncomfortable size, I now consider having at least one a necessity.


Video note! You'll notice that when I knead the red fondant for the "shirt" portion, I use vegetable shortening to grease the work surface. I also work just a little into the fondant. This may seem strange, but it makes the fondant soft and pliable without making it dry. It's not greasy at all, and I highly prefer it over messy powdered sugar and cornstarch. If you're not a fan of fondant, marzipan is a suitable substitute.


The chocolate cigarettes on the corner of the cake were an afterthought because - oops! I accidentally grazed it with my wedding ring. I was really sad when that happened because the cake's surface was so perfectly mirrored and shiny. I like them on the cake though, and I think they make sense on a cake dressed as a smoking jacket. Chocolate cigarettes are perhaps the least alarming cigarettes of them all, am I right? I found them at World Market in the baking ingredients section if you're looking to buy them.


I'm not ashamed to admit that I ate three pieces of this cake yesterday. It reminds me of a chocolate cake from my favorite Italian restaurant - but better! The whiskey gives it a sophisticated flavor, but it's not overly boozy on the tongue. The fact that it's a sheet cake makes it so simple to whip up, but if you're looking for layers, the batter can be baked in two 9-inch round cake pans. You can find baking times for both versions in the recipe below.


Gentlemen's Chocolate Whiskey cake
[click for printable version]
Source: Food.com and Patisserie by Christophe Felder
Prep: 1 hour 30 minutes, total time about 2 hours

Chocolate cake
2 cups/190g all purpose flour
1 teaspoon salt
1 teaspoon baking powder
2 teaspoons baking soda
3/4 cup/85g unsweetened cocoa powder
2 cups/398g granulated sugar
1 cup/200g vegetable oil
1 cup/8oz hot coffee
1 cup/242g whole milk
2 large eggs
1 teaspoon vanilla
2-3 oz. whiskey

Chocolate glaze
1 1/2 cups/300ml heavy cream
1 tablespoon sugar
9 oz./250g bittersweet chocolate (60-70% cocoa)
3 tablespoons/ 50g unsalted butter

Bow tie and shirt decor
4 oz. ready made rolled fondant, red
1 oz. ready made rolled fondant, white
3 black pearl dragees
2 chocolate cigarettes, optional

  1. Preheat the oven to 325F. in a large mixing bowl, sift together the dry ingredients. Add oil, coffee and milk; mix at medium speed for 2 minutes. Add eggs and vanilla and beat 2 more minutes. Expect the batter to be thin. 
  2. Pour the batter into a 13x9-inch greased and floured pan or two 9-inch round pans and bake the 13x9-inch pan for 40 minutes. If using the two 9-inch round pans, check them at 30 minutes. Let the cake cool in the pan for 10 minutes and then turn it out onto a wire cooling rack. Place the cooling rack on a large baking sheet. Using a pastry brush, coat the cake with the whiskey. Allow the cake to stand 20 minutes to absorb the liquor.
  3. For the glaze, bring the cream and sugar to a boil in a small saucepan over medium heat. Finely chop the chocolate and place it in a bowl. Pour half of the hot cream into the chocolate. Let the mixture stand for 2 minutes, then stir the mixture slowly with a wire whisk. Add the remaining cream and whisk slowly until smooth. Add the butter and stir until the chocolate in smooth and shiny. Let the mixture cool slightly.
  4. Pour the glaze over the cake and cover it completely. Use an offset spatula to smooth the surface and wipe off any excess glaze. Lightly rap the rack on the baking sheet to even out the glaze. Refrigerate for 15 minutes, or until the chocolate is set. Scrape the excess chocolate from the baking pan into a bowl and heat it again in the microwave or on the stovetop until pourable but not hot. Place the cake on the rack on top of the baking sheet and cover the cake a second time with the ganache. Smooth with a spatula and rap the rack again to even the ganache coating. Refrigerate again until set.
  5. Run a sharp knife under the edge of the cake to loosen it from the drip rack. Use two cake lifters or two large spatulas to transfer the cake to a cake board or serving platter.  
  6. For the decor, lightly grease a work surface with white vegetable shortening. Knead the red fondant until smooth and pliable. If it is too dry, then knead in a small amount of shortening. Roll out the red fondant to 1/8-inch (2-3mm) thick. Cut a triangle almost as long as the cake. Fold over the two upper corners to create shirt lapels. Lift the piece with a long spatula and place it on the center of the cake. Roll out the white fondant and trim it into a small rectangle, just long enough to make a bowtie. Gather it in the center to shape it. Cut a very small strip from the excess white fondant to make the center of the bowtie; wrap it around the gathered center of the bowtie. Pinch away the excess fondant strip on the backside of the bowtie. Place the bowtie in the center of the red fondant lapels. Press three black pearl dragees evenly spaced down the center of the cake to create shirt buttons. Cross the chocolate cigarettes and place them on one lower corner of the cake, if using.


Breakfast in Bed with Homemade English Muffins (and Doughnut Muffins, too!)

$
0
0

Breakfast in bed is rarely served at my house, but that's something I'm trying to rectify. I know it's considered best if someone makes it for you, but I'm kind of a control freak when it comes to breakfast pastries and breads, so really, I don't mind doing the work.

I decided to document my last effort, which was assorted nibbles shared with the hubby. It was delicious and made us feel cheery all day long. Here's what was on our tray.
  • Coffee is a must for us both and since it's been 85 degrees at 10 a.m., I bought our favorite bottled coffees and made sure they were served ice cold.
  • Doughnut muffins. These are a favorite that I've made countless times. They're easy, and if you've never made them then you should probably drop everything and go make them right now. Seriously, they are my favorite mini breakfast muffin. 
  • Homemade life-changing English muffins (with the option of butter and jam). I'm still pinching myself. I made English muffins that look and taste like English muffins! It can be done! More details on this later.
  • Juicy red cherries. It's good to offer a fresh bite with breakfast. It makes everything seem more vibrant and special.
  • O.J. - good ol' sunshine in a glass. It's thirst-quenching in a way that coffee is not. 
There are a few other small things that make breakfast in bed really great, like the morning paper or your favorite book, real table linens, and a single fresh bloom on the tray.


I made the doughnut muffins the night before. They keep really well (although they never last more than two days), so they tasted just as fresh as the first day. I know many of you have made these before, but for those who haven't, you should know that these muffins get dipped in butter (major!) and then rolled in cinnamon-sugar. They are tops in my book!


Now let's talk about these homemade English muffins, because I can't believe how well they turned out. There were two recipes I considered making before settling on this one. The first is made with a pourable batter that requires the purchase of English muffin rings, but since not everyone has those, I opted for the roll-and-cut version. I still used my pastry rings to fry them in, but I soon discovered that they are not needed. My first muffins were a little too thick, and didn't have that wonderful bubbly, craggy interior, so I patted the dough thinner, cut new rounds and fried a second batch - they were perfect! They have just the right amount of chewiness, and a perfectly pocked interior. I made these the night before too, and they kept well in an air-tight container.


Breakfast in bed is totally indulgent, and I almost dismissed it entirely with a "who has time for that?", but sweet memories are rarely made with that attitude. I'm so glad I made time for it, and I'd encourage you to try it just once!


Edit 6/24/14: Friends, please note that there is an egg in the English muffins and "ground sugar" in the muffin recipe is supposed to be "ground cinnamon". These errors have been corrected in both recipes. My apologies for the omissions! -xo

Homemade English Muffins 
(Roll and Cut Method)
[click for printable version]
Source: The Bread Bible
Yields 12 to 14 three inch muffins
Prep: 45 minutes, total time about 2 hours
1/4 cup/ 60 ml warm water (105° to 115°)
1 tablespoon active dry yeast
1/8 teaspoon sugar
2 teaspoon salt
1 egg
4 to 4 1/2 cups/ 512 to 576 g  all-purpose flour
1 1/4 cups/300 ml warm milk (around 95° to 100°)
2 tablespoons butter, melted
Plain yellow corn meal for dusting

Combine the active dry yeast, water, yeast and sugar in a small bowl and allow it to stand until foamy, about 7 to 10 minutes. 
Combine 2 cups of flour and salt in the bowl of a standing mixer. Pour in the egg, milk, butter and yeast mixture. Stir with a spoon to combine. Fit the mixer with the dough hook and add the remaining flour 1/2 cup at a time, kneading on medium-low speed as you make the additions. Knead for 3 to 5 minutes after the last flour addition.
Place the dough inside a large greased bowl and turn the dough over so that the entire surface is coated. Allow the dough to rise for 1 hour, or until doubled in size. 
Sprinkle a work surface with cornmeal. Pour the dough out of the bowl onto the surface. Sprinkle the top of the dough with cornmeal and roll into a rectangle, slightly less than 1/2-inch thick. Cut muffins with a large round cutter, or with the mouth of a drinking glass.
Lightly oil a skillet and place it over medium heat. Place the muffins in the pan and cook until the bottoms are golden brown, 5-7 minutes per side. 
Serve warm or split and toasted with jam and butter, or cool before placing them in an air-tight container. They will keep for 3 days air-tight or up to 1 month in the freezer.

You may use pastry rings or English muffin molds to help the muffins keep their round shape, but I tried the recipe both ways and found they did fine without.

Cinnamon Sugar Donut Muffins
[click for printable version]
Yields 24 mini muffins
Prep: 15 minutes, total time 40 minutes

Cakes
1/2 cup/100 g white sugar
1/4 cup/ 57 g unsalted butter, melted
Pinch of ground nutmeg
1/2 cup/120 ml milk
1 teaspoon baking powder
1 cup/ 128 g all-purpose flour

Coating
1/4 cup/57 g unsalted butter, melted
1/2 cup/100 g sugar
1 teaspoon ground cinnamon
Pinch of fine grain salt

Preheat the oven to 375°F. Grease the cavities of a 24 quantity muffin tin. (I like using flour-based baking spray that greases and flours the pan in one step).
Mix the 1/2 cup sugar, 1/4 cup butter and nutmeg in a large bowl. Stir in the milk, baking powder and flour until just combined. Fill the muffin cups 1/2 full and bake until lightly golden, about 15-20 minutes. Allow the muffins to cool slightly before turning them out onto a wire rack.

Place the melted butter in a small bowl and dip the muffins into the butter. (I normally use a fork to skewer the bottoms of the muffins and then tilt the butter bowl so it pools to one side, then I swirl the entire muffin into the butter.) As you dip the muffins, place them back onto the wire cooling rack. Pour the cinnamon-sugar in to a large zip-top bag (or a paper lunch sack) and place few muffins in at at time - shake, shake, shake - and return the sugar coated muffins to the wire rack. Repeat until all the muffins are coated. Store in a container that seals air-tight.


Black and White Wedding Cake

$
0
0


I'm not in the business of making wedding cakes, nor do I want to be, but I make exceptions for family and close friends. Clearly, there's a lot of pressure involved, and my hat goes off to anyone who chooses this as an occupation. Any cake that is served to a large group of people should always be the perfect trifecta of beauty, flavor and texture, and I still feel like I'm learning to master all of those elements. That's why I'm amazed that anyone would trust me with their most memorable cake, but alas, earlier this year I was asked, and I said yes because I love my family. I reasoned that even if it was an epic failure, everything would be okay because my family is still obligated to love me.


When I learned of this new project, I turned to my friends at Wilton. They gave me some great products to work with, and I'm not sure how this cake would have turned out without them. The cake's design is very simple, but that means the few embellishments on the cake needed to be well executed.

The black ribbon around the bottom of the cake is cut from Wilton Sugar Sheets. I tried using fondant for this at first, but I could never make it look as uniform as it needed to be. The Sugar Sheets turned out to be a life saver! They are as easy to cut as regular paper (with kitchen-dedicated scissors, of course) and gave the cake a crisp black edge. Plus, it had none of the metallic taste that is associated with black food color. I am a fan!


Another tool Wilton sent was the Lace Fondant and Gum Paste Mold. The bride picked out a specific floral design that I hand painted on the cake, but when I finished painting the first flower, I felt it needed a little something extra. I made the flower centers with black fondant and the gum paste mold. I know it looks subtle, but it really made the finished cake look polished.


The black crossed lines on the bottom tier are made with black fondant, and boy, were those ever difficult to get right! Maybe someday I'll dedicate an entire post and video tutorial on how to create the effect. It sure is pretty but I spent several hours measuring, moving, straightening, fixing - repeat, repeat, repeat!

Speaking of tutorials. I decided to make a video on how to achieve smooth buttercream frosting on a cake, specifically for cakes that will be covered in fondant. Once upon a time I applied a measly thin coat of buttercream, but have since seen the err of my ways. A thick coat hides imperfections better, and in my opinion it makes the cake taste better too.

You'll need a couple of special tools, a $5 bench scraper (that is worth many times that, if you ask me) and a cake turntable (or a homemade turntable, as suggested in the video). Email subscribers, click here to watch the video.


Did I mention the top tier was made of cheesecake? Friends. There's a very good reason why wedding cakes are not made of cheesecake. I'd only suggest doing this if you are able to remove the cake from the refrigerator, snap a couple of formal pictures, and then commence the cutting all within 15 minutes. We did not have this luxury, so the cheesecake was very soft. Luckily, the bride got her requested piece, and the remaining cake was whisked off to the refrigerator.


After agreeing to do cupcake favors and also the groom's cake, I realized I'd need some help. My sister-in-law Megan was a real life saver. I think she's recently taken to wearing flip-flops to avoid tying one more bow. But oh, the favors were pretty!


Major props to Megan again for figuring out how to enlarge the Jeep logo. I've never seen it look so elegant (and trust me, I know because we have two!). I used the same smoothing technique on the groom's cake as I did on the buttercream base for the wedding cake. You can see a few spots where I stopped and started with the bench scraper, but overall the effect is nice. Plus, cake should look like cake - right?! 


I mention in the video to use a frosting with high butter content. You can find  two very suitable frostings here with my cupcake frosting tutorial.


I ended up being the cake-cutter again, but thankfully I had help. The support dowels were removed before the first slice was served (a valuable lesson I learned from making this cake). In the end everyone was served and love was celebrated. I even got a few cake recipe requests, which I'll most likely fill by adding them to this blog.

Biggest love and hugs to the bride and groom. Thank you for allowing me to be part of your big day!


Magic Flan Cake

$
0
0

Life feels a little crazy right now because in two short months the manuscript for my second cookbook is due. As you can imagine, I've been spending all my time baking, testing, and washing loads of dishes. Most mornings I can be found in a quiet place, trying to connect my head and heart so I can articulate how much these recipes mean to me. I'm eager to share all the details with you, but for now I can only tell you that all of the recipes are brand new, except for three favorites from the blog - and the only reason those are being included is because they were the inspiration for the book. Are you curious? (smile)

Between all these working days that fly by too fast, life happens. My husband had a birthday yesterday, and even though there are cookbook sweets all over the house (on every flat surface and some balanced precariously on chair arms) I was determined to make him something special.


This was my first time making Magic Flan Cake, and let me tell you this: it is special. It may not win any beauty contests, but it's the kind of cake that makes you close your eyes after you taste it. And the magic part? That takes place in the oven. The cake batter get poured into the pan first, and then the flan mixture is poured on top of the batter. During baking the two switch places- pretty neat! My favorite part is how the flan infuses the cake batter with creamy goodness, so the whole thing is a glorious custard/pudding/cake masterpiece.


There are two important things you need to know about this cake. (1. start one day ahead, the cake needs to chill in the refrigerator 8 hours or overnight, and (2. it requires a water bath. That might sound like a lot of work, but it's worth it. I repeat - It's SO worth it!

Magic Flan Cake
[click for printable version]
Yields 14 to 16 servings

Source:  adapted from Cook’s Country

Prep: 2 hours 30 minutes


Cake

1/2 cup/155g prepared caramel sauce

1/2 cup plus 2 tablespoons/60 g all-purpose flour

1/3 cup/46 g cocoa powder

2 teaspoons cinnamon

1/2 teaspoon baking soda

1/4 teaspoon salt

4 ounces bittersweet chocolate, chopped

6 tablespoons/85 g unsalted butter

1/2 cup/121 g buttermilk

1/2 cup/105 g sugar

2 large eggs

1 teaspoon vanilla extract

Flan

28 ounces (2 cans) sweetened condensed milk (not evaporated milk!)

2 1/2 cups/598 g whole milk, room temperature

6 ounces cream cheese, room temperature

6 large eggs, room temperature

4 large egg yolks, room temperature

1 teaspoon vanilla extract


Preheat the oven to 350°F.

Spray a 12-cup bundt pan with flour-based baking spray (such as Baker’s Joy).  Pour the caramel sauce evenly into the bottom of the pan.

In a medium bowl, combine the flour, cocoa, cinnamon, baking soda, and salt; set aside. In a microwave-safe bowl, combine the chocolate and butter; heat at 30 second increments in the microwave, stirring between heating until smooth. Add the buttermilk, sugar, eggs, and vanilla to the melted chocolate mixture and whisk until incorporated. Add the flour mixture and stir until combined. Pour the chocolate batter evenly over the caramel in the pan.

Add all the flan ingredients to a blender pitcher and process on liquefy (high) until smooth.  Slowly pour the flan mixture over the cake batter. Place the cake pan in a large roasting pan and then place it in the oven. Carefully pour hot water into the roasting pan (I used hot water straight from the tap) until it reaches halfway up the sides of the bundt pan. Bake the cake for 80 to 90 minutes, or until a toothpick tester comes out with a few moist crumbs clinging (mine took about 1 hour 40 minutes). Gently remove the Bundt pan from the roasting pan and place it on a cooling rack. Allow it to cool completely in the pan. Refrigerate the cake in the pan for 8 hours, or overnight.


To unmold the cake, fill a large bowl (or your sink) with hot water. Place the bottom of the cake pan in the water to warm the caramel/flan portion of the cake. This will help the cake release. Turn the cake out onto a large serving platter or a cake stand that has a lip. The caramel will drizzle down over the cake as you remove the pan. Store the cake covered in plastic wrap in the refrigerator.


Crème Brûlée Filled Strawberries

$
0
0

Happy July, friends! This will be a month of celebrations and birthdays (including my own!) so I've been trying to think up new ideas for party food. One of my favorite desserts of all time is creme brulee, and with all the juicy ripe strawberries at the market right now I felt the two should get together.

The hollowed-out berries each hold one spoonful of creme brulee. The tops of the strawberries are heaped with granulated sugar and then torched until caramelized. It's all so nice together - the freshness of the berry, the creamy custard and the crack of the caramelized sugar - it's a perfect bite!


To make the berries stand upright, cut the pointed end off flat with a serrated knife. Hollow the centers and take extra care to avoid piercing through the sides. At this point the berries can be filled with creme brulee and stored in the refrigerator until you're ready to serve them.


Just before serving, place a spoonful of sugar on top of each berry and use a chef's torch to caramelize the sugar. You can also caramelize the sugar under the oven broiler, just be sure to get it good and hot before you put the strawberries in. The strawberries will break down under heat, so they should only be allowed to stay in the oven for 2-4 minutes, just long enough for the tops to caramelize. Keep a sharp eye on them, it won't take long!


These turned out better than I'd hoped! I served them with mini forks but honestly there's no need for utensils. If you serve them to guests, I suggest putting the berries in paper liners for easy pick up, or have napkins close by to keep fingers tidy.


Crème Brûlée Filled Strawberries
[click for printable recipe]

1 cup/232 g heavy cream
1/3 cup/80 g half and half
Seeds from 1/4 vanilla bean or 1/4 teaspoon vanilla extract
4 egg yolks
1/4 cup/50 g granulated sugar
30 to 40 medium strawberries, capped, hollowed and pointed ends trimmed flat
Additional granulated sugar for sprinkling

Preheat the oven to 300F.
Heat the cream, half and half, and vanilla bean (or vanilla extract) in a medium saucepan over medium heat just to a boil. Immediately turn off the heat. Set aside to infuse for 10 minutes.

Whisk the egg yolks with the sugar in a large bowl until just combined. Whisking constantly, gradually pour in the hot cream mixture. Pour the mixture into a 10x10-inch baking and remove the vanilla bean.
Place the 10x10-inch pan in a large roasting pan and pour in hot water until it reaches halfway up the custard pan. Bake in the center of the oven until the custard is set but still has a slight wobble (it will cook more as it cools), about 55-65 minutes. Remove it from the water bath and let it cool. Cover with plastic wrap and place in the refrigerator until chilled, about 2 hours.

Fill each berry with a spoonful of creme brulee. Store the filled berries in the refrigerator until you're ready to serve them.

Just before serving, place a spoonful of sugar on top of each berry and use a chef's torch to caramelize the sugar. You can also caramelize the sugar under the oven broiler, just be sure to get it good and hot before you put the strawberries in. The strawberries will break down under heat, so they should only be allowed to stay in the oven for 2-4 minutes, just long enough for the tops to caramelize. Keep a sharp eye on them, it won't take long! Let the berries stand for 5 minutes to let the caramelized sugar harden.

Note: The longer the berries stand at room temperature, the more likely they are to weep a little berry juice around the bottoms. I suggest serving these in paper liners or cute candy cups. They'll keep things tidy and disguise drips of berry juice.


Rainbow Meringue Truffle Cones

$
0
0

I've had my serious hat on for a couple of weeks now, mostly due to  deadlines and commitments. I believe that's partly how these rainbow meringue cones came about. I just couldn't take one more day with a furrowed brow. And do you know that rainbow treats are the opposite of a furrowed brow? They are.

Another reason why these rainbow puffs made it onto my baking sheet is because ThinkGeek sent me a Sprinkles the Unicorn Sprinkle Shaker. It's just the cutest thing. I've been waiting for the right  inspiration to use it in a blog post, and I felt something rainbow-themed was in order. This morning while drinking coffee and cloud gazing (I do that sometimes when the clouds are extra puffy), I saw a vaguely horse-shaped cloud illuminated by light, and felt it was a sign to use my unicorn shaker today.


Do you see it too? Practically a unicorn without a horn, right? 
Or maybe a dog. A goat with an abnormally fluffy tail? (smile)


Because the folks at ThinkGeek are so awesome, they sent along another Sprinkles the Unicorn shaker for a giveaway, and I'm opening the contest worldwide. You can enter with the Rafflecopter widget below. Email subscribers, please visit the blog post to enter.


I'd never made rainbow meringues before, but it's really easy. Just fit a piping bag with a decorator tip, and then paint long stripes of gel food color on the inside of the piping bag using an artist's brush. Space the painted stripes out if you'd like some white meringue showing, or if you want a solid rainbow, place the stripes very close together.


Here's my sprinkle shaker in action! I tried all kinds of sprinkles in the shaker, and found that rainbow nonpareils work best. Sprinkle the piped meringues just before you put them in the oven. The sprinkles won't melt away because the meringues are baked at a very low temperature.

I decided to make the meringues into cones because the colorful swirls reminded me so much of these little treats I ate as a kid. They were always stale, but I loved them anyway. I filled the cones with chocolate ganache, which makes the finished dessert taste like exactly four bites of rich chocolate tart. The sugar cone makes a great "crust".


Even though these ice cream cones are the non-melting sort, I think they'd be a cute addition to an ice cream social. It's good to have something a little different and unexpected. Hope everyone is having a GREAT summer!


Rainbow Meringue Truffle Cones
[click for printable version]
Source: Sprinkle Bakes original
Yield: 20 cones
Prep: 30 minutes, 4 hours with baking and chilling

Ganache cones
20 sugar cones or mini ice cream cones
9 ounces semisweet chocolate, chopped finely
1 cup heavy whipping cream

Rainbow meringues
2 egg whites
Pinch cream of tartar
1/2 cup superfine sugar
Gel food color in red, orange, yellow, green, blue, violet (I used Wilton brand)

Assembly
1/2 cup melted semisweet chocolate
Rainbow nonpareils.

If using standard size sugar cones, trim about two inches from the top by scoring the cone with a serrated knife. Break the top at the scored mark and save the excess for later use (on a bowl of ice cream!).
The cones will need to stand upright to be filled. If you don't have a specialty ice cream cone holder (who does?!) then cut several X's into the top of the sugar cone boxes with a serrated knife. Place the cones upright into the X perforations in the box. (See pictures in the blog post for clarification.)

In a large microwave-safe bowl, combine the chocolate pieces and heavy cream. If any chocolate  pieces are poking above the surface of the cream, then pat them down with the back of a spoon. Heat at 30 second intervals or until the mixture can be whisked smooth. Allow the ganache to cool at room temperature until slightly warm but still pourable, about 30 minutes. Pour the ganache into the upright standing cones. Transfer the cones to the freezer until set. Meanwhile, prepare the meringues.

Fit a piping bag with a large closed star decorator tip (Ateco 843). Set aside.
Whip the meringues in a standing mixer until frothy and add the cream of tartar. Beat on high until soft peaks form and gradually add the sugar. Beat on high speed until the meringue is thick and glossy, and will hold a standing peak with the beater is lifted from the bowl. Cover two baking sheets with parchment paper and preheat the oven to 170F.

Using an artist's brush, paint thick 1/2-inch stripes of each gel food color inside the piping bag, cleaning the brush between colors. If you want a true rainbow effect paint the colors in this order once around the inside of the piping bag: red, orange, yellow, green, blue, violet. Place the meringue inside the piping bag. Don't worry if the colors smudge - it'll all be okay in the end. Pipe the first one or two meringues back into the bowl - these will have no rainbow stripe, and the rainbow colors will intensify as you pipe the meringue. Pipe each meringue in two swirls, one on top of the other, to give it the appearance of soft serve ice cream. Bake the meringues for 40 minutes, then turn the pan halfway and bake for another 40 minutes. Turn off the oven and let the pans cool. You can leave them overnight if desired.

Dip the set cones into the melted chocolate and then dip the edges in the multicolor nonpareils. Up to one hour before serving, dip the bottoms of the meringues in a little chocolate and set them on top of the chocolate-dipped cones. Allow them to stand until the meringue is stable. Serve immediately.


A few tidbits before I end this post!

I'd love for my puppy-loving pals to check out my Ice Pops for Pups post on the Etsy blog. Biscuit was on
Etsy's front page - what hoot!


Check out a recipe round up for summer cookout fare on TripAdvisor's FlipKey blog (you'll see a familiar watermelon cake there!).
Check out my latest article for Betty Crocker, it's a sprinkle-coated Confetti Cake Roll!


Pastel Layer Cake and a Blog Birthday!

$
0
0

Sprinkle Bakes just turned 5 years old! When I look back at all the sweet things I've made - the cakes, the friends, the memories -I feel truly blessed. This little corner of the web has brought me more happiness than I ever dreamed possible, and I appreciate everyone who stops by for a peek at what I'm doing. Your support means everything to me!

Because I heart you big time (and because no blog birthday is complete without a gift) I'm giving away a pretty pink mixer. Over the years I've tried several brands of standing mixers, and while some are quite good (I really like my Bodum and Sunbeam) few are truly as great as a KitchenAid. That's not an advertisement, that's just my working experience. I believe every avid baker needs one!


Enter below for a chance to win this KitchenAid Artisan stand mixer. Open worldwide.
Please include your name or username as entered on the Rafflecopter widget with your comment.
Note: You will not be selected as a winner without commenting on the blog post.


As for the cake, it's unapologetically tall and profusely sprinkled on the outside. Slice it, and you'll find a rainbow of pastel color inside. It makes a fun birthday cake, and I think it's especially appropriate for a Sprinkle Bakes birthday celebration! The white cake recipe was new to me, and after baking it, I found the texture was perfect for layering. It's sturdy enough to stack, yet remains soft and palatable to eat. The recipe makes about 12 cups of batter, so if you have a standing mixer then I'd recommend using it for this very cake.

I used vanilla Swiss meringue buttercream for frosting on this cake - mostly because I love the silky texture, but also because the confetti sprinkles stick so well to it.


In related news, I recently opened a little online baking-themed retail shop. Maybe you noticed the "Shop Sprinkle Bakes" sign in the sidebar? For a long while, I've wanted a place to curate my favorite baking items, and to make them available to others. You can find the multicolor confetti sprinkles I used for this cake here (Princess Mix). They are slightly sweet and vanilla scented - really ideal for this cake. Most of the time, sprinkles are so waxy and tasteless, but not these! I love them, and sometimes I eat them like candy.

You can also find the star cupcake toppers here (I used three on top of this cake), and the skinny primary birthday candles here. We're still working on a plan for international shipping, and currently we're only shipping to the contiguous 48 states. It's a work in progress, but I'm so excited to be able to offer you things I use in  my own kitchen.


When I sliced this cake, a sweet vanilla fragrance filled the entire house! I kept finding my way back to the dining room table and sneaking little nibbles. It's so good!

Admittedly, there's no way I can eat an entire 6-layer piece of this cake, unless it is sliced in thin slivers, and even then it's so tall you'd have to eat it off of a full-sized dinner plate. For easier service, consider dividing the slices into 2 or 3 layer pieces (see the picture above). The slices can then be served standing upright on smaller dessert plates.

One more important note - add two dozen eggs on your grocery list for this cake alone. White cake and meringue frosting recipes both use many egg whites!

Pastel Layer Cake with Swiss Meringue Buttercream
[click for printable version]
Yields 20 servings
Source: Martha Stewart layer cake, Sprinkle Bakes frosting
Prep: 2 hours, total time about 4 hours

Cake
6 1/2 cups/789 g cake flour (not self rising), sifted
3 tablespoons baking powder
1/2 teaspoon fine grain sea salt
2 1/4 cups/500 ml whole milk
2 tablespoons pure vanilla extract
1 1/2 cups plus 4 tablespoons/395 g unsalted butter, room temperature
2 1/2 cups/490 g granulated sugar
10 large egg whites
A few drops of each: McCormick neon food color, in purple, green, pink and blue
and standard yellow and orange liquid or gel food color

Swiss meringue buttercream
12 egg whites
2 1/2 cups/500g sugar
1/4 teaspoon salt
2 1/2 pounds unsalted butter, softened
1 tablespoon clear vanilla extract
1 1/2 cups/ roughly 8 oz. assorted sizes of pastel confetti sprinkles
Star cake toppers and birthday candles

Make the cake layers: Preheat the oven to 350 degrees. Grease six 8-inch round cake pans, and line the bottoms with parchment. If you don't have six pans (understandably so) use as many as you have, and plan to wash them between baking cake layers.
Sift the flour, baking powder and salt into a large bowl. Combine milk and vanilla. Beat butter with a mixer on medium speed until smooth. With the mixer running, gradually add the sugar and beat until the mixture turns pale and fluffy, about 3 minutes.
Reduce speed to low, and add the flour mixture in 3 additions, alternating with the milk. Begin and end with the flour mixture. Beat until just combined. Do not over-mix.
Beat the egg whites in a clean mixer bowl on medium speed until stiff peaks form, about 5 minutes. Gently fold the egg whites into the batter in three additions.
Place two cups of batter in six separate bowls. Tint each bowl of batter with a little of the food color. Add food color a little at a time until the desired pastel tint is achieved. Fold the color in well with a rubber spatula until no streaks of white cake batter remains.
Spread the batter into the prepared pans and bake for 18 to 20 minutes. Let the layers cool completely on a wire rack. Run a knife around the edges of the cakes and the pans before turning them out.
Level the tops of the cake with a serrated knife or a cake leveler. Save the cake scraps for breakfast (smile).

Make the frosting: Set a saucepan filled one-third full of water over medium-high heat and bring to a simmer.
Whisk together the egg whites, sugar, and salt in a large heatproof bowl ( I suggest a stainless bowl). Set over the simmering water and whisk until the mixture is hot to the touch and the sugar has dissolved (120-140 degrees on a candy thermometer, to be sure).
Transfer the mixture to the bowl of a stand mixer fitted with the whisk attachment.
Beat on low speed for 2 minutes. Increase to medium-high until stiff peaks are formed.
Continue beating at medium-high speed until the mixture is fluffy and has cooled (the mixing bowl should feel cool to the touch).
Turn the mixer off and switch from the whisk attachment to the paddle. Turn the mixer on medium-low and add the butter, a few cubes at a time, beating until well incorporated before the next addition.
Add the vanilla extract. Beat until the frosting on high speed until it is thick and completely smooth.

Important note about Swiss buttercream frosting! After a few pieces of butter are added to the whipped whites, the mixture will deflate. It may look like soup or even look curdled - do not let this discourage you. This is just one ugly stage the buttercream must pass through before becoming fluffy whipped frosting. You may read more about Swiss meringue buttercream here, and view my video tutorial.

Frost the cake: Transfer 2/3 cup of frosting to a piping bag fitted with a small star tip; set aside.
Fill each cake layer with 1/3 to 1/2 cup of the frosting. Begin with the violet cake layer on the bottom, followed by the blue, green, yellow orange and pink. Cover the entire cake with frosting using an off-set spatula. Place the cake in a large baking pan and toss on the confetti sprinkles, allowing the excess to fall back into the baking pan. Using the reserved frosting in the piping bag, pipe stars around the top edge of the cake and decorate each star with a large confetti sprinkle. Place the star toppers in the center of the cake, and add the birthday candles around the top edge of the cake near the piped stars.

Serve the cake: Cut a standard wedge of cake and divide it with a knife at the halfway point so that you have two pieces of cake. The first slice will be a triple layer of pink, orange and yellow, the second slice will be green, blue and violet. Or, divide the wedge into double layers, to serve three people.

Cover the leftover cake loosely with plastic wrap and store at room temperature.


Homemade Stroopwafels

$
0
0

I've always wanted a waffle cone maker, but admittedly, there's very little space in my cabinets for one to live. I've talked myself out of buying one many times, but the desire came back anew when I walked into my favorite ice cream parlor. I can testify that the warm fragrance of freshly made vanilla waffle cones is strongly persuasive (not that I needed much arm-twisting in the first place). So, I got one.

I fully expected the machine to be single purpose (waffle cone iron = only waffle cones) but I've found it has a second, and maybe even better use for making one of my favorite coffee time treats - stoopwafels!


For those not familiar, stroopwafles are thin cookie-like waffles with a chewy caramel syrup in the center. They hail from the Netherlands, and recently my friend Darla (who happens to live in Nederland) sent me a care package with all kinds of delicious Dutch treats inside. To my delight, authentic stroopwafels were included. They were better, more dense with filling, than the ones I can find locally. That made me curious enough to seek out a stroopwafel recipe. Until now, I'd never dreamed you could make them at home. I'd pondered their thinness while eating one, and figured it defied any tool that inhabited my utensil drawer. To my great surprise, scratch-made stroopwafels are achievable.


If you're interested in making them too, you can find the waffle maker I own here. It's not so awful to store if you keep it in its original box (square things are easier to stack than roundish footed things). Or, if you're a die-hard stroopwafel fanatic, you can buy the genuine article here (though stroopwafel makers seem to be more expensive than their waffle cone counterparts).

The batter is really easy to whip up. It's made with yeast, so it has to stand about 45 minutes before you use it. The dough doesn't raise much, but the yeast definitely adds flavor and helps keep the super thin waffle from tearing when you cut it in half.


It took me a few tries to get the right quantity of dough for the waffle cone maker. Most of the waffles were a little lopsided, so I used a large pastry ring to cut them into 6-inch rounds.


Perhaps the most challenging part of the endeavor is cutting the already thin waffle into two even thinner pieces. You need to do this while the waffle is still hot. I used a large serrated bread knife, and with gentle sawing motions, cut the waffle in two. I found it easiest to position a waffle at the corner of a work surface, that way you can manipulate the movement of the knife easily as you cut. 


The filling is easy enough to make in a saucepan on the stove top. I used molasses, though treacle is called for in the recipe (use whichever you prefer, but be forewarned that molasses is a bit stronger-tasting). When mixed with brown sugar and butter, it yields a deliciously rich and chewy filling. I was eating it warm from the saucepan with a spoon. 


I love these so much, I already have plans for a cookie butter and caramel-filled version. I urge you to try them if you have the opportunity - or the waffle cone maker - or both.

Homemade Stroopwafels
[click for printable version]
Source: adapted from allrecipes.com
Prep: 1 hour, total time about 2 hours

This is a delicious Dutch treat that goes well with afternoon tea or coffee. The recipe calls for treacle, which is a European ingredient similar to molasses. I used molasses, but it is bolder and darker-tasting than treacle. If you can't find treacle, and would like a milder tasting filling, golden molasses or sorghum syrup may be used instead.

Waffles
4 1/4 cups/500 g all-purpose flour
1 cup/250 g unsalted butter, melted
1 1/4 cups/150 granulated sugar
4 1/2 teaspoons active dry yeast
1/4 cup/ 60 ml lukewarm milk
1 large egg

Filling
1 cup/350 g treacle or molasses
3/4 cup/200 g dark brown sugar
2 tablespoons unsalted butter
Pinch of salt
1 teaspoon ground cinnamon

Make the waffles: In the bowl of a standing mixer, combine the flour, butter, sugar, yeast, milk and egg. Knead with the dough hook attachment until you have a smooth consistent dough. This mixture can also be kneaded in the bowl by hand if you don't have a stand mixer. Transfer the dough to a greased bowl and loosely covered it with plastic wrap. Set it in a warm place to rise (it won't rise much) for 45 minutes.

Make the filling: Heat the treacle or molasses, brown sugar, butter and cinnamon in a saucpan over medium heat. Bring the mixture to a bubble. When the mixture thickens slightly and the sugar is melted, remove it from the heat.

Preheat a shallow waffle iron (such as a waffle cone, pizzelle, or stroopwafel iron) as directed by the manufacturer's instructions. Knead the dough briefly and divide it into balls the size of a tennis ball (adjust this according to the size of your waffle iron - mine took slightly more dough). Place the ball in the waffle iron and flatten it slightly, then close the lid to cook the waffles until no more steam escapes and the waffle is golden brown.

Remove the waffle carefully with a fork or spatula. Use a round cutter to cut off the edges to make a perfect circle. Carefully split the waffle into two rounds while still hot. Don't wait too long! They'll tear or break if you let them cool before cutting them.

Spread 1 to 2 tablespoons of filling on one of the halves and top with the other half. Repeat with remaining waffles.

Serve the waffles with tea or coffee. Store them in a container that seals air-tight.


Baklava Pull-Apart Bread

$
0
0

I can't tell you how many times I've drooled over the thought of making pull-apart bread in my own kitchen. I've seen all different varieties - sweet and savory, lemony and cheesy- from my blog buddies and beyond. I've been itching to put a new spin on the recipe, and that's the only reason I've waited so long to make it.

Perhaps you remember the time I made Baklava Cheesecake. All that nutty goodness seemed to improve upon something that is hard-pressed to be made better (because, cheesecake alone is pretty darn good!). I felt in the same quandary with this bread. After some meditation, I dug out my baklava filling recipe.


Here's where I lose my modicum of correct grammar: YOU GUYS. This bread is all kinds of major. Those delicate layers of cinnamon-sugared bread? They hold pockets of nutty baklava filling. It all bakes up so perfectly together. And if that wasn't enough, it also gets a douse of honey syrup.


I have but one complaint with most yeast dough recipes, and that's yield size. If I'm going to spend the better part of a day babysitting dough, then I don't want a measly dozen buns, or just one loaf of bread. So, I've developed this recipe to yield two loaves - one for you, and one for a friend (or one for the freezer, if you're not feeling particularly charitable).

Here's a look at how to assemble the bread. It doesn't take long because it doesn't have to be perfect. This bread is a rustic beauty so it's really difficult to get wrong!


This recipe yields a large amount of dough, so break out your largest bowl for raising. The nut mixture is ground fine in a food processor, then zest and spices are added. Two to four pulses later, the mixture turns into a paste that clings together.


Divide the dough in half. Each half will make one loaf of pull-apart bread.


Gently flatten half of the dough with your fingers.


Roll the dough out to about 20x12-inches. As you can see, my dough is far from a perfect rectangle.


Cover the rolled out dough in an insane amount of butter. Feel weird about it for exactly zero seconds.


After a generous sprinkle of cinnamon-sugar, grab a handful of the nut mixture and crumble it over the dough evenly.


Cut the dough vertically into six even strips.


Stack the strips on top of each other. This can be a little tricky, because the dough will want to stretch as you pick it up, so I lift part of the dough with my bench scraper. You could also use a spatula.


Cut the stacked strips into 6 square-ish pieces, and layer them standing upright in a loaf pan.


Repeat the steps with the remaining dough half, and then let the dough rise in a warm place for about 45 minutes. When the dough is puffed and fills the pan, then it's time for baking.


The bread needs to stand in the pan for a little while so all the layers will stay together when you remove it from the pan. This can feel like an eternity, especially when the toasty aroma of cinnamon and nuts is permeating ev-er-y-thing. But it's worth the wait!


This bread definitely satisfies my autumn frame of mind, but I think it would be great for gift-giving holidays. It's rich and dense with nutmeats and syrup, so it'd be a suitable (more delicate, more inspired) replacement for fruitcake. This bread is rich indeed, and I've been told by my taste-testers that a little goes a long way, but I'll leave that up to you to decide.


Baklava Pull-Apart Bread
[click for printable version]
Source: The bread base was adapted from more than a dozen sites around the web, all using a similar recipe.
Yields 2 loaves, 9x5-inches
Prep: about 4 hours from start to finish

Before you start, two things: 1. I love using black walnuts in this recipe. Use them if you can find them (and if you like them, they are an acquired taste.) And, 2. you may divide this recipe to make only 1 loaf of bread.

Activate the yeast
6 tablespoons warm water (between 105 to 115 degrees F)
4 1/2 teaspoons active dry yeast
1 teaspoon granulated sugar

Dough
1/2 cup/113 g unsalted butter
2/3 cup/160 ml milk
6 cups/750 g all-purpose flour
1/2 cup/100 g granulated sugar
1 teaspoon sea salt
4 large eggs, beaten
2 teaspoons vanilla extract

Filling
2 cups/390 g granulated sugar
5 teaspoons ground cinnamon (this will be divided, see instructions)
1 cup/100 g pistachios
1 cup/110 g black walnuts
1/2 cup/60 g almonds
Zest of 1/2 lemon
1/2 teaspoon sea salt
1 tablespoon vanilla extract
1 cup/220 g unsalted butter, melted

Honey syrup
1 cup/340 g wildflower honey
1 cup/240 ml water
Pinch of sea salt

Activate the yeast: In the bowl of a standing mixer fitted with a dough hook, combine the water, yeast and sugar. Stir gently and briefly. Let the mixture stand until foamy, about 5 minutes.

Make the dough: In a small saucepan, combine the butter and milk. Place over medium heat and cook until the butter is just melted. Remove from the heat and let the mixture cool to 115 to 125 degrees F.
In a large bowl, whisk together 4 cups of flour, the sugar and salt. Pour the dry mixture into the bowl with the activated yeast. Add the milk mixture, eggs and vanilla; stir together on low speed for 2 minutes, and then increase the speed to medium and mix until the ingredients are well incorporated (this may take a few minutes, the eggs can be stubborn to join the party). Add the remaining 2 cups of flour a little at a time. After the flour is incorporated knead for 2-3 minutes.

Place the dough in a large greased bowl and cover with plastic wrap. Let the dough rest in a warm place (for me, that's usually in my kitchen on the stove-top). Since this dough make two loaves, raising time may take a little longer than usual. 50 minutes is the norm, but my dough doubled right at 1 hour 15 minutes.

While the dough is raising, prep the filling and honey syrup.
Stir together the sugar and cinnamon in a large bowl and set aside.
In the bowl of a food processor combine the pistachios, walnuts, almonds, lemon zest and sea salt. Process until the nuts are ground fine. Add the vanilla extract and process until the mixture forms large moist clumps. Set the mixture aside with the bowl of cinnamon sugar.
For the honey syrup, combine the honey, water and salt in a small saucepan. Bring to a boil over medium-high heat, then reduce the heat to medium-low and simmer, stirring occasionally until the mixture had reduced by 1/3. Let the syrup cool slightly then transfer it to a jar with a pour spout to cool further.

When the dough is raised, turn it out onto a floured surface and divide it in half. Each half will make one loaf of pull-apart bread. Gently flatten half of the dough with your fingers. Roll the dough out with a rolling pin to about 20x12-inches. Don't stress if it isn't perfect, remember, rustic. Cover the dough with half of the melted butter and sprinkle on half of the cinnamon-sugar mixture. Crumble half of the nut mixture over the surface of the dough, sprinkling it on as evenly as possible. Cut the dough vertically into six even strips. Stack the strips on top of each other. This can be a little tricky, because the dough will want to stretch as you pick it up, so I lift part of the dough with my bench scraper. You could also use a large spatula. Cut the stacked strips into 6 square-ish pieces, and layer them standing upright in a loaf pan. Repeat the steps with the remaining dough half. Cover the loaf pans with plastic wrap and let them rise in a warm place for about 45 minutes.
Preheat the oven to 350 degrees F. Grease two standard-size loaf pans and line them with parchment so that the paper overhangs two edges.
When the dough is puffed and fills the pan, then it's time for baking. Bake for 30 to 40 minutes, or until the top of the bread is deep golden brown. Don't be tempted to remove the loaf too soon just because it looks done on top - it could be under cooked in the center. My loaves cooked perfectly at about 32 minutes.
Allow the bread to cool in the pan for 20 minutes. Remove the bread by lifting it out by the two overhanging parchment edges. Drizzle honey syrup over each loaf, or serve the syrup on the side if you prefer.

Keep the bread in a container that seals air-tight.


Homemade Vanilla Extract in Wax-Sealed Bottles

$
0
0

There must nine hundred and ninety-eleven recipes for homemade vanilla extract online, and I suppose that's why I've never seriously considered posting a recipe for it here. But I've had a change of heart, because it's something I make regularly and use in almost every sweet thing I bake.

The reason why I love homemade vanilla extract so much is because I know it's pure (I control the ingredients), it costs less to make and - most importantly - the flavor is superlative. As far as staple ingredients go, it's pretty important to me.

This year everyone on my holiday gift list is getting a bottle of homemade vanilla extract - not just the avid bakers in my circle, but also the occasional chocolate chip cookie makers and even my pal who uses her oven as a make-shift magazine rack (she likes vanilla in her hot cocoa and coffee). Everyone can benefit from the loving touch of a little vanilla, if you ask me.

The bean pods need to steep for several weeks, so if you get started now (right now!) the extract will be ready in early December.

It's best if the pods can steep for at least 8 weeks. In the picture above, you can see how the extract develops over time.

You'll need just two ingredients and bottles with tightly fitting lids to make the extract. My personal touches to the bottles are wax-sealed caps and botanical washi tape "labels". Here's a run-down of everything I used, and a few links to the specialty products.
  • Vodka 35-40% alcohol (70-80 proof): Opinions are sure to vary on this, but I say there's no need to buy top shelf. I usually buy an inexpensive variety of vodka, and make sure to steep the vanilla pods for a full 8 weeks before using the extract in a recipe. As long as the vodka isn't too harsh or bitter on the tongue, then it should be fine for extract making. I sometimes use Smirnoff because it can often be found on sale, or read the virtues of $8 Nikolai vodka here.
  • Madagascar vanilla beans: These vanilla beans are strongly fragrant and have a creamy taste that goes well in cakes, cookies and quick breads. Vanilla beans in general can be awfully expensive, but if you them in bulk they cost much, much less. I've been a repeat buyer of this brand
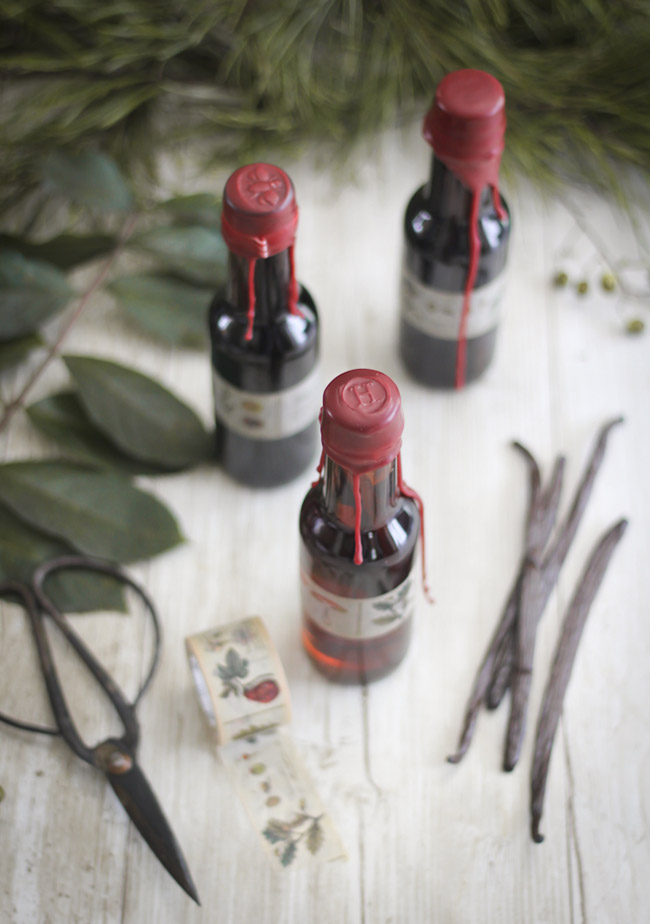
, and I've never had a bad batch. I usually get a few more than their promised 22-24 beans. My last shipment held 27 fat bean pods. I use these beans specifically for extract making, and save the more pricey Tahitian vanilla beans for custards and frostings. Edit: There are some negative reviews of these beans on Amazon, but I personally have never received any that were subpar. If you're not inclined to buy from this seller, Beanilla is also a supplier, and Frontier Co-op sells Fair Trade beans, which is always a good choice. 
  • Lidded 5 ounce bottles: Theseare actually sold as hot sauce bottles, but their size was spot-on for gifting. They're bigger than the usual 2 ounce grocery store bottles, and tall enough to accommodate most whole beans. I only wish these came in amber or green bottles, because dark bottles will obscure sunlight and prevent the flavor from being sapped over time - although that's not a real concern for me, I go through bottles of vanilla extract very quickly.
  • Sealing wax: I used burgundy sealing wax on the bottles I'm gifting. Thiskind of wax, in bead form, melts easily. I heated it in a small metal measuring cup over medium heat on the stove-top. You could also use a small aluminum disposable pan in which to melt the wax, for easier clean-up. 
  • Filament tape: If you plan to cap the bottles in wax, you'll need to wrap a little filament tape around the bottom edge of the bottle cap to make a pull tab. (Filament tape has fibers running through it to give it strength, if you didn't know that already.) This makes the wax cap easy to remove. (See pictures for further explanation.)
  • Decorative washi tape: This is not essential, but it is quite pretty. I found a forest botanical print tape at Terrain Shop. Something about those little mushrooms made me feel happy.

First thing - wash the bottles! Some people like to sanitize them in a dishwasher, but I say there's no better way to sanitize than a dip in boiling water. I suggest keeping a large pot of boiling water on the stove top, that way you can dip the bottles one at a time as you work. Fish them out of the hot water with tongs to avoid burns. The hot water evaporates quickly from the bottles after they are removed from the water, so there's no extended wait for the bottles to air-dry.


Capping the bottles in wax is easy peasy. I strongly suggest making the filament tape tab for easy opening of the bottles, otherwise they will be a pill to open. Filament tape can be found at discount stores, office supply stores, home centers - just about anywhere.


Sealing wax is different than regular wax; it's harder, and more plastic-y. You can melt it in a double boiler or on the stove-top in a small saucepan as recommended, but I used a 1 cup metal measuring cup to melt it in over the range. As I mentioned before, I think a small disposable aluminum pie plate would work well for heating and make for the easiest clean up (maybe recycle frozen pot pie pans?).

The wax needs to be heated to 160 to 170 degrees F, before it can be used for sealing. About 3 ounces of wax will seal 10 to 12 bottles. I dipped each bottle about three times to create a firm cap. Make sure the wax is in a small deep container so it will completely cover the bottle cap when dipped. If you like the drippy effect on my bottles, then turn the bottle upright immediately after the final dip. The wax will run down the sides of the bottle. If you prefer a non-drippy wax cap, hold the bottle upside down until all the excess wax has dripped back into the melting pot.

Remember when I made chocolate wax seals? I used those same stamps on the wax bottle caps, and they turned out so nice! I found my wax stamps here, if you're looking to buy.


Aside from the wax sealing, this homemade gift takes very little effort. The most work you'll do is shaking the bottles once a week to release and disperse the vanilla throughout the liquid. With all my purchased supplies, each of my 12 gift bottles came out to about $5.80, which is pretty inexpensive gift-wise (disclaimer: I already had the filament tape and wax stamps). And I'd say you could lower the cost if you're an environmentally-conscious bottle recycle-er!


Homemade Vanilla Extract with Wax Sealed Caps
[click for printable version]
Yields: Twelve 5-ounce bottles
Prep time, 30 minutes, steep time 8+ weeks

Neutral-tasting vodka is my usual pick for making vanilla extract at home, but bourbon and rum can be used in place if you prefer.

12 bottles (5 ounce capacity) with tightly fitting lids
24 to 36 vanilla beans
3 bottles (750 ml each) Vodka 35-40% alcohol (70-80 proof)
Filament tape
3 ounces bottle sealing wax
Labels or washi tape

Bring a large stock pot of water to a full boil over high heat. Place a large absorbent dish towel over a work surface. Using grippy tongs or a canning lifter, submerge the bottles, one at a time, in the water. Let the bottle stay in the water for 10 seconds, then remove with tongs, allowing the water inside the bottle to pour back into the pot. Place the bottle on the dish towel to dry; Repeat with remaining bottles. After the bottles are done, sanitize all the caps in the water at once. Remove them with a slotted spoon and let them dry on the towel. Let the bottles cool before using.

Split each vanilla bean lengthwise with a small sharp knife. Place 2 or 3 split beans in each sanitized bottle (The Kitchn suggests 3 to 5 beans per 8 ounces of vodka, and I've found that 3 beans per 5 ounces of vodka usually yields a nice, strong result that is obvious in baked goods).

Fill each bottle with vodka using a measuring cup with a pour spout. Screw the bottle caps on tightly. Place the bottles in a cook dark place and shake them about once a week for 2 months or longer.

You can cap the bottles with wax right after they're bottled, or you can wait until closer time for gifting. I'm in favor of doing this early, because the holidays are always so busy. Here's how you do it.

Place a small length of filament tape around the bottom edge of the bottle cap, so that the tape covers the gap between the bottle cap and the bottle neck. Fold the end of the tape back onto itself to create a pull tab. Repeat with all the bottles.

Melt the sealing wax in your smallest saucepan or use a metal (heatproof) 1 cup measure. You could also use a butter warmer with a tea light underneath but this will take much longer for the wax to melt (also see my disposable mini pie pan recommendation in this post). When the wax is melted (at approximately 160 to 170 degrees F), remove from heat. Pour the wax into a small, deep container. Dip the bottle caps into the wax past the filament tape pull-tab. Lift the cap and allow the excess wax to drain; dip again. Turn the bottle upright immediately for drippy effect, and immediately place a wax stamp on top of the bottle cap, if using. For non-drippy effect, hold the wax-dipped bottle over the container until all the wax has dripped off. When the wax stops dripping, turn the bottle upright.

Label the bottles, or decorate them with washi tape, if desired.

Vanilla extract will keep at room temperature indefinitely.


How to Bake Hard Candy Shot Glasses

$
0
0

I know a lot of people who shy away from making hard candy, and I understand why. First, there's the boiling hot syrup that sticks to skin like napalm (been there, not fun!). And second, clean up isn't exactly easy. Pots and pans with stuck-on hard candy will sometimes take hours to soak clean.

That's why I love this little project so much. It's a no-brainer: no candy thermometer, and no dangerously hot sugar syrup involved. All you need is a bag of hard candy discs and a silicone shot glass mold.

I got the idea for these candy shots a couple of weeks ago when Wilton sent me a box of products to test. Tucked inside, between mini loaf pans and sprinkles, I spotted an 8-cavity silicone shot glass mold. The packaging featured a shot glass made of Starlight mints, and I wondered if any hard candy could be used to bake shot glasses.

Since then, I've tried all kinds: butterscotch discs, cinnamon discs, and assorted fruit discs (pictured). They all worked beautifully. My favorite result was with the ones made with assorted fruit discs. They bake into a vibrant rainbow swirl - so fun!


To get started, you'll need to buy the silicone mold. You can find it here, or wherever Wilton products are sold (like the baking aisle in the craft store). You'll also need a big bag of assorted fruit-flavored discs. I used most of a 21 ounce bag (1 lb 5 oz) to make eight shot glasses.


In the pictures above, you can see how I layer the candies into the cavities evenly.

First, push 5 candies into the bottom of a cavity in this rainbow color order: red, orange, yellow, green, violet. It might be a tight fit to get all the candies in, but be bossy about it. It won't hurt for the silicone mold to stretch a little. Push another 5 candies into the mold in rainbow order, staggering them so that a candy rests between two bottom pieces. Finally, place four candies of any color on top of the mold to create the bottom of the shot glass. It's okay if the candies stick up over the top of the shot glass mold. They'll melt down in the oven.

After baking, use a metal spoon to tamp down the melted candy. This will force out any air bubbles and make sure the candy has no gaps when unmolded.


Allow the candy to set at room temperature. After the candy is cooled, pop the shot glasses out from the bottom of the silicone mold, and twist the glass so the middle releases. Voilà! Instant candy shot glass.


Like any hard candy, these should be made on a non-humid day. Humidity can cause the candy to weep and become sticky. Anything you put inside the glasses will take on the flavor of the candy. In just minutes the whipped cream I filled the glasses with was permeated with fruity candy flavor.

Aside from the obvious adult use for the shot glasses, I could see this being fun project for kiddos too. Small hands can unwrap candies and help place them in the cavities. The transformation from hard candy discs to edible cups feels a little like magic, so it's entertaining, too. I could see juice or orange soda being served in these with stripey straws for a Candyland-themed birthday.


Hard Candy Shot Glasses
[click for printable version]
Prep: 20 minutes, total time 1 hour with cooling

When shopping for mints to use in this recipe, be sure to choose hard candy discs. Avoid crumbly, soft peppermints. Butterscotch discs, and Starlight mints are a good choice for baking.

1 bag (21 oz.) hard candy discs
Wilton 8 cavity Round Shot Glass Silicone Mold

Unwrap candies. Preheat oven to 375 degrees Fahrenheit.

Push 5 candies into the bottom of a shot glass cavity. It might be a tight fit to get all the candies in, but be bossy about it. It won't hurt for the silicone mold to stretch a little. Push another 5 candies into the mold on top of the first layer, staggering them so that a candy rests between two bottom pieces. Finally, place four candies on top of the mold to create the bottom of the shot glass. It's okay if the candies stick up over the top of the shot glass mold. They'll melt down in the oven. Repeat the process with remaining candies.

Place the silicone mold onto a level baking sheet and bake for 12-15 minutes. After baking, use a metal spoon to tamp down the melted candy (and try to make the bottom as even as possible). This will force out any air bubbles and make sure the candy has no gaps when unmolded.

Allow the candy to set at room temperature. After the candy is cooled, pop the shot glasses out from the bottom of the silicone mold, and twist the glass so the middle releases. Voilà! Instant candy shot glass.

Notes: It's important that the candies bake long enough to become one solid mass. If you remove your glasses and they have holes or gaps in them, then return them to the silicone pan and bake them for 5 to 7 minutes longer.

Any liquid placed inside the glasses will take on the flavor of the candy. If, for some reason, you want to avoid this, you can coat the inside of the shot glasses with a layer of chocolate or melted candy.


Viewing all 866 articles
Browse latest View live


Latest Images