

There must nine hundred and ninety-eleven recipes for homemade vanilla extract online, and I suppose that's why I've never seriously considered posting a recipe for it here. But I've had a change of heart, because it's something I make regularly and use in almost every sweet thing I bake.
The reason why I love homemade vanilla extract so much is because I know it's pure (I control the ingredients), it costs less to make and - most importantly - the flavor is superlative. As far as staple ingredients go, it's pretty important to me.
This year everyone on my holiday gift list is getting a bottle of homemade vanilla extract - not just the avid bakers in my circle, but also the occasional chocolate chip cookie makers and even my pal who uses her oven as a make-shift magazine rack (she likes vanilla in her hot cocoa and coffee). Everyone can benefit from the loving touch of a little vanilla, if you ask me.
The bean pods need to steep for several weeks, so if you get started now (right now!) the extract will be ready in early December.
 |
| It's best if the pods can steep for at least 8 weeks. In the picture above, you can see how the extract develops over time. |
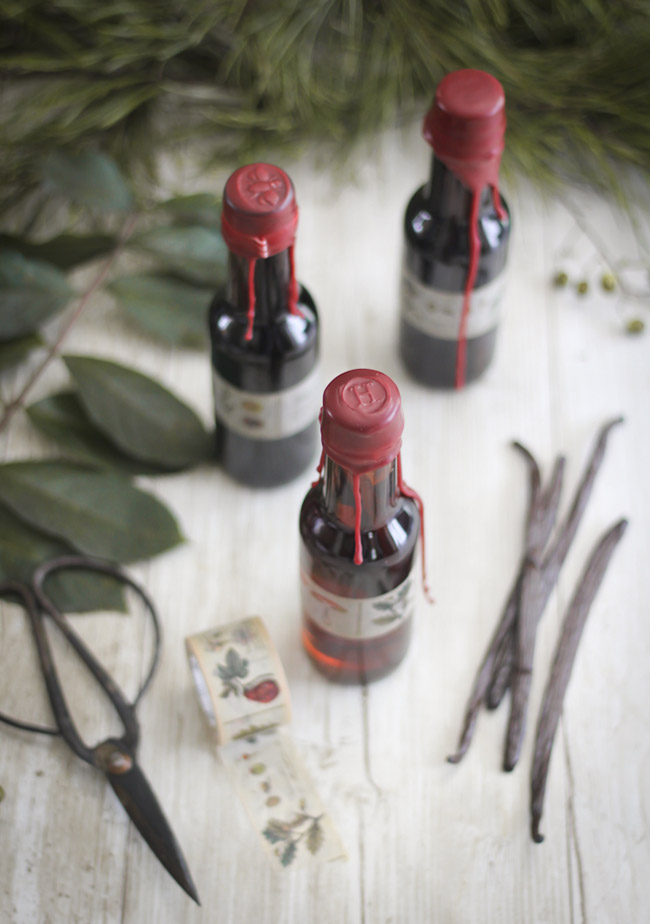
You'll need just two ingredients and bottles with tightly fitting lids to make the extract. My personal touches to the bottles are wax-sealed caps and botanical washi tape "labels". Here's a run-down of everything I used, and a few links to the specialty products.
- Vodka 35-40% alcohol (70-80 proof): Opinions are sure to vary on this, but I say there's no need to buy top shelf. I usually buy an inexpensive variety of vodka, and make sure to steep the vanilla pods for a full 8 weeks before using the extract in a recipe. As long as the vodka isn't too harsh or bitter on the tongue, then it should be fine for extract making. I sometimes use Smirnoff because it can often be found on sale, or read the virtues of $8 Nikolai vodka here.
- Madagascar vanilla beans: These vanilla beans are strongly fragrant and have a creamy taste that goes well in cakes, cookies and quick breads. Vanilla beans in general can be awfully expensive, but if you them in bulk they cost much, much less. I've been a repeat buyer of this brand
, and I've never had a bad batch. I usually get a few more than their promised 22-24 beans. My last shipment held 27 fat bean pods. I use these beans specifically for extract making, and save the more pricey Tahitian vanilla beans for custards and frostings. Edit: There are some negative reviews of these beans on Amazon, but I personally have never received any that were subpar. If you're not inclined to buy from this seller, Beanilla is also a supplier, and Frontier Co-op sells Fair Trade beans, which is always a good choice.
 , and I've never had a bad batch. I usually get a few more than their promised 22-24 beans. My last shipment held 27 fat bean pods.
 - Lidded 5 ounce bottles: These
are actually sold as hot sauce bottles, but their size was spot-on for gifting. They're bigger than the usual 2 ounce grocery store bottles, and tall enough to accommodate most whole beans. I only wish these came in amber or green bottles, because dark bottles will obscure sunlight and prevent the flavor from being sapped over time - although that's not a real concern for me, I go through bottles of vanilla extract very quickly.
 are actually sold as hot sauce bottles, but their size was spot-on for gifting. They're bigger than the usual 2 ounce grocery store bottles, and tall enough to accommodate most whole beans. I only wish these came in amber or green bottles, because dark bottles will obscure sunlight and prevent the flavor from being sapped over time - although that's not a real concern for me, I go through bottles of vanilla extract very quickly.
- Sealing wax: I used burgundy sealing wax on the bottles I'm gifting. This
kind of wax, in bead form, melts easily. I heated it in a small metal measuring cup over medium heat on the stove-top. You could also use a small aluminum disposable pan in which to melt the wax, for easier clean-up.
 kind of wax, in bead form, melts easily. I heated it in a small metal measuring cup over medium heat on the stove-top. You could also use a small aluminum disposable pan in which to melt the wax, for easier clean-up.
 - Filament tape: If you plan to cap the bottles in wax, you'll need to wrap a little filament tape around the bottom edge of the bottle cap to make a pull tab. (Filament tape has fibers running through it to give it strength, if you didn't know that already.) This makes the wax cap easy to remove. (See pictures for further explanation.)
- Decorative washi tape: This is not essential, but it is quite pretty. I found a forest botanical print tape at Terrain Shop. Something about those little mushrooms made me feel happy.


First thing - wash the bottles! Some people like to sanitize them in a dishwasher, but I say there's no better way to sanitize than a dip in boiling water. I suggest keeping a large pot of boiling water on the stove top, that way you can dip the bottles one at a time as you work. Fish them out of the hot water with tongs to avoid burns. The hot water evaporates quickly from the bottles after they are removed from the water, so there's no extended wait for the bottles to air-dry.

Capping the bottles in wax is easy peasy. I strongly suggest making the filament tape tab for easy opening of the bottles, otherwise they will be a pill to open. Filament tape can be found at discount stores, office supply stores, home centers - just about anywhere.

Sealing wax is different than regular wax; it's harder, and more plastic-y. You can melt it in a double boiler or on the stove-top in a small saucepan as recommended, but I used a 1 cup metal measuring cup to melt it in over the range. As I mentioned before, I think a small disposable aluminum pie plate would work well for heating and make for the easiest clean up (maybe recycle frozen pot pie pans?).
The wax needs to be heated to 160 to 170 degrees F, before it can be used for sealing. About 3 ounces of wax will seal 10 to 12 bottles. I dipped each bottle about three times to create a firm cap. Make sure the wax is in a small deep container so it will completely cover the bottle cap when dipped. If you like the drippy effect on my bottles, then turn the bottle upright immediately after the final dip. The wax will run down the sides of the bottle. If you prefer a non-drippy wax cap, hold the bottle upside down until all the excess wax has dripped back into the melting pot.
Remember when I made chocolate wax seals? I used those same stamps on the wax bottle caps, and they turned out so nice! I found my wax stamps here, if you're looking to buy.
Aside from the wax sealing, this homemade gift takes very little effort. The most work you'll do is shaking the bottles once a week to release and disperse the vanilla throughout the liquid. With all my purchased supplies, each of my 12 gift bottles came out to about $5.80, which is pretty inexpensive gift-wise (disclaimer: I already had the filament tape and wax stamps). And I'd say you could lower the cost if you're an environmentally-conscious bottle recycle-er!
Homemade Vanilla Extract with Wax Sealed Caps
[click for printable version]
Yields: Twelve 5-ounce bottles
Prep time, 30 minutes, steep time 8+ weeks
Neutral-tasting vodka is my usual pick for making vanilla extract at home, but bourbon and rum can be used in place if you prefer.
12 bottles (5 ounce capacity) with tightly fitting lids
24 to 36 vanilla beans
3 bottles (750 ml each) Vodka 35-40% alcohol (70-80 proof)
Filament tape
3 ounces bottle sealing wax
Labels or washi tape
Bring a large stock pot of water to a full boil over high heat. Place a large absorbent dish towel over a work surface. Using grippy tongs or a canning lifter, submerge the bottles, one at a time, in the water. Let the bottle stay in the water for 10 seconds, then remove with tongs, allowing the water inside the bottle to pour back into the pot. Place the bottle on the dish towel to dry; Repeat with remaining bottles. After the bottles are done, sanitize all the caps in the water at once. Remove them with a slotted spoon and let them dry on the towel. Let the bottles cool before using.
Split each vanilla bean lengthwise with a small sharp knife. Place 2 or 3 split beans in each sanitized bottle (The Kitchn suggests 3 to 5 beans per 8 ounces of vodka, and I've found that 3 beans per 5 ounces of vodka usually yields a nice, strong result that is obvious in baked goods).
Fill each bottle with vodka using a measuring cup with a pour spout. Screw the bottle caps on tightly. Place the bottles in a cook dark place and shake them about once a week for 2 months or longer.
You can cap the bottles with wax right after they're bottled, or you can wait until closer time for gifting. I'm in favor of doing this early, because the holidays are always so busy. Here's how you do it.
Place a small length of filament tape around the bottom edge of the bottle cap, so that the tape covers the gap between the bottle cap and the bottle neck. Fold the end of the tape back onto itself to create a pull tab. Repeat with all the bottles.
Melt the sealing wax in your smallest saucepan or use a metal (heatproof) 1 cup measure. You could also use a butter warmer with a tea light underneath but this will take much longer for the wax to melt (also see my disposable mini pie pan recommendation in this post). When the wax is melted (at approximately 160 to 170 degrees F), remove from heat. Pour the wax into a small, deep container. Dip the bottle caps into the wax past the filament tape pull-tab. Lift the cap and allow the excess wax to drain; dip again. Turn the bottle upright immediately for drippy effect, and immediately place a wax stamp on top of the bottle cap, if using. For non-drippy effect, hold the wax-dipped bottle over the container until all the wax has dripped off. When the wax stops dripping, turn the bottle upright.
Label the bottles, or decorate them with washi tape, if desired.
Vanilla extract will keep at room temperature indefinitely.