Quantcast
Channel: Sprinkle Bakes
Viewing all 914 articles
Browse latest View live

Easy Almond Buttermints

$
0
0

December 4th's treat is one of my favorite sweets of all time. Go to any bridal shower in the south and you're likely to find buttermints on the reception tables. It's tradition, but I don't limit them to showers. I make them for all kinds of occasions! They're cute and petite with a mighty sweet punch. At Christmastime I flavor them with vanilla and almond extracts, which gives them a sugar cookie flavor.

The candy dough takes about 5 minutes to put together (it's no-cook/no-bake!), and it can be tinted any merry and bright color you choose. The dough can be molded into bonbon shapes using a candy mold, or make them into patties by rolling marble-sized pieces and flattening them with the tines of a fork.


I used thissilicone mold to form them into various shapes. After filling the mold with candy, just pop it into the freezer, and when the candies are firm, pop them out from the bottom-up. So easy and über cute!


I don't know which ones I like best. Maybe the red ones because they remind me of Rudolph's nose.

These look nice placed individually in frilly candy papers. I like to package them in boxes decorated with washi tape, but they look pretty in cellophane bags tied with ribbon, too. If you make them with real butter then they'll need to be refrigerated. You can make them with margarine instead and they'll keep at room temperature for up to a week.


Easy Almond Buttermints
[click for printable version]
Makes about fifty 1-inch pieces

1/3 cup/76 g unsalted butter or margerine
1/3 cup/75 ml light corn syrup
1/2 teaspoon salt
1/2 teaspoon vanilla extract
1/2 teaspoon almond extract
4 1/2 cups/570 g confectioners' sugar
Your choice of gel food color

Using an electric mixer, blend together the butter or margarine, corn syrup, salt and flavorings in a large mixing bowl. Add the sugar and mix until smooth. The dough should not be sticky; add additional powdered sugar if the dough sticks to your hands.
Divide the dough and tint with gel food color as desired. The dough can be molded into bonbon shapes using a candy mold, or make them into patties by rolling marble-sized pieces and flattening them with the tines of a fork.

If using a silicone mold, press the dough into the cavities and level the tops with a knife. Transfer the mold to the freezer and chill for 1 hour. Pop the shapes out from the bottom while still firm. Place the shaped mints in candy papers and let them come to room temperature.

Note: If you make the mints with real butter then they'll need to be kept refrigerated. You can make them with margarine instead and they'll keep at room temperature for up to a week.


Golden Gingerbread with Hard Sauce

$
0
0

I am deeply smitten with giving little bundt cakes at Christmastime - and getting them (hint hint)!

This classic gingerbread recipe has been around for ages. My personal touch to the confection is sorghum molasses (I recommend  Muddy Pond pure sorghum from my home state, it's the best!). Sorghum is lighter in flavor and color than regular molasses. It gives this cake a golden appearance and mild flavor, but if you prefer a darker, more typical gingerbread, then blackstrap molasses can be used in place of the sorghum.


This is a good cake to gift to long distance friends, because it's sturdy enough to ship. The liberal soak of rum preserves the cake and prevents it from drying out. A slice is great alone but even more delicious with strong coffee.


One of my favorite ways to package mini cakes for gifting is to wrap them with disposable forks standing upright in their centers (I like biodegradable Birchwarebrand). With the fork provided, the giftee can enjoy the cake right away. Which is good should a cake emergency arise. (Cake emergency = real thing.)


Golden Gingerbread with Hard Sauce
[click for printable version]
Yields 1 bundt cake or approximately 6 to 8 mini bundt cakes
Source: Southern Living, The Desserts Cookbook circa 1976

Cake
1/2 cup/113 g unsalted butter
1 cup/ 200 g sugar
1 cup/240 ml sorghum molasses (or blackstrap molasses if preferred)
2 eggs, separated
3 cups/350 g cake flour, sifted
1 teaspoon baking soda
1 teaspoon sea salt
2 teaspoons ginger
2 teaspoons cinnamon
1 cup/240 ml buttermilk
1 cup/ 240 ml dark rum
3 tablespoons brown sugar

Hard sauce
2 cups/260 g confectioners' sugar
1 tablespoon dark rum
Milk or cream

Preheat the oven to 350 F.
Cream the butter in a bowl with an electric mixer. Add sugar and beat until light and smooth. Add the molasses and egg yolks; mix thoroughly. Sift the flour with the baking soda, salt and spices and add to the creamed mixture alternately with the buttermilk.

In a separate bowl, beat the egg whites until stiff. Fold the egg whites into the creamed mixture using a large rubber spatula. Pour the batter into a well-greased and floured mold (a bundt pan, or 6 to 8 mini bundt pans). Bake for 30 to 40 minutes (check mini cakes at 25 minutes), or until the cake springs back when pressed.

Let the cake rest in the pan for 5 minutes then turn it out onto a wire rack and let it cool completely.

Combine 1 cup of dark rum with the brown sugar in a small saucepan. Place over medium heat until the sugar is dissolved. Remove the pan from the heat source and let cool slightly. Brush the cake liberally with the syrup using a pastry brush. Allow the cake to stand, loosely covered, for several hours to ensure the rum is thoroughly absorbed.

For the hard sauce, combine the confectioners' sugar and rum in a medium bowl. Add milk a few drops at a time while whisking. When the mixture is thick and drop from the whisk in a thick ribbon back into the bowl, then the correct consistency has been achieved. If the glaze is thinned too much, add additional powdered sugar until consistency is achieved. Pour the glaze over top of the cake, allowing it to run down the sides.

Let the cake stand uncovered until the sauce hardens. Package as desired.


Sprinkle Christmas Tree Cookies

$
0
0

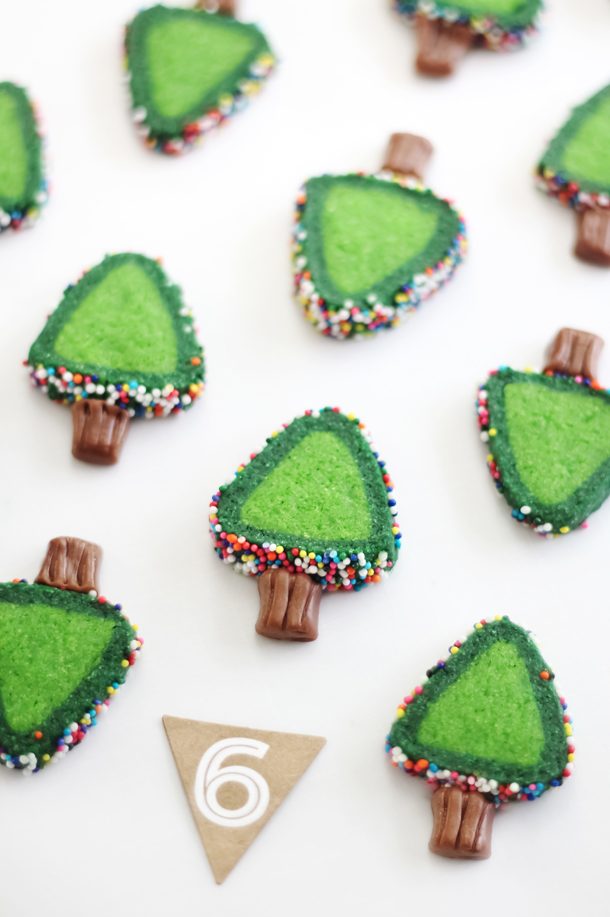
I'm not exactly sure how it happened, but one day after some experimentation with sugar cookie dough, I ended up with green slice-and-bake triangles. They looked so much like Christmas trees, that I felt they should have some kind of decoration - cue the sprinkles!


I love these so much, I decided to make them into a Christmas card!

The technique for making these is pretty simple. Just divide the sugar cookie dough in two and tint one piece dark green and the other light green. I decided to make mini trees, so I divided the dough into four pieces (2 dark green pieces and 2 light green pieces). Roll the light green piece of dough into a fat log and then shape it into a triangle (I did this by gently pinching the dough with my fingers as I pressed the dough flat against a work surface). Roll the dark green piece of dough flat between two pieces of parchment paper, and then wrap it in a single layer around the light green triangle dough.

Time for sprinkles!


It's best to coat the cookie dough in the sprinkles while it's at room temperature. It's okay if the sprinkles don't completely coat the outside - it doesn't have to be perfect. It helps to gently press the sprinkles into the dough with your fingers. I did this and they stuck fairly well.

I found these cookies slice best after they've chilled about 20 minutes in the freezer. The sprinkles stay on better and the shape doesn't squish when you cut it.


The tree trunks are made from Tootsie Rolls. I just pressed little pieces into the bottoms of the cookies and they held together on their own. If you have some trouble getting them to stick, a dot of melted candy (candy melts) can be used as adhesive.

Because my trees were so tiny, I cut the Tootsie Roll candies into smaller pieces to make the tree trunks. It's best if the tootsie rolls are fresh and soft so they'll stick to the cookies well. If you've had your Tootsie Rolls since Halloween, then you might want to purchase a fresh bag.


I'll close with a great big  HOORAY(!) for slice-and-bake cookies. You can store the shaped dough in the freezer until you're ready to bake them.


Sprinkle Christmas Tree Cookies
[click for printable version]
Yields about 4 dozen 2-inch cookies, more or less depending on what size you shape them

1 cup/226g unsalted butter, softened
1 1/2 cups/300 g granulated sugar
1 egg
1 1/2 teaspoons vanilla extract
1/2 teaspoon almond extract
2 3/4 cups/350 g all-purpose flour
1 teaspoon salt
Leaf green gel food color
Dark green food color
1 cup rainbow nonpareils
Tootsie Rolls
Candy melts (meltable candy disks) optional

In a large bowl, beat butter and sugar with an electric mixer at medium speed until well blended. Beat in egg and extracts; mix well. Combine flour and salt; add to butter mixture. Beat until well blended. Divide dough into two equal pieces. Tint one piece light green and the other piece dark green (I kneaded it into the dough with my hands, but you could use the mixer on low speed).  The dough should not be sticky, but if it is, then add extra flour to the batter until it is no longer sticky.

Divide the tinted dough into four equal pieces (or six, for mini trees). Shape the light green portions into triangles by rolling the dough into a log and then pinching in into a triangular shape with your fingers. Roll the dark green pieces of dough flat between two pieces of parchment paper and wrap it over the light green triangle in a single layer. Cut away the excess dough with a knife.

Place the sprinkles in a shallow dish and place the dough on top of them, turn the dough to coat the outside, pressing the sprinkles on with your fingers as you go. This part doesn’t have to be perfect. It’s okay if some of the sprinkles don’t stick to the dough.

Cover the sprinkle-coated dough in plastic wrap and chill in the freezer for 20 minutes.
Preheat oven to 350°F. Line two (or more) baking sheets with parchment paper.

Cut the dough into 1/4-inch slices, and place them on the parchment –lined sheets. Bake small cookies for 7-9 minutes, and 10-12 minutes for larger cookies. Bake times will vary according to size, so keep an eye on them.  They are done when slightly puffed and fragrant.

Cut Tootsie Rolls candies in half, and then into small rectangles to make the “tree trunks”. Use the back of a knife to press tree bark striations in the candy.  Press the Tootsie Rolls onto the bottoms of the trees. If the Tootsie Rolls are fresh and soft, they should stick to the sprinkles naturally. If you’re gifting these or taking them to a party, I suggest adhering the trunks to the trees with a dot of melted candy melts (insurance is best!)

Allow the cookies to stand for several minutes or until the melted candy is set and the Tootsie Roll tree trunks are stable.

Cheerful cookies like this are meant to be seen, so gift them in clear cellophane bags tied with pretty ribbon.


Rosemary Shortbread

$
0
0

This shortbread is the best kind of aromatherapy. Rosemary has a piney fragrance that reminds me of a freshly cut fir tree, and when combined with buttery shortbread dough you've got a cookie that tastes like Christmas!

I usually cut shortbread into long fingers (they're great for dipping in coffee) but this aromatic dough absolutely begged to be cut into evergreen shapes.


I love how the chopped rosemary speckles the cookies throughout. It's just so naturally beautiful.

Just about any cookie-lover will appreciate these, but I'm especially excited to give these to the avid herb gardener on my Christmas list.


Rosemary Shortbread
[click for printable version]

2 1/2 cups/320 g all-purpose flour
2 tablespoons chopped rosemary
3/4 teaspoon salt
1 cup/226 g unsalted butter, softened
2/3 cup/85 g confectioners' sugar

Line two baking sheets with parchment paper.
In a bowl, whisk together flour, rosemary and salt. In a stand mixer, beat the butter and sugar on medium speed until well blended. Reduce speed to low and slowly add in the flour mixture. Blend until the mixture resembles coarse crumbs.
Gather dough into two balls. Roll each dough ball flat (to about 1/4-inch) between two pieces of parchment paper; refrigerate for 10 minutes.
Preheat oven to 350F.
Cut the dough with a tree-shaped cookie cutter, or other desired cookie cutter shape.Transfer cut-outs to the prepared sheets; re-roll scraps and cut as many shapes as possible.
Bake for 10-12 minutes. (Do not allow cookies to brown.) Transfer cookies to a cooling rack.

Note: Sometimes a rosemary leaf will not cut with the cookie dough, so you'll have a piece sticking out of the side of your cut-out. Just take a pair of kitchen-dedicated scissors and snip the piece away from the edge before baking.


Sugar Cookie Bark

$
0
0

Who doesn't love candy bark? There must be a million different ways to vary the confection and I want to try them ALL. I created this version when Wilton sent me a bag of sugar cookie-flavored candy melts. Boy, are those things good! I ate one or two (or five) right out of the bag.

They also sent the cutest candy bark mold imprinted with Christmas greetings. I think I'd rather get candy bark than a Christmas card, wouldn't you?


I love making cookie crumbles for cake and muffin toppings, so I knew it would be a delicious addition to this candy bark. It only takes minutes to whip up a batch, and it really adds a delicious homemade element to this candy bark. Sugar cookies of all kinds need sprinkles, if you ask me, so I added Christmasy red and green nonpareils to the mix.

For those of you without a moment to spare, you can short-cut this recipe by crumbling bakery-purchased sugar cookies in a bowl and mixing them with red, white and green sprinkles.


This was a really easy (seriously easy!) and fun project - delicious too! The bark has just the right amount of creamy cookie-flavored candy to the crunchy cookie crumbles. I'm hooked!

If you're a gifter of edibles around the holidays, then I'd recommend using the silicone candy mold - it makes an adorable presentation. If you'd rather skip the mold, then the candy melts can be spread on a baking sheet and then sprinkled with the cookie crumble.

Sugar Cookie Bark
[click for printable version]

Sugar Cookie Crumble
1/2 cup/100 g granulated sugar
2 tablespoons light brown sugar, packed
3/4 cup/90 g all-purpose flour
1/2 teaspoon baking powder
1/2 teaspoon salt
2 tablespoons red, white and green nonpareils
1/4 cup vegetable oil (or other neutral tasting oil such as canola)
1 tablespoon pure vanilla extract

1 package Wilton Sugar Cookie Candy Melts (10 oz.)

Preheat the oven to 300 F.
Combine the sugars, flour, baking powder, salt and sprinkles int eh bowl of a standing mixer fitted with the paddle attachment and mix on low speed until well combined.
Add the oil and vanilla and mix again until the mixture forms small clusters of crumbs.
Spread the mixture onto a baking sheet and bake for 15 minutes. When the crumbs are golden, remove from the oven and let cool completely.

If using the sugar cookie mold, fill the cavities with the candy disks and microwave at 30 second intervals until melted - you won't even have to stir the candy melts as you heat them. Just tap the mold on a work surface to even the surface. Sprinkle the melted candy generously with the cookie crumble. Let cool completely before unmolding.

If you're not using the mold, line a baking sheet with parchment paper. Melt the bag of candy melts in the microwave at 30 second intervals, stirring in between heatings until smooth. Spread the candy onto the parchment and sprinkle generously with the cookie crumble. Let cool and then break the candy into pieces.

Place candy in a cellophane bag tied with pretty ribbon for gifting.

Gingerbread Cupcakes with Candy Stripe Frosting

$
0
0


I'm into gingerbread in a big way this season, and that's not always been the case in previous years. I'm not sure why. Perhaps because I was too busy stuffing Oreos inside Red Velvet Crinkles, or building the biggest Black Forest Cake ever, ever, ever. But this year is different and I just can't get enough ginger-spiced goodness!


There's just a touch of cream cheese added to the frosting - not enough to call it cream cheese frosting, but just enough to give it a tang. It's a nice complement to the spiced cake.

I gave the frosting a candy stripe with red and green gel food color painted on the inside of the piping bag. I think next time I make these, I'll add a little peppermint extract so the flavor matches the appearance.


Paint 3 or 4 lines of gel food color  on the inside of the piping tip and piping bag
for the candy stripe effect. Piping tip is Ateco 847.


You may remember seeing some similar bow-topped cupcakes earlier this year. I just love how they make cupcakes look like a present (for me?!) so I hunted down the supplier and now they're available in the shop! You can purchase them here (the shop is best viewed via desktop, mobile is still a work in progress, le sigh). Orders are shipping the same day so there's still time to get them well before Christmas!


Gingerbread Cupcakes with Candy Stripe Frosting
[click for printable version]

Cupcakes
1/2 cup/100 g granulated sugar
1/2 cup/113 g butter or margarine, softened
1/2 cup/ 170 g molasses
2 eggs
2 cups/260 g all-purpose flour
1 teaspoon baking soda
1/2 teaspoon salt
1 1/2 teaspoons ground ginger
1/2 teaspoon ground cinnamon
1/2 teaspoon ground allspice
3/4 cup/180 ml water

In large bowl, beat granulated sugar, 1/2 cup butter, the molasses and eggs with electric mixer on medium speed, or mix with spoon. Stir in flour, baking soda, salt, ginger, 1/2 teaspoon cinnamon, the allspice and water. Spoon about 1/4 cup batter into each muffin cup.
Bake 15 to 18 minutes or until toothpick inserted in center comes out clean. Cool 5 minutes; remove from pans to cooling racks. Cool completely, about 20 minutes.

Frosting
1 cup/226g  unsalted butter, softened
2 ½-3 cups/320 to 384g confectioners’ sugar
3 ounces cream cheese, softened
1 tsp vanilla extract
Milk or heavy cream, optional
Red and green gel food color for icing stripes (optional)

In a stand mixer fitted with the whisk attachment, mix together the butter and confectioners sugar. Begin on low speed until crumbly, and then increase to high and beat for 3 minutes. Add the cream cheese a little at a time.
Add vanilla extract and beat again until light and fluffy.  If you find the buttercream is too stiff, you may add milk or heavy cream 1 tablespoon at a time until the mixture is piping consistency.

Fit a piping bag with a large closed star decorator tip (Ateco 847). Dip a small artists’ brush in the red or green food color and paint 4 well-spaced stripes onto the inside of the piping tip and all the way up the piping bag. Carefully spoon the frosting into the piping bag and pipe swirling mounds of icing (about 3 passes) on top of the cooled cupcakes.

Garnish with a bow cupcake topper, if desired.

Microwave Grey Sea Salt Caramels

$
0
0

This is one of my favorite caramel recipes because you don't have to use a candy thermometer. Total cooking time is about 7 minutes in the microwave (as opposed to 20 + on the stovetop) and after a short chill in the refrigerator, they're ready to be cut and wrapped. This is a great recipe for busy holiday cooks.


Sea salt is the ultimate complement to this caramel. I use coarse Celtic grey sea saltto finish this candy because it's beautiful and makes the candy taste like it's been kissed by a mermaid.


Wrap these up in waxed paper because they are rather soft at room temperature. A few pieces wrapped up in a culinary scallop shellmakes a beautiful little gift, especially if you opt to use the coarse sea salt.


Microwave Grey Sea Salt Caramels

4 tbsp unsalted butter, cut into cubes
1 cup light brown sugar, tightly packed
1/2 cup corn syrup
2/3 cup sweetened condensed milk (not low fat)
1/2 tsp pure vanilla extract
Grey sea salt

Lightly grease an 8x8 dish with vegetable shortening or butter and line the pan with parchment paper. Cut the paper long enough to overhang the two edges of the pan.
In a large microwaveable bowl or 8 cup glass measure, combine the butter, brown sugar and corn syrup. Microwave at 100% power for 2 minutes.
Stir mixture well.  It will be a little grainy. Microwave for another 2 minutes, stir well.
Add 2/3 cup sweetened condensed milk.  Microwave for 3 minutes.  Watch carefully, it is prone to bubble up at this stage. If it starts to bubble over, open the microwave door intermittently so that the mixture will sink down and not bubble over.
Remove from microwave and stir in vanilla extract. Be very careful at this stage, the caramel is extremely hot and sticky!
Pour hot caramel into the parchment lined pan.
Lightly sprinkle with grey sea salt.
Let stand until set, or speed setting with refrigeration.  Lift caramel block from pan and cut into individual squares.
Wrap the caramel pieces in waxed paper squares.


Note: this recipe should be made in a standard household microwave. High powered commercial microwaves are not suitable for this recipe.

Muddy Reindeer Cookies (Chocolate-Dipped Gingerbread)

$
0
0

Santa's reindeer have quite a job to do on Christmas Eve. They have just one night to travel 75 million miles and carry a sleigh of toys that weighs over 300 tons (some years more or less depending on the naughty to nice children ratio). Wow!

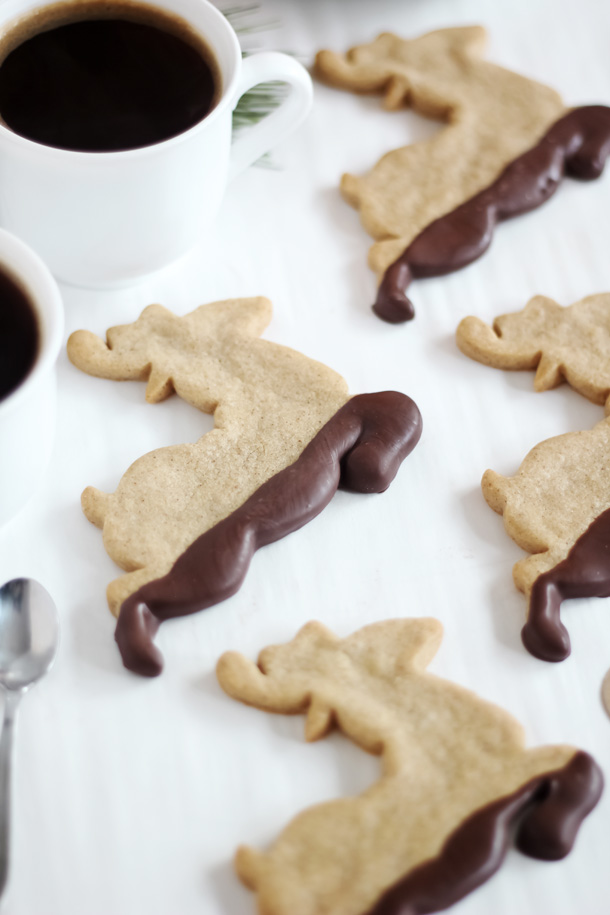
That's a lot of landing on sooty rooftops and traveling through inclement weather. No doubt the reindeer would become a little sullied from the journey. These cookies are my way of regarding Santa's antlered helpers.


Remember when I said I was SO into gingerbread this year? Yeah. I wasn't kidding (see here and here). This vintage gingerbread recipe was new to  me and I'm so glad I decided to try it. It's made differently than some of the contemporary gingerbread cookie recipes. Instead of creaming butter and sugar together (like most any cookie recipe) the butter is cut into the flour with a pastry blender (or a food processor) as you would to make pie crust. This makes for a truly delectable texture.


These guys were "muddied" with melted semisweet chocolate. It gives the cookies just a little extra sweetness, and that makes them delicious with hot tea or strong coffee. You could also dip the cookies in white chocolate - I'm sure the reindeer encounter many snowy rooftops on their travels as well!


You can find the reindeer cutter I used here but there are many other reindeer silhouettes (like this one) that would be cute, too.

If you're like me, and crazy about gingerbread, then you can find links to some of my other ginger-spiced creations below.

Gingerbread Bundt Cake with Coffee Glaze
Gingerbread Pie
Bavarian Gingerbread house (Gingerbread House Dough Recipe)
Gingerbread Hobbit Hole
Designer-Worthy Gingerbread Houses for HGTV


Muddy Reindeer (Chocolate Dipped Gingerbread)
[click for printable version]
Yields 2 dozen cookies

1 1/4 cups/160 g all-purpose flour
1/4 teaspoon baking soda
Pinch of salt
1 teaspoon ground ginger
1 teaspoon ground cinnamon
5 tablespoons unsalted butter, cold, and cut into pieces
1/2 cup/100 g granulated sugar
2 tablespoons pure maple syrup
1 egg yolk, beaten
6 ounces chocolate, finely and evenly chopped

Sift together the flour, baking soda, salt and spices. In a large bowl, cut the butter into the flour mixture with a pastry blender (or you may use two forks or process in a food processor). When the mixture resembles fine bread crumbs, add the sugar, syrup and egg yolk, and mix or process to a firm dough. Knead lightly.
Line two baking sheets with parchment paper.
Roll the dough to 1/4-inch thickness between two sheets of parchment paper. Cut the rolled dough with a reindeer cookie cutter (or other preferred cutter). Transfer the shapes to the parchment lined baking sheets using a spatula, and then chill the shapes in the refrigerator for 10 minutes or until firm.
Preheat the oven to 350F.
Bake the cookies for 10-12 minutes, or until golden around the edges. The cookies should be fragrant and slightly puffed.
Let the cookies cool on the sheets for 10 minutes, then transfer to a wire rack to cool completely.
Line a work surface with a sheet of waxed paper or parchment paper.
Melt the chocolate in a small saucepan over low heat on the stove top, or heat at 30 second increments in the microwave until melted and smooth. Dip the reindeer's feet/lower half of body into the chocolate and place on the paper. Let stand until the chocolate is set.
When the chocolate is well set, place the cookies in an air-tight container, or package them in cellophane bags tied with holiday ribbon for gift giving.


Peppermint Mousse Cups

$
0
0

This is one of the easiest and prettiest treats to make this holiday season, and best of all? It's totally edible, right down to the candy cups and peppermint spoons.

These cups are yet another sweet inspired by Wilton's Christmas products. The candy cups are easy to make with white vanilla candy melts (although, peppermint candy melts could be used for a triple peppermint whammy!). Just paint the melted candy on the inside of a paper cupcake liner. When the candy is set, just peel away the liner!


Instant candy cup!


I went crazy over the peppermint spoons. They are so perfect for these mousse cups, but there are so many other ways they can be enjoyed - dipped in chocolate or stirred into a steaming mug of hot cocoa. You can find them here or at most craft stores in the baking aisle.


Peppermint Mousse Cups
[click for printable version]
Yields 6 standard cupcake size mousse cups

8 ounces white vanilla candy melts (or almond bark)
1/2 cup white chocolate baking chips
1 cup plus 3 tablespoons heavy whipping cream
1/2 teaspoon peppermint extract
2 drops red or pink liquid food color
Crushed peppermint candy
Peppermint spoons

Have ready 6 paper cupcake liners.
Melt the vanilla candy  melts in the microwave at 30 second intervals until smooth. Using a pastry brush, coat the inside of each paper cupcake liner. Refrigerate until set.

Meanwhile, in a small bowl, heat the vanilla baking chips, uncovered in the microwave for 1 minute at full power. Stir in 3 tablespoons heavy whipping cream. Heat for an additional 30 seconds, oruntil chips are melted and can be stirred smooth with the heavy cream. Stir in the peppermint extract and food color. Let the mixture cool to room temperature.

In a medium bowl, beat 1 cup of heavy cream with an electric mixer on high speed until stiff peaks form.  Fold the melted peppermint mixture into the whipped cream.  Spoon or pipe the mousse into the candy cups. Refrigerate until serving. Just before serving, sprinkle with crushed peppermint candy.


Mocha Party Punch

$
0
0

Silly me. I thought all party punch was supposed to be bright red and fruity, but this punch changes everything. It's like sipping on a combination of chocolate milkshake, Yoo-hoo and café frappé. The ice cream on top mixes with the chocolaty punch and creates the most divine frothy topping. If you're looking for something unexpected to serve at your next party - this may be it!


I decided to display some of my most-loved vintage party napkins beside this punch. I collect mid-century cocktail napkins, and I'm seriously stingy about using them. I only bring them out for special occasions, and apparently, when chocolate punch is being served (smile).


One dip or two? 


The chocolate curls on top makes the punch look like a million bucks - and when has extra chocolate ever been a bad idea?

I doubled this recipe because my punch bowl holds 12 quarts.

Mocha Party Punch
[click for printable version]
Yields: about 5 quarts, or 20 punch cup servings

The coffee flavor in this punch is mild but obvious and it intensifies the chocolate flavor. I certainly recommend using it, but if you're serving this to children or you do not like the flavor of coffee, you may omit the instant coffee granules. If you  have instant chocolate milk mix or powdered hot cocoa mix, then you may use it in place of the freeze dried coffee.

1 1/2 quarts water
3/4 cup/255 g prepared chocolate syrup
1/2 cup/65 g powdered vanilla coffee creamer
1/2 cup/100 g granulated sugar
2 tablespoons light brown sugar
4 tablespoons instant coffee granules
1/2 gallon vanilla ice cream
1/2 gallon chocolate ice cream
Whipped topping or whipped cream (I used 2 cups, but use as much as you like!)
Chocolate curls or shavings for garnish

In a large saucepan, bring the water to a boil. Remove from the heat. Add the chocolate syrup, creamer, sugars and instant coffee granules. Stir until well dissolved. Cover and refrigerate until cold, about 3 hours, or overnight (preferred).

20 minutes before serving, pour the chilled chocolate punch into a punch bowl. With a large ice cream scoop, place dollops of ice cream on top of the punch; stir briefly and let stand until the ice cream spreads and covers the surface of the punch. Heap the whipped topping in the center of the punch and garnish with chocolate curls or shavings.

12 Treats of Christmas

$
0
0

1. Sugar Cookie Lollipops; 2. Peanut Butter Cup Bars; 3. Almond Florentine Cigars, 4. Almond Buttermints; 5. Golden Gingerbread with Hard Sauce; 6. Sprinkle Christmas Tree Cookies; 7. Rosemary Shortbread; 8. Sugar Cookie Bark; 9. Gingerbread Cupcakes; 10. Microwave Sea Salt Caramels; 11. Muddy Reindeer Cookies; 12. Peppermint Mousse Cups

It's hard to believe that we're a mere 9 days away from Christmas Eve! Time sure does fly, so I resolved to make the most of Christmas baking this year. I started planning and recipe testing the 12 Treats of Christmas in early November. It's been a lot of fun posting every day for the past two weeks, and I hope you've enjoyed the treats as much as I have. Many of them are easy and make great homespun gifts.

I'll be back to regular posting soon. Right now I'm catching up on a mountain of Christmas gift wrapping!

Happy Winter!


Salt Dough Ornaments for The Etsy Blog!

$
0
0


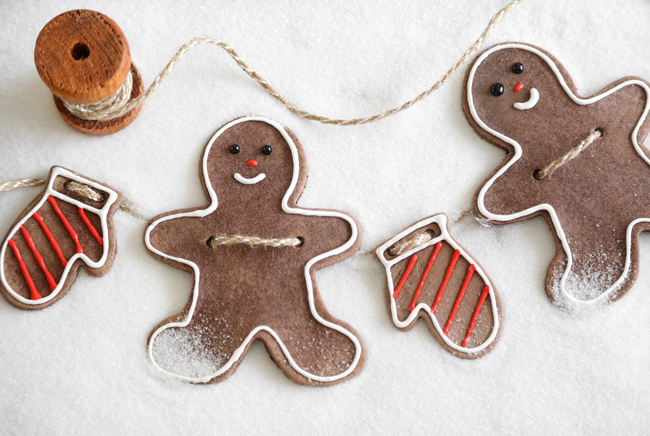
Today I've cooked up something a little different - treats for your tree! These salt dough ornaments look and smell just like real gingerbread, and they make a sweet homemade gift. Best of all, they keep indefinitely, so you can use them each year to decorate your tree.

You'll find the complete instructions along with step-by-step photos here on the Etsy Blog!


Double Vanilla Pink Stocking Sugar Cookies

$
0
0

Since joining Wilton's Sweet Treat Team last February, I've had the opportunity to try out all kinds of new products and explore new ideas in confectionery. It's been a sugar-filled fun year to say the least!

To end the year on a sweet note, the members of the Treat Team decided to have a cookie exchange. I was paired to swap cookies with Marilyn of Pink Martinis and Pearls. She makes some of the most beautiful sugar cookies I've ever seen, so I knew I had to up my cookie game. Plus, something pink with pearls had to happen!


If you've never had the experience of shipping decorated cookies before, I can tell you from experience that it's a real nail-biter! These little pink stockings are making the journey from Tennessee all the way to California. Hopefully the little prayer I said over them, along with all the extra bubble wrap will help them to arrive unscathed.

Below you'll find my favorite sugar cookie recipe for decorating, except this time they're infused with double vanilla goodness! You can use this recipe for any shape cookie you like, but if you're interested in making your own pink pearled stocking cookies, scroll down a little furthe rfor the quilting technique instructions.


Double Vanilla Sugar Cookies
[click for printable version]
Yields 2 dozen
Source: SprinkleBakes book

Vanilla Sugar Cookies
1/2 lb. (two US sticks) unsalted butter
1 cup plus 2 tablespoons/225 g granulated sugar
1 egg
1 tsp. vanilla extract
Seeds of 1 vanilla bean
3 cups/380g all-purpose flour
Pinch of salt
In a stand mixer fitted with the paddle attachment, mix the butter and sugar together until just incorporated. Do not over-mix at this stage, or the cookies may spread while baking.
Add the egg and vanilla and vanilla seeds. Mix again on low speed, stopping to scrape down the sides of the bowl intermittently as needed.
In a medium bowl, whisk together the flour and salt.  Add to the butter and egg mixture.  Mix on low speed until a dough is formed and there are no longer any streaks of butter in the mixing bowl. The dough will often clump around the paddle attachment while being mixed. This is normal and a good sign that your dough is the right consistency.  If your mixture does not come together and is crumbly, add ice cold water 1 tbsp. at a time until the dough clumps.
Line a baking sheet with parchment paper.
Turn the dough out onto a sheet of wax paper and top with a second sheet.  Roll dough into an oblong disc between the paper with a rolling pin.  Transfer dough - wax paper and all - to a large cookie sheet.  Wrap the dough tightly onto the cookie sheet with plastic wrap and refrigerate for 1 hour.
Remove top sheet of wax paper and roll dough a little thinner.  It should not be sticky.  You may dust the surface lightly with flour if it is sticky, but not too much!  You don’t want streaks of white flour baked onto your pretty sugar cookies.
Roll dough to a ¼-inch to ½ -inch thickness.
Cut out desired shapes from the dough and transfer to the prepared baking sheet. (Use a 3-inch stocking-shaped cookie cutter for the cookies featured.) Be careful not to stretch the cutout shapes or they will be distorted after baking.
Refrigerate the cutouts for 30 minutes. This will help the cookies maintain a crisp shape during baking.
Preheat the oven to 350°F.
Bake the cookies for 15 to 20 minutes, more or less depending on size.
Let cool on the baking sheet for 5 minutes. Transfer to a wire rack. Decorate the cookies when completely cooled.


Pink Quilted Stockings
Supplies:
Stocking cookie cutter
Wilton Quilt Pattern Roller 1907-1354
1/2 lb pink ready made fondant
1/8 lb white, red and green ready made fondant
Corn syrup
Pearl nonpareils
Small artists' brush
Sanding sugar
No.3 decorator piping tip
9 inch fondant rolling pin

Knead all fondant well before using.
Roll the pink fondant out to 1/4 inch thickness; use the quilt pattern roller to emboss the fondant.
Use the stocking cookie cutter to make stocking-shaped pieces of fondant. Dot the backs of the pieces with corn syrup and lay them on top of a sugar cookie. Place a pearl nonpareil at each intersecting line and press it into the fondant.
To make the fuzzy white tops of the stockings, roll a piece of white fondant out and cut a straight edge. Use the top of the stocking cutter to cut 1/2-inch pieces of the white fondant. Lightly brush the pieces with water and sprinkle with sanding sugar. Use corn syrup to adhere the stocking tops to pink fondant.
For the buttons, roll the red and green fondant flat. Cut circles using the #3 round decorator tip (it measures approximately 3/4-inch). I used a 1/2-inch magic marker cap to make a button-like impression in the fondant, but you could use any pen cap or even a chapstick lid. Use the #3 piping tip to punch four button holes. Allow the buttons to dry until firm, about 3 hours. Attach them to the stockings with a dot of corn syrup.
Allow the cookie to stand until the fondant pieces are set and well-adhered, about 2 hours. Package the cookies in airtight containers or zip-top bags.

Chocolate Champagne Genoise

$
0
0

January clockwork. This time of year always seems to bring out the optimist in me. I am hopeful. No other word can describe it better. Hopeful.

2014 was a year filled to the brim. It was a year of baking and recipe testing and a whole lot of avoiding dirty dishes. It was the year I wrote a new book for you. I know it seems like forever ago when I first told you about it, and I'd considered keeping it a secret until closer to the release date, but ultimately I decided to spill the beans. I want you to know what I'm up to, especially when blog posts seem sparse. I would love to be the kind of blogger who can simultaneously write a book of recipes and also post blog recipes regularly, but I am not that person. It's slow and steady for me, and I'm learning to accept my inner tortoise. Now the finish line is in sight with a fall publish date for the book and I could not be more excited. It was certainly a year of hard work, and for that, I'm grateful beyond words.


I had trouble deciding what to make for the first blog post of the New Year, and I'd considered nearly a dozen recipes before settling on this one. My motto is, when in doubt - chocolate. Plus, genoise cake is something every baker and baking enthusiast should know how to make. If you're looking to expand your baking abilities in 2015, then this classic cake is a great place to start.

Genoise is a sponge cake that has no chemical leaven, and instead relies on the air whipped into eggs to give it rise as it bakes. The cake's dry spongy texture is made for soaking up delicious flavored syrups and it's sturdy enough for layering, so it's no surprise that this recipe is a common building block in patisserie.


This cake is often baked in a thin sheet or in a standard 9-inch round, but I decided to use a Savarin Mold.I love how this pan makes cakes look like one big doughnut (note to self: make One Big Doughnut Cake).


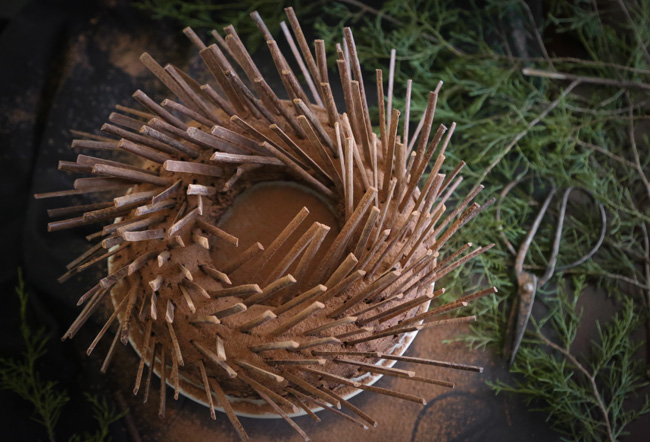
What do you think of this cake with quills? I'd seen a similar cake in a bakery, and decided to make my own version at home. It reminds me a little of the winter treescapes right now - a whole lot of bare limbs jutting towards the sky. Chocolate sticks can be purchased online, but because this cake requires quite a lot of them, I made my own. It's not difficult, and if you have the tools, it's totally beginner friendly. Another great thing to learn in 2015 (if you haven't already) is how to temper chocolate. You can find my tutorial here with last year's Etsy post for Red Velvet Bonbons. But if you're not inclined to temper, then an excellent substitute is Ghirardelli Chocolate Melting Wafers.These wafers taste deeply chocolaty and no tempering required.


You can find the tools I use for making the chocolate sticks here
It's relatively inexpensive and the comb can be used to texture the edges of frosted cakes, too. 


In the picture above, I've spread the chocolate to about 1/4-inch thickness, then run the pastry 
comb straight through it. You can tidy the edges by running the scraper across each end. 


After the chocolate stands for a few minutes and the surface becomes matte, you can cut it into even lengths with the scraper. This particular scraper has a very flexible knife, which is important for removing the sticks from the paper. It glides underneath the sticks easily without breaking the thin pieces of chocolate.


This cake was given a generous soak of champagne syrup and then left to absorb overnight. This is an important step if you're using the chocolate sticks as decoration. If the genoise cake isn't properly saturated, then the chocolate sticks will not insert easily and because they are so thin, they'll break.

I really loved the flavor of sweet champagne syrup with chocolate cake. It tastes like a celebration. And with that, I'll bid you a very Happy New Year!


Chocolate Champagne Genoise Cake
[click for printable version]
Yields one 9-inch cake

Plan ahead, this cake needs to stand for at least 3 hours or preferably overnight.

Chocolate genoise
3 large eggs plus 3 large egg yolks, at room temperature
3/4 cup/150 g granulated sugar
1/8 tsp. salt
1/3 cup/40 g cake flour
1/3 cup/40 g cornstarch
1/4 cup/35 g unsweetened alkalized cocoa powder

Champagne syrup
1 cup/240 ml champagne or prosecco
1/2 cup/100 g granulated sugar

Decoration
10 ounces chocolate sticks (about 120 pieces)
Unsweetened cocoa powder, for dusting

Preheat oven to 350°F. 
Grease and flour a 9-inch round baking pan or a 9 3/4-inch Savarin mold.
In a heat-proof bowl (preferably stainless) beat together whole eggs, egg yolks, sugar and salt, using an electric hand mixer at high speed.  Place bowl over pan of simmering water and continue beating with the electric mixer until the mixture is warm. Remove bowl from water. Continue to beat until mixture is cooled and increased in volume;  this will take 5-7 minutes, and the batter should be thick and leave a trail when the beaters are lifted from the bowl.

Sift together cake flour, cornstarch and cocoa.  Sift dry ingredients over the beaten egg mixture, gently folding with a rubber spatula.  Pour batter in prepared pan.
Bake for 30 minutes or until cake springs back when touched with finger. Cool in pan on wire rack for 10 minutes. Loosen edge with knife and invert cake onto a rack. Cool completely.

For the syrup, combine the champagne or prosecco and sugar in a small saucepan. Simmer over medium-high heat, stirring constantly, until the sugar is melted. Remove from heat and let cool until just warm, about 20 minutes.

Place the cake upside down on a large sheet of plastic wrap. Poke holes in the bottom of the cake using a fork. Using a pastry brush, liberally brush half the syrup all over the bottom of the cake. Turn the cake upright and brush with the remaining syrup. Be sure to use all the syrup so the cake is thoroughly saturated. Loosely wrap the cake in the plastic wrap, and then in a layer of aluminum foil and allow the cake to stand at least three hours or preferably overnight.

To decorate the cake, press the chocolate sticks into the cake at a 45 degree angle, beginning at the center. Do this gently, as chocolate sticks are fragile. Avoid holding the sticks in your hands as you decorate because they will become soft. Keep them on the counter top. Continue pressing more sticks into the cake, moving outward, until the entire cake is covered. Dust the cake with unsweet cocoa, if desired. Store the cake in the refrigerator, covered with plastic wrap, for up to 3 days.


Note: This cake is excellent brushed with Kirsch (cherry) syrup. Just replace the champagne with Kirsch liqueur and serve with whipped cream. Add a few Morello cherries and you've got Black Forest Cake.

Edit 1/6: Someone asked how this cake is sliced. If you cut between the chocolate pieces at an angle, you'll get a clean slice.

Baked Buttermilk Doughnuts

$
0
0

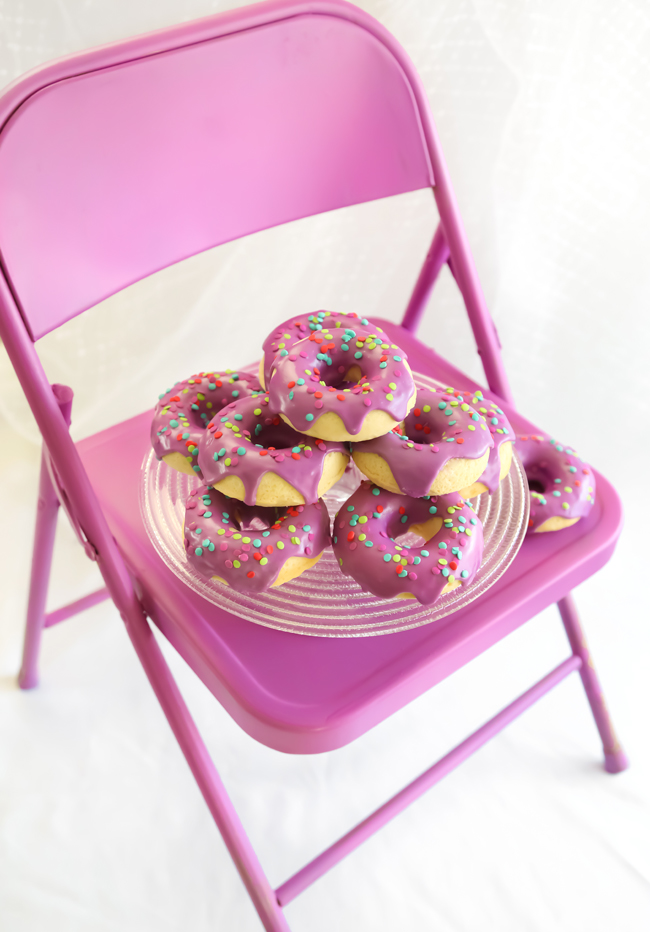
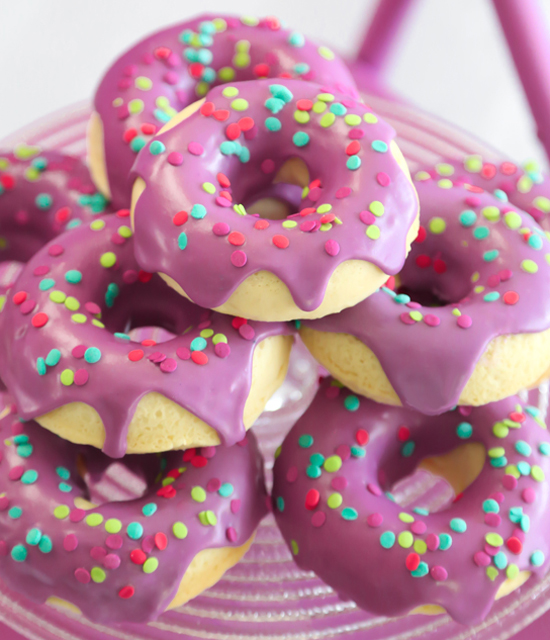
January is a funny time, because just as you're getting a fresh start and looking at things anew, the world outside looks grey and dismal. Something about that doesn't exactly match up. Although there are days when I prefer a sky that looks like wet cement (accompanied by snowflakes, hot tea and fuzzy socks), there are other days when I long for a colorful landscape. On those days I am prone to create my own scenery - like a mountain of purplish-pink doughnuts with the prettiest confetti sprinkles.


Remember way back when I made these baby doughnuts? Since then I've used the heck out of that mini doughnut pan.Recently I decided that I needed the regular-sized version.I put it on my Christmas list and was happy to find it in my stocking.

These buttermilk doughnuts could almost be called pound cake doughnuts. They're hearty and cakey and so good with cup of java. The tang of the buttermilk really makes all the difference, so I suggest seeking out the real thing. If you can't find real buttermilk, then a good approximation can be made with 1 cup of whole milk mixed with 4 1/2 teaspoons white vinegar or fresh lemon juice.


How pretty are these confetti sprinkles? I just love the color palette. I've had my eye on them for a long time, but my supplier has been sold out of them for months! I felt pretty lucky to snag a bulk supply of them recently, and they're available here in the shop.

Baked Buttermilk Doughnuts
[click for printable version]
Source: Wilton
Yields 13 doughnuts

This recipe requires the use of a doughnut pan.

Doughnuts
2 cups/240 g cake flour, sifted
3/4 cup/150 g granulated sugar
2 teaspoons baking powder
1 teaspoon salt
Pinch of nutmeg
3/4 cup/180 g buttermilk
2 eggs, lightly beaten
2 tablespoons butter, melted
1 teaspoon vanilla extract

Glaze
2 cups/260 g confectioners' sugar, sifted
1 teaspoon clear vanilla extract
Whole milk
1 drop violet gel food color (I used Americolorbrand)
2-3 drops neon pink liquid food color, (I used McCormickbrand)

Preheat oven to 425F. Spray the doughnut pan with nonstick cooking spray.
In a large mixing bowl, sift together the cake flour, sugar, baking powder, salt and nutmeg. Add the buttermilk, eggs, butter and vanilla. Beat until just combined. The batter will be thick. Transfer the batter to a piping bag with a 1/2-inch opening. Pipe the batter into the doughnut cavities until approximately 2/3 full.

Bake the doughnuts for 7 to 9 minutes, or until the top of the doughnuts spring back when touched. Let cool in the pan for 4 minutes. Turn the doughnuts out onto a wire rack to cool completely.

To make the glaze, put the confectioners' sugar in a large bowl. Make a well in the center and add the vanilla extract and 1 tablespoon of milk. Stir together with a whisk; add the food color. Add more milk a little at a time as needed, until a thick glaze is formed. The glaze should fall from a spoon in a thick ribbon back into the bowl, leaving a trail that disappears completely by the count of 10.
Spoon the glaze onto the doughnuts. Garnish with confetti sprinkles. Let the doughnuts stand until the glaze is set, about 30 minutes.

Doughnuts are best served fresh. They can be stored in an air-tight container overnight, and they will still taste fresh, but the glaze will have a wrinkly appearance.


Harlequin Truffle Roulade

$
0
0

If you've been reading this blog for very long, then you know I love a cake roll. I found this recipe in a secondhand baking textbook, and was instantly smitten. The alternating chocolate ganache and vanilla buttercream interior was so striking on the page, I had to try my hand at the technique.

Compared to the eye-catching interior, the outside of the cake seemed a little plain. That was easily remedied with a swirl of dark chocolate ganache buttercream on top and an assortment of truffles. You may also recall how much I lovebonbons on cake.


Below you'll find a pictoral of the Harlequin buttercream filling process. I think the finished cake looks quite daunting, but once you see how it's made, you may be inspired to try it! It's easier than it looks.


This last process shot is my favorite. I had anticipated having a real mess on my hands after rolling up the cake, but it was a relatively tidy affair. It's important that the buttercream isn't too lax in texture. It should have a little heft to it so it rolls up nice and clean.


One prerequisite for this recipe - you must like buttercream (no issues here!). This cake is rich, so a small slice goes a long way. The textbook suggests using slices of this cake to create a beautiful dessert tray. I can imagine slices fanned out on a fancy platter would be quite pretty.


Harlequin Truffle Cake Roll
Source: Professional Baking textbook with my adaptations and notes
Yields 12 servings

Buttercream filling
1/3 cup/3.5 ounces heavy cream
5 ounces dark chocolate, chopped
1 1/2 cups/340 g unsalted butter, softened
4 cups/510 g confectioners’ sugar
1 teaspoon vanilla extract
Pinch of salt
2 tablespoons unsweet dark cocoa powder
In a saucepan, bring the cream to a simmer. Remove from the heat and pour in the chopped chocolate. Whisk to combine. Transfer the mixture to a shallow dish and transfer to the refrigerator. Stir the mixture intermittently to speed cooling.
In a large bowl beat the butter until creamy. Add the confectioners’ sugar and beat until light and fluffy, about 4 minutes. Beat in the vanilla extract and pinch of salt.
Remove half of the frosting and place it in a piping bag fitted with a 1/2-inch decorator tip (or no tip, and a 1/2-inch hole cut in the end). Beat the cooled chocolate mixture and 2 tablespoons dark cocoa into the remaining frosting. Transfer the chocolate frosting to a piping bag fitted with 1/2-inch decorator tip (or no tip, and a 1/2-inch hole cut as previously mentioned). Set aside. Keep the bags at room temperature.

Sponge roll
1/2 cup egg yolks (about 7 yolks from large eggs)
3 tablespoons/ 1 1/2 ounces granulated sugar
1 tablespoon vegetable oil
1/3 cup/2 ounces cake flour, sifted
1/4 cup egg whites (about 2 egg whites from large eggs)
Confectioners’ sugar for dusting
Beat the egg yolks and sugar together in a standing mixer on high speed until light in color, about 5-8 minutes. Gradually add in the oil. You can tell the mixture is properly whipped when it has the appearance of lemon pudding.
Gently fold in the cake flour using a large rubber spatula. Set aside.
Beat the egg whites in a separate bowl until soft peaks form. Gently fold the beaten egg whites into the yolk mixture.
Preheat the oven to 350°F. Grease a baking sheet with vegetables shortening and line it with parchment paper (the greased surface helps the paper to stick to the pan). Carefully spread the mixture in an even layer over the parchment with an offset spatula.
Bake for 8 to 10 minutes, or until the cake just starts to brown around the edges. The cake may look glossy and underdone in the middle, but looks can be deceiving. Check the cake’s center by pressing your finger on the cake. If it springs back, it’s done. Be careful not to over-bake this cake, or it break into pieces as you try to roll it.
Let the cake cool slightly. Run a knife around the edge of the pan and turn the cake onto a work surface dusted with powdered sugar (put a piece of waxed paper down first and clean-up will be a snap). Peel off the parchment paper. Trim the brown edges away from the cake. Let the cake cool completely.
Pipe spaced lines of chocolate frosting across the length of the cake. Leave just enough space to allow for same-sized lines of white icing between the chocolate icing. Pipe the white frosting between the chocolate rows, filling the gaps completely. You should have leftover chocolate frosting, reserve it for later use. Gently begin to roll the cake, starting at a long side, pushing it forward with your fingers. Roll the cake up completely and wipe away any excess frosting that gets squished out during rolling. Place the cake roll on a large sheet of waxed paper (or parchment) and roll the cake up into the paper. Chill the cake in the freezer until firm.

Chocolate glaze and topping
4 oz. chocolate, finely chopped
1/2 cup/120 g heavy cream
Assorted chocolate bonbons
Place heavy cream in a large microwaveable bowl.  Heat in the microwave at 40 second intervals until very hot but not boiling (you can do this on the stove top if you don’t have a microwave). Stir in chopped chocolate.  Let stand for 3 minutes then begin gently stirring mixture.  You can use a whisk, but do not whisk vigorously as it will create air bubbles in the finished glaze. 
Remove cake from freezer and place it on a grid baking rack; place the rack on top of a large baking pan. Pour glaze over entire surface, allowing the excess to drip into the pan. Let stand for 2 minutes, and then transfer the cake to the freezer.

Transfer the remaining chocolate frosting to a piping bag fitted with a large open star tip. Pipe an undulating line of frosting on top of the cake. Garnish with chocolate bonbons. Cut the cake into pieces with a warmed knife, cleaning between slices, while it is still cold. Let the slices come to room temperature before serving.


Applewood Bacon Shortbread Cookies

$
0
0

Many months ago I purchased a sampler set of flavored salts on an impulse. The names and colors drew me in: Murray River Pink, Bolivia Sunset, and Red Alaea. Since then I've sampled all twelve salts in the set, and my favorite - the supply that is quickly dwindling - is the flavorful brown-black grains of Applewood Smoked Sea Salt. It lends a smoky, almost bacon-like richness to anything it touches. If you love the flavor of Applewood bacon, then you may want to pick up a pinch tin. It's good on just about anything!

I've had the idea to use this salt on shortbread ever since I first tasted it. I just knew it would be fantastic on top of a slightly sweet, butter-rich cookie. And oh, it is!


How fun are these streaky bacon slices? I learned how to make bacon cookies from Jennifer when she made bacon sugar cookies. I was happy to find the technique also works with shortbread dough. If you're into making your cookies look like bacon too, then be sure to take a look at her dough stacking technique. I followed it loosely, and was pleased to find my cross section of shortbread looking so... bacony!

Once the slab of "meat" was assembled, I sprinkled on the Applewood salt and some freshly ground black pepper. The sliced dough yields a well-balanced cookie, with the salt and pepper crust just at one edge. I love the playfulness of this treat, but it's really delicious too. The recipe is based on the Scottish shortbread recipe in the Sprinkle Bakes book.


If you chill the shortbread slices in the freezer for about 10 minutes, they'll hold their shape well during baking. The cookies are done when the edges turn slightly golden, which I think gives them an even more realistic appearance. If you can't find Applewood Smoked Sea Salt locally, then you can order it here, or the entire sampler set I purchased can be found here.

These cookies made us giggle and hoot and brought out our inner practical jokers. Make them if you're in need of a delicious treat or just a smile.

Applewood Bacon Shortbread Cookies
[click for printable version]
Yields about 2 1/2 dozen cookies

The key to making great shortbread is using the best quality butter you can find.  Applewood smoked salt can be found in kitchen specialty stores and online.

1 pound (4 sticks) unsalted butter, softened
1 cup granulated sugar
1 teaspoon vanilla extract
4 cups all-purpose flour, plus more for dusting
1/4 teaspoon salt
Wilton Burgundy gel food color
Wilton Brown gel food color
Liquid red food color
Applewood Smoked Sea Salt, in fine grain
Ground black pepper

In a stand mixer fitted with the paddle attachment, beat the butter and granulated sugar until light and fluffy. Add the sugar and mix again until well incorporated.
Add the vanilla extract and mix again.
Add 2 cups of the flour, and the salt, and mix on low speed until a dough forms. Add the remianing 2 cups of flour and mix again on low speed until a very stiff dough forms.

Divide the dough into 4 even portions. Place one portion back in the mixing bowl and add some of the burgundy and brown gel food color. Mix well. Add food color as needed to create a dark brownish-red color; add more flour 1 tablespoon at a time if the dough gets too sticky to handle; set aside.
Tint a second portion of dough in the same way, but use less of each food color so that it is slightly lighter than the previous batch.
Tint a third portion of dough with a small amount of brown food color and a few drops of liquid red food color to create a light pinkish-brown color.
Leave the fourth portion of dough untinted.

Flatten 3/4 of the untinted dough into a rough rectangular shape, about 1/2 inch thick. Flatten and stack the two lighter colors of dough alternately on top. Add the remaining untinted portion in random pieces on top (this creates another "fat streak" in the dough"). Finally, add the darkest portion of dough.

Flip the dough over so that the untinted portion is on top. Sprinkle with Applewood Smoked Salt and black pepper. Chill the dough in the refrigerator until firm, about 2 hours.

Preheat the oven to 350F. Line two large baking sheets with parchment paper.
Slice the shortbread dough into long even rashers, about 1/4-inch thick. Carefully transfer them to the cookie sheets. Bake for 12 to 15 minutes, or until the edges of the cookies turn golden brown. Let the cookies cool on the baking sheets until they are firm enough to move to a wire cooling rack. When the cookies are completely cooled, transfer them to an airtight container.

Note: I have made this with rendered bacon fat added to the dough. If you'd like to try it, add 1/4 cup chilled bacon fat to the butter mixture and 1/4 cup of flour.


Raspberry-Covered Devil's Food Cake

$
0
0


I'd like to introduce you to my favorite Devil's Food Cake recipe - or perhaps you've already met. You may recognize it from my cookbook (in a different kind of heart shape) or from this recent post on Food52. It's soft yet substantial and deeply chocolate with a velvety texture. The recipe yields exactly one 9-inch round cake, but I also bake it in an 8x8-inch square brownie pan. I used the latter to make this cake.


This cake revealed itself to me while I was sketching on my tablet. I've been recording some of my cake sketches, and I thought it might be fun for you to see one. More often than not, this is where my confections begin - on a drawing board. You can find a short video below (or here, for email subscribers).


Believe it or not, after years of curating a specialty cake pan collection (an accidental one), I've never splurged on a heart-shaped cake pan. It's just so darn easy to cut your own heart-shaped cake from a template! Just trace the bottom of the cake pan onto a piece of parchment paper, cut out the shape, fold the paper in half and then cut into a heart.


Trimming the cake into a heart is easy-peasy, just lay the template on top of the cake and cut around it with a serrated knife. The rest comes together rather quickly - just spread on a layer of frosting and go crazy with the berries.

It's important to make sure you have enough berries to cover the entire cake, so don't leave the grocery store with less than 3 pints of fresh raspberries.


Check out the inside of this cake. It's seriously dark and rich and so delicious with tart raspberries.


To be completely and utterly cheesy, I added a little chocolate love note badge top of the cake. I made it with a chocolate transfer sheet (similar here) and a handful of chocolate chips. If you'd like to see how the transfer sheets work, then you can find my tutorial here. Otherwise, a little square of Ghiradelli or Scharffen Barger would look nice, too.

I hope you'll give the cake a try, because it is literally tops in my (cook)book!


Raspberry-Covered Devil's Food Cake

Yields one 8 or 9-inch cake layer

I use LorAnnraspberry flavoring oil in the frosting to boost the berry flavor. I recommend using it if you can find it, but the cake is just as lovely with vanilla flavored frosting. If you prefer vanilla frosting, omit the flavoring oil and add 1 teaspoon pure vanilla extract. 

Devil’s Food cake
1/2 pound unsalted butter, softened
1 1/2 cup light brown sugar, packed
2 eggs
6 tablespoons unsweetened cocoa powder
1 1/2 teaspoon baking soda
1 teaspoon vanilla extract
1/4 teaspoon salt
1 1/2 cup all-purpose flour
2/3 cups sour cream
1/2 cup hot coffee

Buttercream and berries
1 cup unsalted butter, softened
4 cups confectioners’ sugar
1/2 dram bottle (about 1/3 teaspoon) raspberry flavoring oil
Liquid red food color
3 pints raspberries, rinsed and dried
Confectioners’ sugar for dusting
Decorative square of chocolate or chocolate transfer*

Preheat the oven to 350° F. Grease and flour an 8 x 8­inch square cake pan.
Using an electric mixer beat the butter in a large bowl until smooth.  Add the sugar and eggs; beat until lightened in color. Add the cocoa, baking soda, vanilla extract, and salt; mix well. Beat in the flour in 3 additions, alternating with the sour cream (begin and end with the flour). Add the hot coffee and mix until a smooth batter forms.
Pour the batter into the prepared pan. Bake until a toothpick tester comes out clean, approximately
40 to 50 minutes. Cool the cake in the pan for 10 minutes before inverting and cooling completely on a wire rack.
Level the top with a serrated knife, if needed. This cake usually doesn’t crown much (that means it doesn’t get the bump on top when it bakes) and I rarely have to level it.
Trace the bottom of the 8x8-inch square cake pan on a piece of parchment paper. Cut out the shape and fold in half diagonally. Conservatively trim away two corners with scissors to create a heart shape. Lay the paper heart on the cake and, holding a serrated knife vertically, cut the cake around the paper using gentle sawing motions. Save the extra cake pieces as ice cream crumbles, or have a few bites for a pick-me-up while you frost the cake.

For the frosting, combine the butter and confectioners’ sugar in a mixing bowl. Beat with an electric mixer until smooth and fluffy. Add the raspberry flavoring oil and a few drops of the liquid red food color. Beat until combined. Add red food color a little at a time until a red-raspberry color is achieved. Spread the frosting onto the cake with an off-set spatula. Make sure you get at least 1/4-inch thickness of icing on the sides of the cake, otherwise the berries will not stick!
Starting at the pointed end of the heart, line the raspberries around the bottom edge of the cake. Pack them together closely so as little of the frosting shows through as possible. Travel upward with your berry rows until the entire cake is covered in raspberries. If you see any icing lines showing through, dab a little frosting on a berry and place it over the exposed icing. 
Use a little frosting to adhere the chocolate square in the upper left hand corner of the cake. 
Store the cake in the refrigerator. Remove it about 1 hour before serving so that the cake loses its chill. Dust with powdered sugar and cut into slices. Store the leftovers in the refrigerator.


*For chocolate transfer instructions, see this post

Raspberry Rose Water Layer Cake

$
0
0


I'm having a raspberry moment. A little over a week ago I posted the most chocolaty-raspberried cake, ever. We ate every last smidgen, but that still didn't cure my craving. I decided to make a second and completely different kind of raspberry cake.

These fluffy yellow cake layers are marbled with rose water batter. There's just a whisper of rose fragrance added- it's nearly undetectable, but it enhances the raspberry elements of the cake like nothing else can. If you've ever stewed raspberries on the stove top, then maybe you've noticed their pretty floral aroma. The rose water just makes the berries taste more... raspberry!


The bright red filling is absolutely bursting with sweetness and berry flavor. It may be my new favorite cake filling (sorry lemon curd!). I used two tablespoons of the filling in the buttercream and it presented the most beautiful pink color. It also adds a berry note that ties the entire cake together.


The meringues! I'd planned for these gentle giants to have a blog post of their own, but they just begged to be arranged on top of this cake. They are so delicious. The inside is soft and marshmallowy and the outside is crisp and cookie-like. I decided to add a little sparkle with some gold leaf I've been saving for something special. And altogether, I think this cake deserves that description.


Raspberry Rose Water Layer Cake
[click for printable version]

Rose Marbled Cake Layers
1 cup unsalted butter, softened
1/4 cup shortening
2 cups granulated sugar
5 large eggs
3 cups all-purpose flour (I like White Lily)
1 teaspoon baking powder
1/2 teaspoon baking soda
1/2 teaspoon salt
1 cup whole milk
2 teaspoons vanilla extract
1/4 teaspoon rose water
2 drops liquid pink food color

Grease and flour three 9-inch round cake pans. Preheat the oven to 350°F.
In a bowl, cream the butter, shortening and sugar until fluffy. Add the eggs one at a time, mix well with each addition. Combine the flour, baking powder, baking soda and salt. Add the flour mixture to the creamed mixture alternately with milk, beginning and ending with flour. Beat well after each addition.
Place two cups of batter into each pan. Add the 1/4 teaspoon rose water to the remaining batter in the mixing bowl; add the two drops of liquid pink food color and mix well. Drop spoonsful the pink batter on top of the white batter in each pan. Spread the batter evenly into the pans then run a knife or skewer through the batter to marble it (try to avoid scraping the bottom of the pan with the knife, this will remove the pan’s floured coating).
Bake for 25 to 30 minutes or until a toothpick tester comes out clean. Cool for 10 minutes before removing the cakes from the pans.  Transfer to wire racks to cool completely. Level the cakes with a serrated knife or cake leveler.
Note: The floured surface of the coated baking pan usually contributes to an orangey-brown cake crust.  I usually trim this away from the bottom and sides of the cake, and I did this to this cake. It’s an extra step but the cake will be softer and more delicate.

Raspberry Filling
12 ounces fresh or frozen raspberries (thawed)
3/4 cup water
1/2 cup sugar
2 tablespoons cornstarch
Pinch of salt
In a small saucepan, bring the raspberries and water to a boil. Reduce heat. Simmer for 5 minutes. Remove from heat. Press raspberries through a sieve; discard seeds and allow the mixture to cool.
In the same pan, combine the sugar and cornstarch; stir in the cooled raspberry puree and whisk until smooth. Bring the mixture to a boil and cook for 2 minutes or until thickened. Transfer the mixture to a separate bowl and let cool completely.

Raspberry Frosting
1 cup unsalted butter, softened
4 cups confectioners’ sugar
2 teaspoons vanilla extract
2 tablespoons raspberry filling (recipe above)
2 to 4 tablespoons heavy cream or milk
Combine the butter and sugar in a large mixing bowl and beat until just combined. Add the vanilla extract and raspberry filling. Beat again until incorporated. Add milk or cream a little at a time until the mixture is spreading consistency.

Assembly
Assorted meringues (recipe follows)
Fresh raspberries
Transfer 2/3 cup of the frosting to a piping bag with a plain tip (or with the end snipped to about 1/2 inch diameter).  Place a cake layer on a cake stand or serving plate. Pipe a circle of frosting around the top edge of the cake layer; fill with raspberry filling (this should be about 1/2 cup plus 2 tablespoons filling per cake layer).  Stack a second cake layer on top and pipe and fill as before.  Finish with the third cake layer on top.
Use an off-set spatula to spread the frosting on the top and sides of the cake.  Top the cake with assorted meringues and fresh raspberries.

Giant Meringues
1 cup granulated sugar
1 cup confectioners’ sugar
6 egg whites at room temperature
1/4 teaspoon cream of tartar
Gold leaf (optional)

Preheat the oven to 170F.
In a medium bowl, combine the two sugars.  Line two cookie sheets with parchment paper.
Place the egg whites in a clean mixing bowl and whip them with an electric mixer on high speed until frothy. Add the cream of tartar. Beat again on high speed until the egg whites start to thicken. Gradually add the sugar mixture a little at a time.
Beat until the mixture is shiny and holds stiff peaks, about 5 to 7 minutes.  To make sure the sugar is dissolved, rub a little between your thumb and forefinger to see if granules remain. If grainy, beat the meringue until the sugar is dissolved.
Spoon the meringue in 10 large heaps on the cookie sheets, or transfer the meringue to a piping bag fitted with a star tip and pipe swirls onto the cookie sheets. (I did both).
Place the cookie sheets, staggered, on the top and bottom oven rack. Bake for 2 hours, rotating the pans halfway through baking. Turn off the oven and let the meringues cool down with the oven, about 1 hour. When the oven is cool, remove the meringues. They should lift easily from the parchment paper.
 Press gold leaf onto the meringues, if using. Serve immediately, or store them in an airtight container for up to three days.


Salted Greek Honey Nut Pie

$
0
0

Last week an ice storm hit our little corner of the world with great force. We lost our electricity and much of our heat source, and without a safe way to leave the house, well - we were cold. I spent most of last week being mad at myself because the cold made me feel tired and cranky and kind of like a weakling. I tried to work despite the frigid environment (I had baked a cake the day before, and my camera batteries were charged), but would eventually find my way back to huddling with two pups in a wool blanket.

As soon as power was restored I turned on the oven. I needed comfort food and to use some of the things in my freezer that were quickly thawing. One of those was a box of Filo dough.


I have strong feelings for pie, and I have even stronger affections for Baklava (see here and here). Put the two together, and I'm a goner. Completely. This pie is absolutely bursting with nutty goodness. It's a hearty stick-to-your-ribs kind of dessert, yet it retains lightness thanks to gossamer layers of Filo. It's a short-cut to Baklava, but with a warm cinnamon note. I wasn't sure I could finish a whole piece by myself, but I did (!) and it certainly revived my wilting energies.


One ingredient you mustn't underestimate or leave out in this recipe is salt (fine grain sea salt, if possible).  I know. I can get preachy about salt in desserts at times, but here it accentuates the pecans, pistachios and black walnuts like nothing else can. It's transformative!


Before I close, I'd like to share some news that had me jumping up and down on my tippy-toes! Out of thousands of entries, Better Homes and Gardens has chosen this site as one of their Top 10 Baking Blogs. (Side note: I'm pretty sure when my Mom reads this she's going to die of happiness. She's a BHG reader from way back!). There's another round of voting for "Reader Favorite", and you can vote for your favorites by clicking the icon below. I was thrilled to find myself in the company of so many baking bloggers that I love and admire. Warm and fuzzies all around (take that ice storm!).


http://www.bhg.com/blogs/bhg-blogger-awards/?ordersrc=rdbhg1108249


Okay, back to the delicious business of this pie. If you love Baklava, then you will love this dessert. It's one of the best pies I've ever made, and I'm planning to bring it to Easter dinner this year. It is truly worth sharing with the people you love. I hope you'll find it to be a glowing addition to your recipe box.


Salted Greek Honey Nut Pie

Yields one 9-inch pie, 8 servings

This recipe comes from a magazine clipping tucked in one of my second hand cookbooks. I've altered it somewhat with my favorite variety of nuts and seasoned it to taste. I recommend using black walnuts if you can find them. They add depth to the overall flavor of this pie. If you can't find them, regular walnuts are always welcome to this pie party.

Pie
2 cups chopped black walnuts
1 cup chopped pecans
1 cup chopped pistachios
1/4 cup brown sugar, tightly packed
2 teaspoons ground cinnamon
1/4 teaspoon fine grain sea salt
1 cup unsalted butter, melted
1 package (16 oz.) frozen Filo dough, thawed

Honey syrup
3/4 cup granulated sugar
1/2 cup water
1/2 cup wildflower honey
2 pinches fine grain sea salt, plus extra for sprinkling slices
2 tablespoons vanilla extract

Preheat oven to 350F.

Combine the black walnuts, pecans, pistachios, brown sugar, cinnamon and salt in a large bowl. Toss the ingredients together so that all the nuts are coated with the sugar, cinnamon and salt. Brush a 9-inch pie plate with some of the melted butter. (I used a tart pan with a non-removable bottom).

Unroll the Filo dough. Drape a piece of plastic wrap over it and cover it with a damp towel to prevent it from drying out. Layer 8 sheets of Filo in the prepared pie pan, brushing each layer with butter and rotating sheets to cover the pie plate. Allow the edges to overhang the sides. Sprinkle a third of the nut mixture over the layered Filo.

Layer four sheets of Filo over the nut mixture in the same manner; sprinkle with a third of the nut mixture. Repeat these last two steps. Top with an additional eight sheets of Filo, again, brushing, buttering and rotating the sheets. Fold the end of the overhanging Filo up over the top of the pie. Brush with butter.

Using a sharp knife, cut the pie into eight wedges. Cut 1-2 additional sheets of Filo into thin strips; arrange decoratively on top of the pie. (Save remaining Filo for another use). Bake pie for 40 to 45 minutes or until golden brown.


Meanwhile in a saucepan, combine the sugar, water honey and salt. Bring to a boil; reduce heat. Simmer uncovered for 10 minutes. Remove from heat and add vanilla extract. Pour the syrup over the warm pie. Let the pie cool in the pan.

Sprinkle each slice of pie with a pinch of sea salt before serving.


Viewing all 914 articles
Browse latest View live