Quantcast
Channel: Sprinkle Bakes
Viewing all 914 articles
Browse latest View live

Apple Cider Caramel Bars with Smoked Maldon Salt

$
0
0

This morning I was roused from sleep by a little pug burying himself under our bed linens. For the first time in many months the air in our bedroom was chilly. It was such a strong and obvious change, that I shouldn't have been surprised to discover that today is the autumnal equinox - happy first day of fall!

Today is one of two days that (reportedly) have equal portions of daylight and dark (the other being spring equinox). I've been told that it's a good time to evaluate priorities and strive for more balance in life. Since that's a bit overwhelming for me to think about -I fall short in several areas- I'll work on finding balance in my baking; a little victory to help me on the way to balancing other, bigger things in life.


To me, this treat is symbolic of today because it's all about contrast and balance. The crumbly shortbread crust is a nice counter to all that chewy caramel, and a sprinkling of smoked Maldon salt perfectly balances the sweetness.


I got the idea for these caramel bars after making cider caramels for the Etsy blog (see here). It's amazing how similar they taste to apple pie, so naturally I felt inspired to add a crust. After researching a few caramel bar recipes online, I decided to do some experimenting. I have to say, I love the results! These candies taste so much like apple pie. 

To get that deliciously strong apple flavor, you'll need to buy a bottle of boiled cider. You can find it at kitchen specialty stores and online at King Arthur Flour. Or, if you're inclined to make your own, a substitute can be made from 2 1/2 cups sweetened apple cider simmered on the stove top until reduced to 1/2 cup. The flavor will be more subtle than the purchased boiled cider, but the caramels will still have a recognizable apple flavor.


Since the caramel is so soft and delectable, these bars need to be kept refrigerated or they will lose their shape. Alternatively, you can wrap the bars individually in wax paper as you would normally wrap caramels, and they can be stored at room temperature. 

If you've never used Maldon flake salt before, then I urge you to get a small pinch tin. It's delicious on everything. The smoked variety gives caramel rich, sophisticated flavor. I'm hooked!


Apple Cider Caramel Bars with Smoked Maldon Salt
Yields about 15 bars 

Shortbread crust
1/2 cup plus 2 tablespoons/141 g unsalted butter, softened
1/2 cup/100 g granulated sugar
1/2 teaspoon fine grain sea salt
1 egg yolk
1 2/3 cups/210 g all purpose flour

Caramel
1 cup/210 g unsalted butter
1 cup/220g dark brown sugar
3/4 cup/235g light corn syrup
1 teaspoon fine grain sea salt
1/4 cup/50 g granulated sugar
1/4 cup/80g sweetened condensed milk (not evaporated milk)
1/2 cup/150 g plus 1 tablespoon boiled apple cider, divided
1 teaspoon powdered cinnamon
1/8 teaspoon grated nutmeg

Grease a 9x9-inch baking pan and line it with parchment paper so that two edges of the paper overhang the sides of the pan. 

In a large bowl, mash the butter, sugar and salt together with a pastry blender or with a fork. Blend in the egg yolk. Blend in the flour until fine crumbs form. Pour the mixture into the bottom of the prepared pan and press it down evenly with your hands. Refrigerate for 30 minutes.

Preheat the oven to 350 degrees Farenheit.

Bake the crust for 25 to 30 minutes, or until the edges of the crust are golden brown. Remove from the oven and let the crust cool completely.

To make the caramel, combine the butter, brown sugar, corn syrup, salt, sugar, sweetened condensed milk and 1/2 cup boiled cider in a large pot. Clip a candy thermometer to the side of the pot bring the mixture to a boil over medium-high heat. Reduce heat to medium and cook, stirring constantly, until the candy thermometer reads 248 degrees Fahrenheit. Remove from the heat and stir in the remaining 1 tablespoon of boiled cider, cinnamon and nutmeg. 
Pour the caramel on top of the shortbread and refrigerate until firm, about 3 hours. Run a thin knife around the outer edge of the caramel and lift the block out using the two overhanging edges of parchment paper. Cut the block into bars or squares using a large sharp knife. Sprinkle with Maldon smoked flake sea salt before serving. 
Wrap caramels so that they keep their shape, or keep the bars chilled in the refrigerator.


Caramel Bourbon Brownie Milkshakes and a Seriously Delish Cookbook Giveaway!

$
0
0

My favorite thing to do most evenings is to curl up with a good cookbook, a snack, and my two canine bookends. It's something I've always loved to do even before I started blogging, and not much has changed except that many of the cookbooks in my bedside pile are from my blogging peers!

One of my recent favorites is from my pal Jessica of How Sweet It Is. Her new cookbook is called Seriously Delish and it is outstanding. It's full of beautiful glossy images and Jessica's friendly relatable voice really shines through the written word. There's all kinds of recipes - certainly decadent desserts, but also lighter fare and what I call "solid food" (meaning food that isn't buttercream and has actual nutritional value - something I need to work on learning more about -ha!).

Would you like a copy? I thought so!


To Enter! 
Leave a comment telling me what your favorite sweet snack is - mine just might be the Fleur de Sel Caramel Bourbon Brownie Milkshakes from Jessica's cookbook - holy cow! Now there's something to cozy up with!

PS. This milkshake tastes extra good while wearing fuzzy socks.
PPS. I made the brownies for this recipe in my mini doughnut pan, 
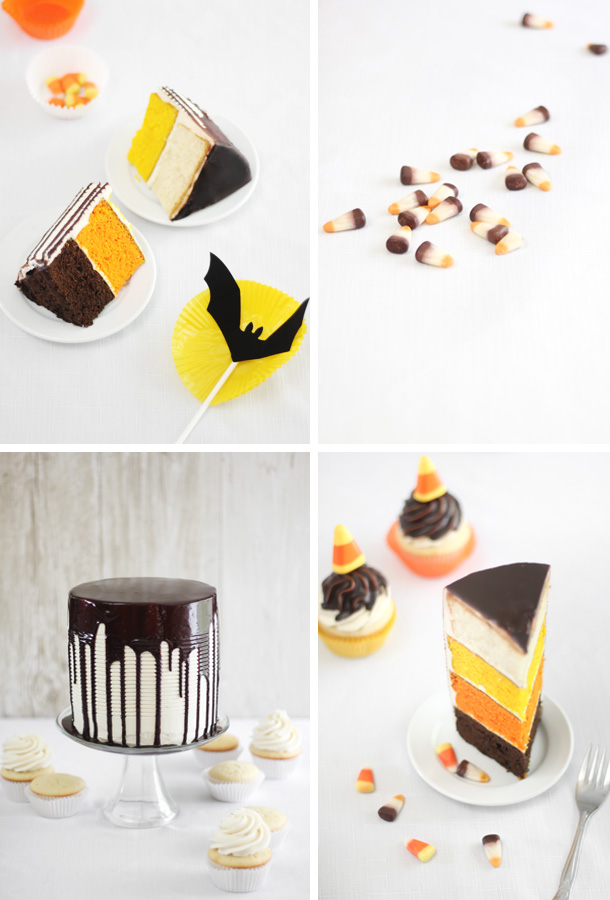
which made them way too easy to eat!


Fleur de Sel Caramel Bourbon Brownie Milk Shakes

Yields: 2 servings
 2 cups whole milk
2 cups vanilla bean ice cream
1/2 cup bourbon
2 brownies, plus extra for crumbling on top
1 cup caramel sauce, plus extra for drizzling
1/2 teaspoon fleur de sel plus extra for sprinkling
Whipped cream for topping

Combine the milk, ice cream, bourbon, brownies, 1/2 cup of the caramel sauce and salt in a blender and puree until smooth. 
Fill two glasses with 1/4 cup of caramel each and pourthe shakes into the glasses. 
Top the shakes with the whipped cream, an extra drizzle of caramel and another pinch of salt.
Crumble a brownie on top. 

Recipe by Jessica Merchant


Baby Chocolate Bundt Cakes for Fair Trade Month!

$
0
0

Hello October! After a humid summer here in the southern US, temperatures have finally cooled. To me, the world feels more awake and invigorated! The sky seems bluer, the landscape sharper, and the pugs are frisking in the brisk fall air. We are truly in our happy place!

Along with cool weather and mini specters, October brings us Fair Trade month. It seems like everywhere we look - in all corners of the world - there are needs to be met. It can be overwhelming to think about, but doing something small like buying Fair Trade Certified coffee and chocolate can positively impact someone's life. It's a good thing for you, too. Fair trade products are grown and prepared with care, using no pesticides, no GMO's, and with practices that will protect the environment. Add to this list a slew of awards and accolades for outstanding flavor, and you can be sure that buying Fair Trade Certified products for your baking is a good decision!


These baby bundts were made using Lake Champlain baking cocoa and Guittard extra semisweet baking chips. Both are Fair Trade Certified and are known for their superior quality. Together they give this cake a chocolaty flavor that is deep and lingering; a quality I also attribute to the dose of Equator coffee added to the batter.


Speaking of coffee! 

This year the folks at BeFair.org invited a handful of bloggers to be paired with a Fair Trade farmer, to tell their story. As a self-professed coffee connoisseur, I was thrilled to meet Basingwa Maria, a coffee grower from Rwanda. 

Basingwa Maria started farming in 1974 and she says that after her husband died in the war she poured her heart into her coffee trees. Coffee was her family's sole source of income, and she had to make it profitable. She joined the Dukunde Kawa cooperative in 2000, and with the increased income she has received from her fair trade coffee over the years, she has been able to bring running water to her home and invest in solar panels on her roof. She hopes to bring electricity to her house soon.
She has also been able to diversify her family's nutrition. They used to eat potatoes and beans everyday with no change, and they could not afford food at the market or oil for cooking. Now her family is able to buy food from the market and they do not have to solely rely on growing everything they eat.
While she never attended school, she says that because of the cooperative all of her children were able to attend school and two of them are currently in university. She beams when saying that her children have good ideas, and that now they have the ability to fulfill their visions.

"After the war I never believed we could get this kind of life. Having this beautiful house, sitting with my children having discussions of how to improve our lives." - Basingwa Maria

She has twice won the cup of excellence award from her cooperative, which is pretty amazing! These farmers put so much care and love into their coffee growing, and knowing that inspired me to make a dessert worthy of such an ingredient - and what's better than chocolate-chocolate cake with a big dose of coffee in the batter? 


I'm so excited to also be hosting a giveaway for the chocolate and coffee I used to make these little cakes - and more! 

a Rafflecopter giveaway


This prize package includes:


Big thanks to all the brands who generously donated these products to make this giveaway possible!


One more thing! The participating Fair Trade Month bloggers are having a friendly Recipe Rally pinning competition. Check out our Pinterest Board to find new delicious recipes, and pin your favorites!


Baby Chocolate Bundt Cakes
[click for printable version]
Yields 8 small bundt cakes or 1 twelve cup bundt cake

These baby bundt cakes took about 40 minutes to bake, which really surprised me. I expected them to bake in half of that time. My advice is to keep an eye on them so they don't over-bake. They are done when the cakes spring back when pressed in the centers.

My bundt pans were metal, and about 3/4 cup capacity. If you don't have small bundt pans, then a jumbo muffin tin can be used. This batter will also make one standard 12 cup bundt cake.

Cake
Baking spray with flour
1 cup/280 ml strongly brewed hot coffee
1 cup/120 g Lake Champlain unsweet cocoa powder
1 cup/240 g sour cream
3 cups/380 g all-purpose flour
1/4 teaspoon fine sea salt
1 teaspoon baking powder
1 teaspoon baking soda
2 1/4 cups/450 g sugar
1 1/2 cups/282 g unsalted butter, softened
4 large eggs
1 tablespoon pure vanilla extract 

Coffee glaze
1/2 cup/125 ml strongly brewed coffee
10 ounces Guittard extra semi-sweet chocolate chips

Chocolate Leaves
2 ounces semisweet chocolate, melted

Make the cake: Preheat oven to 325 degrees. Coat 8 mini bunt pans (approximately 3/4 cup capacity each) or one 12 cup capacity bundt pan with baking spray with flour.

In a medium bowl, whisk hot brewed coffee into the cocoa powder until smooth; whisk in sour cream. In a large bowl, whisk together flour, salt, baking powder, and baking soda. Beat butter and sugar together in the bowl of a standing mixer until light and fluffy. Beat in eggs, one at a time, until incorporated and then beat in the vanilla. Add flour mixture in three additions, alternating with 2 additions of cocoa mixture and beat until combined.

Pour the batter into the prepared pans, filling the small bundt pans no more than 3/4 full. Place the mini bundt pans on a baking sheet and place them in the oven. Bake the mini bundts for 35- 40 minutes, or until the cake springs back when pressed in the center.  If making one standard bundt cake, bake for 1 hour to 1 hour 15 minutes. Transfer to a wire rack set over a waxed paper lined baking sheet. Let cool 15 minutes, then turn out onto a rack and let the cakes cool completely.

Make the glaze: In a medium bowl, pour the hot brewed coffee over the chocolate and let stand 5 minutes.  Whisk until well combined. Dip the top of each mini bundt cake into the glaze and then turn it upright and place it on the cooling rack set over waxed paper.  For the standard size bundt cake, pour the glaze over the cake allowing the glaze to drip down sides and cover cake. Let set 3 hours at room temperature or 1 hour in refrigerator.


Make the chocolate leaves: To make the chocolate leaves, you’ll need chemical-free nontoxic fresh leaves – try min, lemon, ivy, rose, or strawberry leaves – and a clean, small paintbrush.

Using the paintbrush, brush one or two coats of chocolate on the underside of each leaf. Wipe away any chocolate from the top side of the leaf. Then place the leaves, chocolate side up, on a baking sheet lined with waxed paper or a curved surface (such as a rolling pin or the bottom edge of a pie plate) and place in the refrigerator until set. While the chocolate is cold, peel the leaf away from the chocolate.  Store the leaves in the refrigerator until ready to use. Garnish each baby bundt with one or two chocolate leaves.


Dairy-Free Pumpkin Cakelettes with Coconut Whipped Cream

$
0
0

I hadn't planned on blogging this recipe, but it's just so darn good that I decided to go ahead and share. Last week I was asked to create a smash cake for a baby's first birthday, and it had to be dairy-free. I used a simple egg-free vanilla cake recipe with vegetable oil as the fat instead of butter. I was uncertain that the cake would rise well because of the lack of eggs, but a combination of baking soda and vinegar as leaven worked like a charm. End result? Pretty good. It tasted best straight from the oven, but over time (and without frosting) it became dry.


I decided to completely re-work the recipe as pumpkin spice cake. I felt sure that the added pumpkin would completely change the cake's texture for the better - and it did! It's moist and tender, and so good with - also dairy free - coconut whipped cream. I baked the batter in a ruffled cakelette pan, but you can also divide it between paper liners and make cupcakes. The cakes crown as they bake (meaning they get that cute little "bump" on top) so they'll support a nice big dollop of frosting.


I'm no expert on dairy-free or vegan baking (which I suppose is why I was hesitant to share these) but I feel these little cakes are every bit as good as their butter-filled counterparts. And I love that they are made with pantry staples - no weird substitutes or hard-to-find ingredients. I hope you'll try them!


Dairy-Free Pumpkin Cakelettes with Coconut Whipped Cream
[click for printable recipe]
Yields about 15 cakelettes or cupcakes
Prep: 15 minutes, total time 40 minutes

Please note that the coconut milk in the recipe requires overnight refrigeration. This is not accounted for in the prep time.

Cakes
1 3/4 cup/220 g all-purpose flour
3/4 cup/175 g pumpkin puree (I used canned pumpkin)
1 cup/200g granulated sugar
1/2 teaspoon baking powder
1 teaspoon baking soda
1/2 teaspoon salt
2 teaspoons vanilla extract
1/3 cup/60 g extra virgin olive oil
1/2 cup/125 ml cold water

Coconut whipped cream
1 can (14 ounce) full fat coconut milk, refrigerated overnight
1 tablespoon granulated sugar
Seeds from one vanilla bean, or 1 teaspoon vanilla extract
1/2 cup chopped pecans
Cinnamon for dusting

Make the cakes: Position an oven rack in the upper third part of the oven.
Preheat the oven to 350 degrees F.
If using a cakelette pan as I have, grease the pans with vegetable shortening and dust them with flour. Tap the excess flour out of the cavities. If making cupcakes, line a cupcake pan with papers.
Stir together all the cake ingredients in a large bowl. I simply used a large balloon whisk to combine the ingredients well, but you could also use an electric mixer on the lowest speed. Fill the cavities 3/4 full and bake for 20 to 25 minutes, or until the cakes spring back when pressed in the center. Allow the cakes to cool in the pan for 5 minutes, and then place them on a wire rack to cool completely.

Make the coconut whipped cream: Open the can of chilled coconut milk. There will be a firm layer of coconut cream on top. Scoop out the solidified cream and place it in a medium bowl (do not include the coconut water, save it for smoothies or another use). Beat the cream with an electric mixer until soft peaks form, then beat in the sugar and vanilla seeds.
Dollop each cake with coconut whipped cream and sprinkle with chopped pecans. Dust cakes with cinnamon before serving. Refrigerate leftover coconut whipped cream.


Pumpkin Bavarian Crepe Cake

$
0
0

I just love a good Bavarian cream. Remember this cake I made two years ago? Yeah. That's still one of my favorite recipes of all time. I usually make a molded white chocolate Bavarian each year at Christmastime, but I'd never considered making one during autumn months. I mean, with all the warm cinnamon rolls, pumpkin breads and apple pies, it didn't even occur to me until... until! My oven suddenly stopped working - mid-brownie baking, no less. 'Twas a sad day.

During the two weeks without an oven I revisited an idea for a crepe cake. I've been wanting to make another one for ages (see my first one here), but other recipes took precedence. So, when I found myself with no means of baking, the crepe cake idea seemed like a shiny new penny. Most of the work is done on the stove top, and that part of my kitchen was still alive and well.


First, I should tell you that this cake was one big experiment from the get-go. With no instruction, I wasn't sure if crepes and Bavarian cream even belonged together. Or if it would mold as beautifully as I'd imagined. Thankfully it did! It's just as dreamy as I'd hoped it would be, and the many-layered texture is divine!

Here's how I put it all together.


First, you'll need chocolate crepes. The recipe I provided makes a big stack of sturdy, eggy crepes. Some grocery stores sell ready-made crepes, and if you wanted to short-cut this recipe, then you could buy them instead. You'll need 12.


The Bavarian cream is simple and delicious. I added a dose of Creme de Cacao to the pumpkin spice mixture to complement the chocolate crepes. It really made a big difference in flavor! 


First, you'll layer 1/2 cup of the pumpkin Bavarian in the bottom of a spring-form pan.


Spread it as evenly as possible with an off-set spatula. 


Add a crepe!


Top with another 1/2 cup of pumpkin Bavarian, and spread as before. Continue this process until all the crepes are used.


Cover the last crepe with the remaining pumpkin Bavarian. This will be slightly more than 1/2 cup. Refrigerate for 4 to 6 hours, or until completely set.


Run a small knife between the top of the pan and the Bavarian cream, then gently remove the spring-form collar. You could serve the cake on the spring-from base, but I turned it onto a cake stand, then used the small knife to gently remove the bottom of the spring-form pan. It unmolded beautifully!


I sure didn't love life without an oven, but if it had never stopped working I may have never attempted this cake. And we LOVE this cake! My honey suggested I bring it to Thanksgiving dinner this year. It tastes much like pumpkin pie, but creamier, and with a little punchy bite of chocolate. I decorated the top center with chocolate wafer rolls, but you could use chocolate shavings or curls, if you prefer.


Pumpkin Bavarian Crepe Cake
[click for printable version]
Yields one  9-inch cake
Prep: 1 hour 30 minutes

The crepe recipe makes 15 to 18 crepes, but you’ll only need 12. This gives you a little room to master your crepe-cooking technique, or, if you get perfect crepes every time, then save the extra ones for breakfast (I suggest a Nutella/whipped cream filling!).
You’ll need a 9-inch spring form pan to make this recipe. This cake needs to chill for 4 to 6 hours, so plan ahead.

Crêpes
6 large eggs
1 cup/280 ml whole milk
1/2 cup/120 ml heavy cream
1/2 tsp vanilla
3/4 cup/95 g all purpose flour
1/4 cup/30 g unsweetened dark cocoa powder
1/8 tsp salt
1/4 cup/30 g confectioners sugar

Place all ingredients in the bowl of a food processor or a blender and process until well combined.  The mixture will be the consistency of heavy cream.
Brush an 8 or 9 inch skillet with melted butter and place over medium heat until butter just starts to smoke.  Pour scant 1/4 cup of batter into the skillet. Swirl the batter with the pan lifted over the stove eye until the bottom is coated with a thin layer of batter.  Place pan on the stove eye and cook until the surface of the crepe loses most of its glossiness and the top is set.  At this point, most recipes will tell you to flip the crepes; mine were cooked through without flipping, so I just slid them out of the skillet and onto a plate. 
Repeat process until all crepe batter is used. If the crepes start to cook before you can get the entire bottom of the pan coated with batter, then reduce the heat to medium-low.
Allow the crepes to cool completely.

Pumpkin Spice Bavarian
24 ounces (about 2 3/4 cups) canned pumpkin puree
2 teaspoon pumpkin pie spice
3/4 cup/150 g sugar
1/3 cup/ 80 ml crème de cacao
2 envelopes/ 1/2 ounce unflavored gelatin powder
2 cups/475 ml heavy cream

Combine the pumpkin, pumpkin pie spice and sugar in a saucepan. Cook over medium-low heat until the sugar is dissolved into the mixture (check by rubbing a bit of mixture between your thumb and forefinger – if grainy, keep cooking).  Cook, stirring the mixture constantly, for 5 more minutes. Cool to room temperature (do not refrigerate).
Combine liqueur and gelatin in a heatproof cup and let stand 5 minutes.  Heat in microwave for 10 seconds or until gelatin turns to liquid.  You can also melt it in a saucepan on the stove top if you don’t have a microwave.
Whisk the gelatin mixture into the cooled pumpkin mixture.
Beat heavy cream in bowl until stiff peaks form, using electric mixer at high speed. Fold pumpkin mixture into the whipped cream.

Assembly
2 cups whipped cream
Chocolate wafer rolls
Cinnamon for dusting

Cover the bottom of an ungreased 9 inch spring form pan with 1/2 cup pumpkin Bavarian cream. Spread evenly with an off-set spatula. Center a chocolate crepe on top of the Bavarian cream in the pan.  Cover the crepe with 1/2 cup of pumpkin Bavarian, spreading it to the edges of the pan.  Repeat the process until all the crepes are used; spread the remaining Bavarian cream over the surface of the last crepe evenly.
Drop the pan on the counter once or twice to settle the cream and remove air pockets.  Cover and refrigerate until mixture sets, 4 to 6 hours.
Run a small knife between the Bavarian cream and the pan. Remove spring form collar. Spread 1 cup whipped cream on the sides of the cake.  Pipe a decorative border of whipped cream around the edge of the cake with the remaining whipped cream, using a large star decorator tip (if desired).  Dust the entire cake with cinnamon and garnish with chocolate wafer rolls.

Refrigerate leftovers.


Pretzel Broomstick Appetizers for the Etsy Blog!

$
0
0

Hi friends! Halloween is fast approaching, so today I'm sharing a SUPER simple recipe for witchy pretzel broomstick appetizers on the Etsy blog. They'll elevate your Halloween party table to a whole new level of cute, and they only require two ingredients!

Hop on overfor all the details and step-by-step photos.


Happiest October to you!

xo
H

Candy Corn Tuxedo Cake

$
0
0


It's been brought to my attention that I'm a candy girl in the truest sense. Meaning, I like all candy. Meaning, I like candy that most people don't like. Just last weekend I was getting major side-eye from the Mr. for eating candy corn and black licorice at a party. Turns out, that candy was meant to be table decoration, but hey - decorate with candy and expect to come up a few pieces short. Am I right or am I right?


This cake is for both candy corn fanatics and detractors. The only prerequisite is - you have to like cake. I used a tried -and-true white cake recipe and manipulated the flavor with extracts. It's pretty hard to nail down the flavor of candy corn (it's mostly just one note - sweet), so I decided to make the cake layers little more interesting. From top to bottom, the white layer is vanilla, the yellow layer is butter rum (I used LorAnn flavoring), the orange layer is flavored with orange extract, and the bottom layer is chocolate, made with dark chocolate cocoa powder. I really love how all the layers taste together - it's kind of like a citrus-y butter candy with a chocolate wallop at the end.


The chocolate elements of this cake were inspired by the new flavors of candy corn available. I mean, have seen S'mores Candy Corn 
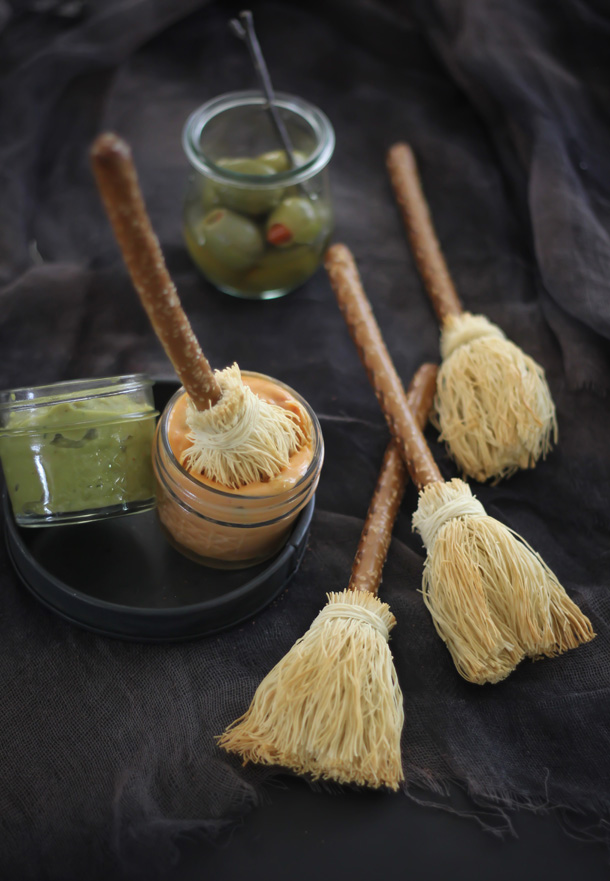
yet? I'd reckon even the most candy corn-eschewing person would have trouble turning that down.

As for the drippy ganache, it's quite spooky looking, don't you think?  I didn't realize how spooky until I saw Kristan's Scary Cherry Cake. Like Kristan, I tend to lean toward cakes that look cute-spooky instead of scary-spooky, and the ganache is right on point for cute.

Continued, click to read more...

Dusty Bones Sugar Cookies

$
0
0

Boy, October seems to be flying by too fast! There are all kinds of things I'm still trying to squeeze in before Halloween - pumpkin carving, pie baking, costume-making - and I'm determined to not let it all go by without celebrating to the fullest.

I've been enjoying the recent box of goodies that Wilton sent me to review, especially this bone cookie pan. I squealed a little when I saw it because I knew I'd not only use it for Halloween treats, but also for dog biscuits for the pug-a-lugs. But first, I wanted to whip up some spooky people treats, and glazed sugar cookies seemed a good fit.

Continued, click to read more...

How to Make Sugar Skulls for Day of the Dead

$
0
0

I adore all things Halloween - the costumes, the candy, the spooky decor - so each year I try to post something special here to celebrate. The past two years I've created movie-inspired cakes (see here and here), but this year I'm doing something a little different. Recently my best friend created the most beautiful ofrenda skull, and it inspired me to make one of my own!

If you're not familiar with sugar skulls and their meanings, then here's the gist of it: Day of the Dead (Dia de los Muertos) is a Mexican holiday that takes place October 31, November 1st and 2nd. During this time, spirits are welcomed back to their homes with decorated altars made by their loved ones. Sugar skulls are an important part of this decor and they commonly bear metallic embellishments, brightly colored icings and the name of the deceased loved one being honored.

I'd never made sugar skulls before, so I thought it'd be fun to document my first attempt with a video (you can find that a little later in this post). It was a fun process, and reading all the history and tradition behind the holiday really made it meaningful.


It wasn't too hard to choose a subject for my sugar skull. Mexican painter Frida Kahlo is one of my favorite artists of all time. Her work is beautiful, tragic, ugly, and honest. It's full of pain but also the love of life. Much of her life was spent in physical pain due to a bus accident that shattered her spinal column, and she also suffered emotional pain because of the man she chose to love (the marriage of a dove to an elephant, some called it - you can guess which is which). But from all this pain and loss and love grew beautiful works of art from her hands, most of them self-portraiture.

Speaking of hands - I bet you saw the above picture and wondered why my sugar skull is wearing a hand as an earring. You can see Frida wearing these in "Self Portrait Dedicated to Dr Eloesser". The earrings (called milagros) are wax pieces shaped in the form of the body part that a person wants to be healed. The earrings were a gift from Pablo Picasso, during the time she was recovering from a hand injury.


But enough backstory for now - on to the creative deets! To get started, you'll need a sugar skull mold. I love the look of the larger 3D skulls (more room to decorate!) and I found a nice mold here. According to this site, good meringue powder is also a must! I followed their advice and used CK products meringue powder, and the blanks turned out beautifully. You can see the results of my very first attempts in the video embedded below.


You'll need to whip up a batch of royal icing to assemble the skulls, which shouldn't be a problem since you'll already have the meringue powder on hand. Before putting the two halves together, the middles of the skulls need to be scooped out to about 1/2 inch thickness. This lightens the weight of the skull so they can stand upright. Only scoop out the skull portion - leave the chin portion as-is.

Continued, click to read more...

Candy Bar Cheesecake Brownie Mountain

$
0
0

It's that time of year again when we're all staring down a bowlful leftover Halloween candy and feeling some ambivalence. We certainly can't eat it all, right? But tossing out perfectly good candy is not an option. This year I decided to put my leftovers to good use and make something that's truly share-worthy. I present to you, Candy Bar Cheesecake Brownie Mountain.


I often gush about new recipes, but I'm not exaggerating when I say this one is TOPS. It's so easy to make and crazy town delicious. The brownie and cheesecake both have mini chocolate bars baked inside. You can use just about any fun-size chocolate bar you have on hand. My brownie mountain contains a medley of Reese's Cups, Snickers, Milky Ways, Kit Kats and Rolo's (clearly, I have no self-restraint when it comes to these things... sorry not sorry).


The entire dessert is finished with caramel sauce, roasted salted peanuts and more mini candy bars. Cutting this "Mountain" into pieces is half of the fun, because it's like a candy bar treasure hunt. Each slice is a little different. My first piece had half a Reese's cup and part of a Snickers bar, mmmm-mmm!

I took plenty of step-by-step pictures to show you how to make your own. Like I said, it's easy - easier than you'd think! You'll need an 8x8-inch square pan to get started.


First, make the brownie layer. After you mix up the brownie batter, spread half of it in a pan and top with your choice of mini candy bars (I used about 10). Top with the remaining batter and bake!


Bake the cheesecake layer in the same pan, or in an identical pan to the one you used to bake the brownie layer. Mix up the cheesecake batter, pour it in the pan and press in about 10 mini candy bars. Bake!


You'll notice I line the pans with parchment paper - this is a must. Make it so that the edges of the parchment overhang all four sides, then you can lift the brownie and cheesecake out of the pan easily. I removed the brownie layer from the pan when it cooled completely, but the cheesecake layer needs to cool in the pan and then in the refrigerator overnight to ensure that it removes in one flawless piece.

I suggest chilling both layers overnight so that they cut easily and you can handle them without fear of them falling apart.


I love this cheesecake recipe because it requires no water bath. But that means it'll puff up during baking and sink down when it's removed from the oven, leaving a puffy edge when it's completely cooled. Cut off the puffy edge to level the cheesecake before assembling.


The amount removed isn't much, but it's enough to crumble over a bowl of ice cream!


After you've leveled the cheesecake, cut it in half diagonally.


Cut the brownie layer in half diagonally. 


Mmm, hidden treasure!


To begin assembly, place about 2 or 3 tablespoons chocolate-hazelnut spread on one piece of cheesecake and spread evenly. If you're not into Nutella, then you could use chocolate ganache or even cookie butter.


Press the two pieces together. 


Hold for a few seconds and then release. The two pieces should stand upright on their own. 


Transfer the cheesecake portion to a 10-inch serving plate (or cake stand) with an edge. Cover the sides of the cheesecake with the chocolate spread.


Press a brownie layer on each side of the cheesecake layers. 


Cover the exposed cheesecake edges with Nutella; fill in any gaps between the layers. Leave the front and back unfrosted.


Drizzle on the caramel sauce and top with everything but the kitchen sink!


This Brownie Mountain requires some creative cutting as you travel toward the center. Cut vertical slices, and then divide them into manageable pieces before plating them. The first piece yields one very large piece, or two pieces divided at the middle. Trust me, it's not difficult to figure out once you get started, and it becomes more intuitive as you go.


I found the best candies to use inside the layers are the softer sort, like Reese's cups, Milky Way bars and Rolo's. They make for neater slices. The Kit Kat wafers and peanut Snickers bars were a little more resistant to the knife and made slicing messy. I suggest placing those bars on top of the dessert, so that you can clearly see where to cut around them.

I can't help but imagine this as a centerpiece on a holiday table. The shape reminds me of a Christmas tree, which gives me all kinds of ideas for new variations. I'm thinking gingerbread or peppermint would make a mighty fine mountain worth scaling!


Candy Bar Cheesecake Brownie Mountain
[click for printable version]
Yields 16 servings

Start one day ahead. The brownie and cheesecake layers need to chill overnight before assembly. This recipe requires prepared caramel sauce. Avoid using the prepared caramel in squeeze bottles, as it's too thin. Go for the jars of thick caramel in the ice cream aisle - OR, if you have homemade salted caramel at the ready, then definitely use it!

Brownie layer
4 eggs
1 cup granulated sugar
1 cup brown sugar
1 cup/ 226g unsalted butter, melted
1 1/4 cups unsweet cocoa, sifted
2 teaspoons vanilla extract
1/2 cup all-purpose flour, sifted
1/2 teaspoon sea salt
10-12 fun-size candy bars (approximately 1 to 1.5 oz. each) Note! soft varieties like Reese's cups, Milky Way, Three Muskateer and Rolos work best.

Cheesecake
24 ounces full fat cream cheese, softened
1 cup granulated sugar
5 large eggs
1/4 teaspoon salt
1/2 teaspoon vanilla extract
10 fun-size candy bars (approximately 1 to 1.5 oz. each) Note! AGAIN, soft varieties like Reese's cups, Milky Way, Three Muskateer and Rolos work best.

Assembly
8 to 10 ounces prepared caramel syrup
2/3 cup chopped peanuts
10 ounces Nutella chocolate-hazelnut spread (or prepared chocolate ganache)
Assorted chocolate bars of all kinds, as much as you like; Snickers, KitKat, M&M's etc.- no rules!


Make the brownie layer: Preheat oven to 300 degrees F. Grease an 8x8 square pan with vegetable shortening and line it with parchment so that the paper overhangs to edges. Grease the bottom portion of the parchment paper and place another sheet of parchment, crosswise, so that the paper overhangs the other two edges of the pan.

In a mixer fitted with a whisk attachment, beat the eggs at high speed  until lightened and fluffy, about 5 minutes. Add both sugars. Add the remaining ingredients and mix on medium speed to combine. Scrape down the bowl as needed.

Pour half of the batter into the prepared pan and spread evenly. Press the candy bars, evenly spaced, into the brownie batter. Cover with the remaining brownie batter and smooth the top with an off-set spatula; bake for 45-50 minutes. The brownie layer is done when a toothpick tester inserted in the center comes out clean. Remove from the oven and allow to cool completely. Remove the brownie by gently lifting it out by the four overhanging parchment corners. Transfer the brownie to a large plate and cover with plastic wrap. Refrigerate.

Wash the pan and line as previously instructed with the brownie layer.

Make the cheesecake layer: Preheat the oven to 325 degrees F.
Cream together the cream cheese and sugar until fluffy. Add the eggs, one at a time, beating well as they are added. Add the salt and vanilla extract. Pour the batter into the prepared pan and top with candy bars, evenly spaced. Using your index finger, press the candy bars down into the batter until they are completely submerged. Bake for 1 hour to  1 hour 20 minutes (check at 1 hour), or until the cheesecake is firm in the center and well-browned on top. Allow the cheesecake to cool completely in the pan. Cover the pan and transfer to the refrigerator. Allow both brownie layer and cheesecake layer to chill overnight.

Assemble! Cut off the puffy edge to level the cheesecake before assembling.
After you've leveled the cheesecake, cut it in half diagonally. Cut the brownie layer in half diagonally. 
Place about 2 or 3 tablespoons chocolate-hazelnut spread on one triangular piece of cheesecake and spread evenly. If you're not into Nutella, then you could use chocolate ganache or even cookie butter. Press the two cheesecake pieces together and hold for a few seconds and then release. The two pieces should stand upright on their own.
Transfer the cheesecake portion to a 10-inch serving plate (or cake stand) with an edge. Cover the sides of the cheesecake with the chocolate spread. Press a brownie layer on either side of the cheesecake layers. Cover the exposed cheesecake edges with Nutella; fill in any gaps between the layers. Leave the front and back unfrosted.
Drizzle on the caramel sauce and top with nuts and chopped candy bars. 

To serve, cut the cheesecake in vertical slices and divide larger pieces into smaller servings before plating. Store leftovers in the refrigerator.


Confetti Cupcakes with Cake Batter Frosting for Three!

$
0
0

I'm super excited about today's blog post because, not only do I get to share confetti cupcakes with you (which are my favorite!), but we're also having a virtual baby shower! My blog buddy Jessica of How Sweet It Is will welcome her new baby in December, so a whole bunch of us food bloggers are throwing her an online shindig. I know she'll be the best mama ever, and good gracious will that child ever be well fed!


The theme of the shower is trashed up foods - and who doesn't love a good homemade Funfetti cupcake with too many (and I mean waaaay too many) sprinkles.  So no, It wasn't difficult to decide what to make for Jessica. We share an intense (insane?) love of sprinkles and confetti cupcakes seemed just perfect to me. This recipe is a riff on her One Bowl Vanilla Cupcakes for Two. Since her family is increasing from two to three (er, I'm assuming), I decided to develop a recipe that makes exactly three cupcakes.

Now, I realize it will be a good long while before the baby will be eating cupcakes, but it's good to think ahead, right? And something tells me this kid will be introduced to sprinkles early on.


As for the cake batter frosting? It was also inspired by Jessica's magic, specifically this sprinkled Cake Batter treat. I try to avoid eating buttercream straight from the bowl (hehe, yeah right) but this one is irresistible!  I already have plans to shmear it over a batch of Rice Krispy treats.

Also, friends, please take a gander at all the fabulous trashed up (read: freaking delicious) foods that my blog buddies have created. You'll find the entire list with links just below the cupcake recipe.


The only important thing I have left to say is - Congratulations Jessica! We're all so excited for you! 


Confetti Cupcakes with Cake Batter Frosting for Three
[click for printable version]
Yields 3 standard-size cupcakes
Total time 25 minutes

I like a lot of frosting on my cupcakes, especially when it tastes like cake batter. If you're less inclined to eat so much frosting, the recipe can be halved.

Cupcakes
1 large egg
3 tablespoons sugar
3 tablespoons vegetable oil
1 teaspoon vanilla extract
1/2 cup/60 g all-purpose flour, sifted
1/2 teaspoon baking powder
pinch of salt
2 tablespoons milk
2 tablespoons confetti sprinkles, plus more for garnish

Cake batter frosting
1/2 cup/113 g unsalted butter, softened
1 cup/120 g confectioners' sugar
1 teaspoon vanilla extract
pinch of salt
2 1/2 tablespoons French Vanilla cake mix (I use Betty Crocker, of course!)
1 to 2 tablespoons milk, if needed

Make the cupcakes: Preheat oven to 350 degrees F. Line a muffin pan with three cupcake papers.

In a large bowl, combine the egg, sugar and vanilla using a whisk. Whisk in the oil. Add the flour, baking powder and salt; stir together until just combined, then add the milk. Fold in the two tablespoons of confetti sprinkles. Divide the batter between the three cupcake liners, filling them no more than 3/4 full.

Bake for 12 to 14 minutes, or until the cupcakes have fully crowned and spring back when pressed in the center. Let cool completely.

Make the frosting: Cream the butter in a large bowl with an electric mixer. Add the confectioners' sugar and beat to combine. Beat in the vanilla.

Add the pinch of salt and cake mix; beat together. Add milk one tablespoon at a time until the mixture is lax enough to pipe. Transfer the frosting to a piping bag fitted with a large star tip and pipe onto cooled cupcakes. Garnish with sprinkles.


trashed up salads


trashed up cocktails


  1. Minimalist Baker - Bourbon Pumpkin Milkshakes
  2. Stylish, Stealthy & (sometimes) Healthy - Apple Cider Shandy
  3. A Spicy Perspective - Preggy Punch Mocktail
  4. Honestly Yum - Maple Bacon Pisco Sour
  5. A Thought For Food - Mezcal Citrico Cocktail
  6. A House in the Hills - Pomegranate Rosemary Spritzer
  7. The Novice Chef - Ginger Bourbon Apple Cider


trashed up burgers


trashed up tacos


  1. With Food + Love - Harvest Hash Breakfast Tacos


trashed up desserts


  1. Love & Olive Oil - Loaded Junk Food Brownies
  2. Lauren’s Latest - Bakery Sugar Cookies
  3. Hummingbird High - Breakfast Cereal Cake Donuts
  4. Simple Bites - Lemon Layer Cake
  5. She Wears Many Hats -  Chocolate Covered Grapefruit


trashed up pizza

  1. i am a food blog - Grilled Cheese Pizza
  2. My Life as a Mrs - Chili Cheese Dog Pizza
  3. Yes I Want Cake - Roasted Pumpkin Pizza
  4. Dula Notes - Pork Bahn Mi Pizza
  5. Take a Megabite - Roasted Beet Pizza
  6. Bakers Royale - Trash’d Street Tacos


Black Truffle-Pistachio Chocolate Cake

$
0
0

There's no shortage of inspiration when it comes to using classic fall flavors in my baking. I love cinnamon spiced apples, anything pumpkin-filled and I've been dreaming of what to do with a fat butternut squash that's been sitting on my kitchen counter for a good two weeks now. But after sampling some unique chocolates, I was inspired to make something a little less traditional this week.

Black truffles are most commonly used in savory dishes, but chocolatiers (such as the handsomely bearded Mast Brothers) have been incorporating them into chocolate. After sampling some, I was instantly smitten. Black truffles have a deep, earthy flavor that, to me, evokes feelings of the fall season. Depending on the variety, they've been described as "reminiscent of undergrowth, wet earth ... or dried fruit with a hint of cocoa". The trouble is, truffles are expensive, but luckily there are less expensive ways to incorporate them into your confectionery.


First of all, the cake is topped with Urbani's black truffle bonbons (I bought mine here
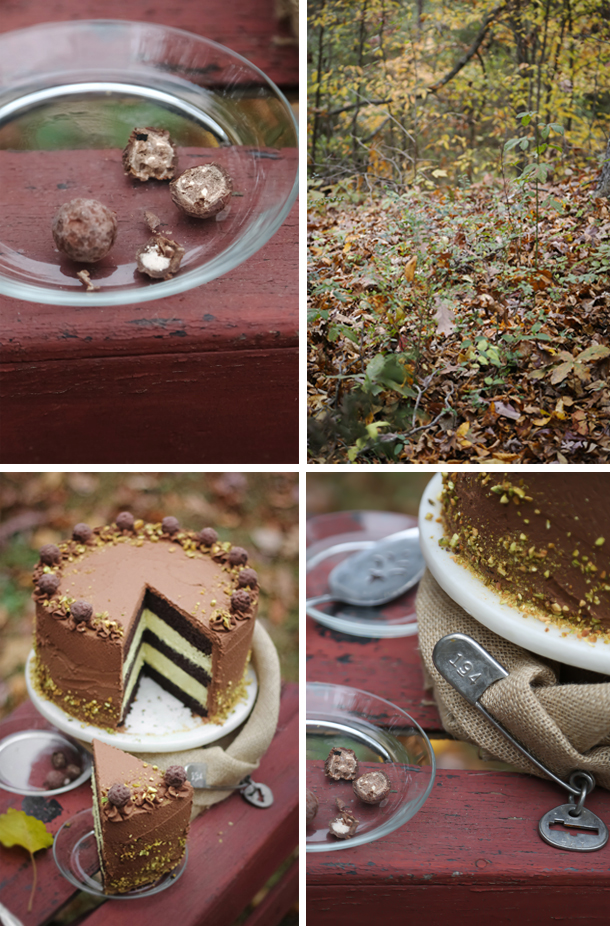
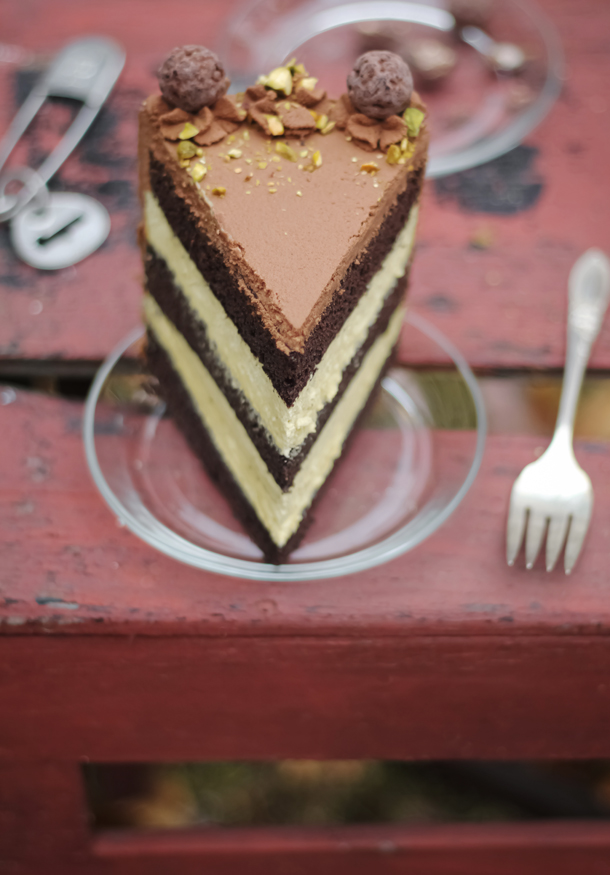
). They're small, dense little candies filled with black truffle pieces, nuts and chocolate. They're rich and earthy, and after tasting one I knew they were destined to adorn a chocolate cake filled with pistachio cream.

Secondly, the chocolate frosting is infused with a small amount of black truffle oil. Now, as far as I know, da Rosario is the only brand of truffle oil that is 100% organic and natural. Most other truffle oils contain no real truffles and instead are made with synthetic flavoring. That said, only a very small amount of truffle oil is used in the frosting, so purchase what your budget will allow. In general, real is always better than fake, but I view using the oil in the same way I view using artificial candy flavorings. It's okay to use in small quantities, and when options are limited.


The pistachio filling is one of my favorite elements of this cake. It's hugely rich with pistachio flavor, and that's thanks to 11 ounces of pure pistachio paste. I couldn't find it locally, so I ordered it online. You can find it here or in bulk here. It's truly worth seeking out!


I really love the way this cake turned out. In fact, I told my husband I might enter it in the Tennessee State Fair next year. The black truffle flavors mixed with pistachio makes me think it'd be right at home at a fine Italian restaurant. Yesterday I had a slice with strong coffee, and let me tell you, I'm having trouble imagining anything better!

If you're new to the flavor of black truffles, I suggest you familiarize yourself with it before embarking upon this cake. It's an acquired taste for some people. Kitchen specialty shops often have oil tasting stations, which is a good way to explore their savory notes as the oils are usually served with garlicky seasonings and baguette rounds. To get an idea of how the flavor will taste in chocolate frosting, seek out a small chocolate bar or bonbons with black truffle shavings incorporated.


Black Truffle-Pistachio Chocolate Cake
[click for printable version]
Source: Recipe by Heather
Yields one 9-inch triple layer cake

I recommend da Rasario 100% organic black truffle oil for the frosting. Truffle Hunter black truffle oil is also good and made with real black truffles, but be aware its flavor is also enhanced synthetically. Pungent oils must be used sparingly. If your truffle oil is mild, then the amount of oil added to the frosting can be increased to taste.

Dark chocolate cake
8 ounces dark chocolate, chopped
1/2 cup/216 g butter, softened
2 cups/440 g light brown sugar, firmly packed
3 eggs
1 teaspoon vanilla extract
2 cups/380 g all-purpose flour
1/4 cup/30 g dark cocoa powder
2 teaspoons baking soda
1/2 teaspoon sea salt
1/2 cup/121 g buttermilk
1 cup/235 ml piping hot water

Preheat oven to 350°F.
Grease three 9-inch cake pans and line the bottoms with circles of parchment paper.
Melt chocolate in a small saucepan over low heat, or melt in the microwave in a microwave-safe bowl at 30 second intervals. Set aside.
Beat the butter with an electric mixer until creamy. Add sugar and beat until combined. Add eggs one at a time, beating each until just incorporated. Stir in melted chocolate and vanilla.
Sift together the flour, cocoa powder, baking soda and sea salt; add to the butter mixture alternately with the buttermilk, beginning and ending with the flour mixture. With the mixer running, gradually add in the hot water. Mix until the batter in consistent (batter will be thin).
Pour batter into prepared pans and bake for 30 minutes, or until a toothpick tester comes out clean. Cool in the pans on wire racks 10 minutes; remove cakes from the pans and cool completely on wire racks.

Pistachio filling
1/4 cup/32g all-purpose flour
1 teaspoon fine grain sea  salt
2 cups/460g buttermilk or whole milk
2 cups/1 pound unsalted butter, softened
1 cup/200g granulated sugar
1 can (11 ounces) pistachio nut paste

In a medium saucepan, whisk together flour and 1/2 cup of the milk until smooth. Set over medium heat and let cook for 3 minutes, or until slightly hot. Whisk in remaining milk and salt. Whisk constantly until the mixture is thickened (almost like pudding). Remove from heat and pour into a separate bowl. Place in the refrigerator until completely chilled. When cool, mixture will be thick like set custard.
In a large bowl (or bowl of a stand mixer, if you have one) beat the butter and sugar together until fluffy. Beat in chilled flour mixture one tablespoon at a time on medium-high speed. When all the flour mixture is added beat on high speed until light and fluffy, about 6 minutes. Rub a little frosting between your fingers, if sugar granules remain, beat for 4 more minutes, or until granules cannot be detected with fingers. Beat in the pistachio paste a little at a time until well incorporated.
Place a chocolate cake layer on a cake stand or serving plate and top with three cups of pistachio filling. Top with another cake layer and spread the remaining 3 cups of filling over the second layer. Top with the third and final layer. Refrigerate the filled cake while you make the frosting.

Black Truffle Chocolate Frosting
8 ounces semisweet chocolate, chopped
1 1/2 cups heavy whipping cream
1/4 teaspoon black truffle oil (add more to taste, but be careful – it’s strong stuff!)
12 black truffle bonbons (such as Urbani) or black truffle chocolate squares (such as Mast Brothers)
4 ounces ground pistachios

Combine the chocolate and whipping cream in a saucepan. Cook over medium heat, whisking occasionally. When the mixture is steaming and the chocolate is melted remove from the heat. Add the truffle oil (add more to taste, but be careful – it’s strong stuff!).  Whisk the mixture until the chocolate is completely melted and incorporated into the cream. Pour into a shallow dish and chill until the mixture reaches a pudding-like consistency, about 1 hour.
Beat the mixture with an electric mixer until it is thick and spreadable. Transfer 2/3 cup of frosting to a piping bag fitted with a large star tip. Frost the cake evenly with the remaining icing and pipe rosettes around the top edge of the cake.  Top every other piped rosette with a black truffle bonbon. Sprinkle the top with ground pistachios. Place the cake on a large baking sheet and toss ground pistachios along the bottom edge of the cake, allowing the excess to fall back into the pan.

Store the cake in the refrigerator.  Serve chilled or let slices come to room temperature before serving – it’s good both ways!


Adorable Acorn Cookies for the Etsy Blog!

$
0
0

Hi friends! I hope everyone is having a lovely autumn and baking up a storm. I've been a busy baker myself, finding inspiration in steaming mugs of cider, leathery fallen leaves and watching scant snow flurries dance around in the porch light.

I love finding inspiration close to home, and these acorn cookies were inspired by a hop over the fence and a walk through the woods behind our house. They're super easy to make and so season-appropriate. If you have little ones, they'll love helping you add "caps" to the acorns.

You can find the recipe along with step-by-step instructions here on the Etsy blog.


Classic Apple Pie

$
0
0

Thanksgiving day preparations are in full swing around these parts, and the Mister and I have more dinner invites than we can shake a stick at.  My contribution to the feast(s) will likely be dessert, so I figure now is a great time to brush up on my pie-making technique. It's also feels good to add a classic recipe to the blog roster.

Is there anything better than buttery, cinnamon-kissed, classic apple pie?  Maybe apple pie à la mode? Apple buttermilk pie? It's hard to say.


I'd like to tell you that I slaved over the leaf cut-out crust, but it's really quick work when you use these little gizmos. If you have experience cutting out sugar cookies, then you can certainly make this fancied-up pie crust. It's all a matter of layering the cut-outs near the edge of the pie, and working your way inward.

Making pie crust in the food processor is a snap, but if you consider it a chore then you can certainly substitute a ready-made crust. If you opt for the cut-outs then you'll need at least three refrigerated pie crusts (that's 1 1/2 boxes of refrigerated roll-out dough). That's a good thing to keep in mind when making your shopping list.


You'll need three large apples for this pie. I went for the largest, firmest apples I could find, which turned out to be Gala apples at my grocery store. Granny Smith is also an excellent choice for pies.

There are many ways to vary this pie, but I like it best with a dollop of whipped cream or vanilla ice cream. A drizzle of salted caramel never hurt anything, either.


Classic Apple Pie
[click for printable version]
Yields one 9-inch pie

Pie crust (yields 2 crusts)
2 1/2 cups/310 g all-purpose flour, plus more for dusting
1 teaspoon salt
1 teaspoon sugar
16 tablespoons/226 g cold unsalted butter, cubed
4 tablespoons ice water, additional as needed

In a food processor combine the flour, salt, and sugar; pulse several times to combine. Add butter and pulse until mixture resembles coarse meal, with just a few pea-size pieces remaining.
Remove the lid and sprinkle 2 tablespoons ice water over the mixture. Re-attach lid and pulse until the dough is crumbly but holds together when squeezed with fingers (if needed, add up to 2 tablespoons more ice water, a little at a time).
Turn dough out onto a work surface and divide in two equal pieces. Form each piece of dough into a 3/4-inch-thick disk. Wrap tightly in plastic, and refrigerate until firm, at least 1 hour.
Unwrap dough; place on a floured surface. Flour a rolling pin and roll the dough to a 14-inch round. Roll the dough onto the rolling pin and carefully unroll over a 9-inch pie plate. Gently fit into bottom and up sides of plate.

Trim overhang to 1 inch; fold overhang under itself. Re-roll the scraps into one long piece and cut into three even strands (use some of the reserved pie dough if you don’t have enough scrap dough); braid the strands together. Brush the edge of the fitted pie crust with water and lay the braid on top of the damp edge. Press gently to adhere.  Refrigerate while you prepare the filling.


Pie filling
1/2 cup/100 g sugar
1/2 cup/65 g all-purpose flour
1/2 teaspoon ground cinnamon
1/4 teaspoon ground nutmeg
5 cups thinly sliced peeled apples (about 3 large apples)
1 tablespoon unsalted butter
Egg wash: 1 egg beaten with 1 tablespoon water

Preheat the oven to 425 F. 
Stir together the sugar, flour, cinnamon and nutmeg in a large bowl. Add the sliced apples and toss to coat. Pour the mixture into the prepared pie crust and dot with butter. Return to the refrigerator.

Remove the second pie crust from the refrigerator and roll to 1/4-inch thickness. Using a small cookie cutter (1 1/2 to 2-inch) cut as many shapes as you can from the dough. Re-roll crust and cut out more shapes; repeat until all the dough is used. Remove the pie from the refrigerator and layer the shapes on top of the pie starting at the outer edge and working inward. Using a pastry brush, lightly cover the entire crust with egg wash.
Bake 30 to 35 minutes or until the crust is golden brown and the juice is bubbling. 

Note: If you find the edge of the pie crust is becoming too brown, cover it gently with aluminum foil or a pie crust shield. 


Salted Caramel Eggnog Shooters

$
0
0

It's hard to believe we're getting ready to bid November farewell. I can almost hear those sleigh bells jingling, can you?

When it comes to party fare, I'm always searching for the perfect bite that will satisfy guests and make them feel special. But since it's also the busiest time of year - especially for home bakers - simplicity is key. That's why I love this recipe so much.

Creamy eggnog pudding takes all of five minutes to whip up, and after a quick chill, it's layered with prepared caramel in shot glasses. The shots are topped with whipped cream and Stacy's Salted Caramel Pita Chips - the latter provides a crunchy contrast to the creaminess of the pudding. If you're like me, you'll forgo the spoon entirely and use the chips instead - so keep a bowlful close by!


The chips have a rich, buttery, authentic caramel flavor (which is rare joy in a world of artificially flavored snack foods), and they have just the right amount of salt and sweet. They are certainly delicious enough to serve on their own, but their sturdiness makes them great for dipping.


These little desserts are about six-ish bites of salted caramel goodness, which is just enough to indulge your sweet tooth without overdoing it. They look elegant all lined up on a fancy serving tray and no one will guess that they took just minutes to put together!

Find out more about Stacy's Chips on their website or on their Facebook page. Stacy's Salted Caramel flavor is available for a limited time only - from November 2014 to December 2014, so be sure to look for them in the Deli section at your local grocery store.

Salted Caramel Eggnog Shooters
[click for printable version]
Yields six 2 ounce servings

1 cup commercially prepared eggnog
2 tablespoons granulated sugar
1 1/2 tablespoons cornstarch
7 ounces caramel ice cream topping (the thick jarred variety)
3/4 cup whipped topping or homemade whipped cream
Freshly grated nutmeg
Stacy's Salted Caramel Pita Chips, for serving

Have ready six 2 ounce empty shot glasses.

Combine the eggnog, sugar and cornstarch in a medium saucepan. Place over medium-high heat and bring to a bubble while whisking constantly. When the mixture thickens, remove it from the heat and transfer to a bowl.
Cover the surface of the pudding with plastic wrap and let chill for 15 minutes. Stir the pudding and transfer to a piping bag or a zip-top bag with the corner snipped.
Transfer the caramel to a piping bag or zip-top bag with the corner snipped.
Pipe a little of the pudding into each shot glass, followed by the caramel. Alternate until all of the eggnog pudding and caramel is used.
Top each shot with the whipped topping and garnish with freshly grated nutmeg. Just before serving, place a Stacy's Salted Caramel Pita Chip upright in each shooter.
Serve the shooters next to a bowlful of the pita chips for easy dipping and eating. Spoons are optional.


Disclosure: This post is sponsored by Stacy's Pita Chips. Regardless, I only recommend products or services I use personally and believe will add value to my readers. Thank you for supporting our sponsors!


Orange Chiffon Cake with Sparkling Cranberries

$
0
0

When I sit down to Thanksgiving dinner this Thursday, I know there's going to be a little more butter and cream in the mashed potatoes. The cornbread stuffing will have an extra dose of love (read: bacon fat) and I'll help myself to second servings (maybe thirds) of my mom's famous garlic cheese grits.

Admittedly, that's a lot of heavy food. That's why I'm bringing this chiffon cake for dessert. It's light and fluffy, and so fragrant with citrus that it perfumes its surroundings.


How do you feel about fresh cranberries? I've been a little wary of their tartness, so I've mostly avoided using them as a garnish. But these! They are delicious because they get a bath in hot sugar syrup and then a toss in sparkling sanding sugar. They are a perfect bite of tart, crunch and sweetness and they crack between your teeth which makes them addictively poppable. I love how they look like sparkling gems on top of this cake. It was fun making them because they are so simple and beautiful.


This cake is a nice, light addition to a Thanksgiving feast, but it will also beautiful on a Christmas dessert buffet (those cranberries!). If you've never made a chiffon cake, then you should know that there's quite a bit of egg-whipping involved. A standing mixer is helpful and preferred for this recipe.

I added marshmallow cream to the glaze on this cake, which is a good counter to all the feather-lightness. If marshmallow cream is not available to you, then it may be omitted from the recipe. This cake is still lovely with a basic confectioners' glaze.


Orange Chiffon Cake with Sparkling Cranberries
[click for printable recipe]
Yields one 10-inch cake

This recipe requires the use of a tube pan.

Cake
2 cups/240 g all-purpose flour
1 1/2 cups/300g granulated sugar
3 teaspoons baking powder
1/4 teaspoon salt
7 eggs, separated
1/2 cup/125 ml orange juice (2 to 3 oranges, freshly squeezed)
1/2 cup/125 ml vegetable oil
1/4 cup/50 ml water
1 teaspoon vanilla extract
2 teaspoons orange extract
2 tablespoons orange peel
1/2 teaspoon cream of tartar

Glaze
1 cup/130 g confectioners’ sugar
2 tablespoons milk (plus more for thinning, if needed)
3.5 ounces marshmallow cream (about half of a 7 ounce jar)
1/2 teaspoon orange extract

Cranberry garnish
1/2 cup/125 ml water
1/2 cup/100 g granulated sugar
8 ounces fresh cranberries
6 ounces sanding sugar
Grated orange peel, if desired

Sift the flour, granulated sugar, baking powder and salt into a large bowl; make a well in the center. In the bowl of a stand mixer, beat the egg yolks until thickened and light yellow in color, about 7 minutes.
Beat in the orange juice, oil, water, vanilla, orange extract and orange peel. Pour the wet ingredients into the well of dry ingredients; combine with a large spoon or spatula until well incorporated.
In a separate bowl, beat the egg whites on medium speed until foamy. Add the cream of tartar; beat until stiff peaks form. Gradually fold into batter with a large rubber spatula.

Transfer the batter to an ungreased 10-inch tube pan. Bake at 325°F for 55 to 60 minutes, or until the cake springs back when lightly touched. Immediately invert cake; cool completely. Loosen the cake from the sides of the pan with a butter knife; remove the cake and place on a serving platter. Let cool completely.

For the glaze, combine the confectioners’ sugar and whisk in the milk 1 tablespoon at a time. The mixture will be thick. Stir in the marshmallow cream and extract. Thin the mixture with additional milk, if needed. The mixture should be thick enough to fall in a thick ribbon from a spoon. Pour glaze evenly over the top of the cooled cake.

For the cranberry garnish, heat the water and granulated sugar in a small saucepan until the sugar is dissolved. Place the fresh cranberries in a shallow dish and pour the sugar syrup over them. Stir them gently, then transfer them to a wire rack placed over a length of parchment. Allow them to dry slightly before rolling them in the sanding sugar. Garnish the top of the cake with the cranberries. Add grated orange peel, if desired.

Store cake loosely covered on the counter top or under a glass cloche.


Lollipop Sugar Cookies

$
0
0

Happy first day of December, friends!

Let's kick things off right with a treat that's fun and festive. I just love these swirly lollipop sugar cookies. They make a cute edible gift and they'll be right at home on any holiday cookie tray. I plan on making a big batch of these for my cookie swap this year. They're easier than you'd think!


Most any sugar cookie recipe will work with this technique, but if you don't have one then you'll find a really great recipe to use at the end of this post. Just divide the cookie dough into three even pieces, and tint each piece a contrasting color. Then you'll pinch off about a 2-inch piece of each color of dough, roll each into a rope, and then roll the three colors together into one big rope! As you roll you'll notice the colors will start to twist and make a candy stripe. It's pretty intuitive once you get started!

After you have approximately 10-inches of cookie rope, coil it up and place the cookie on a parchment-lined baking sheet. Insert a lollipop stick straight through the middle of the cookie, making sure to pass through all the coils without poking the lollipop stick through the top of the cookie. After that, repeat, repeat, repeat until all the dough is used.


After the cookies bake and cool, you can pick them up by the stick - just like a lollipop! I like to package these individually in cellophane wrappers an tie them with ribbon or baker's twine. They are so pretty displayed standing upright in a Styrofoam base, or even tied onto a gift-wrapped package (which is like getting a present on top of a present!).


Lollipop Sugar Cookies
[click for printable version]
Yields 18 to 20 cookies
Source: The lollipop technique was first spotted at Occasional Cookies, and then on Sweet Sugarbelle's blog. The cookie recipe is my own.

1 cup/226g unsalted butter, softened
1 1/2 cups/300 g granulated sugar
1 egg
1 1/2 teaspoons vanilla extract
1/2 teaspoon almond extract
2 3/4 cups/350 g all-purpose flour
1 teaspoon salt
Red gel food color
Leaf green gel food color
Dark green food color
Lollipop sticks

Preheat oven to 350°F. Line two (or more) baking sheets with parchment paper.
In a large bowl, beat butter and sugar with an electric mixer at medium speed until well blended. Beat in egg and extracts; mix well. Combine flour and salt; add to butter mixture. Beat until well blended. Divide dough into three equal pieces. Tint each piece a different color with the gel food color (I kneaded it into the dough with my hands, but you could use the mixer on low speed).  The dough should not be sticky, but if it is,then refrigerate it for 15 minutes.

Pinch away a 2-inch piece of each color dough and roll each piece between your palms to make small, fat logs. Stack the logs on top of each other, then roll them into one long 10 to 12-inch rope. The dough will twist and stripe as you roll it.  Coil the rope into a 3-inch round and transfer to a parchment lined baking sheet. Insert a lollipop stick straight through the middle of the cookie, making sure to pass through all the coils without poking the lollipop stick through the top of the cookie.

Repeat with remaining dough. Space cookies at least 2-inches apart on the cookie sheet.

Bake 10 to 12 minutes or until fragrant and puffed. Cool on the pan for 10 minutes; transfer the cookies to a cooling rack and let them cool completely. 
Package in cellophane wrappers tied with pretty ribbon.


Salty-Sweet Peanut Butter Cup Bars

$
0
0

This recipe is so easy, it feels like cheating. It's one of those treats you can turn to in the most harried days of the Christmas hustle and bustle. In about 5 minutes you can have a weighty pan of candy made, and after a short chill in the fridge, they're ready to be sliced up and packaged for gift giving.


You're probably aware by now that I'm a HUGE fan of salty and sweet together, especially when peanut butter and chocolate are involved. I love Maldon flake sea salton these bars, but Fleur de Sel or any other sea salt would be wonderful too. Or, if you'd rather keep things sweet, the salt can be omitted - but I urge you to think about it first. Or perhaps taste-test one lightly salted piece before adding it to the entire pan.


You can package the bars in cellophane bags tied with pretty ribbon, or place them  in cupcake liners and gift them in a pretty holiday tin. They're potent, so I usually cut them no larger than 1x3-inches.


Peanut Butter Cup Bars
[click for printable version]
Yields 12x8 or 13x9 dish
Prep: 5 minutes, total time about 45 minutes

The peanut butter portion of these bars is almost cookie-like, thanks to the addition of graham cracker crumbs to the batter. If you're short on time, buy graham cracker crumbs and chopped peanuts already prepared from the grocery store.

1 cup/226 g unsalted butter
1 cup/250 g creamy peanut butter
2 cups/90 g graham cracker crumbs
1/2 cup/ 4 oz. finely chopped peanuts
2 1/2 cups/320 g confectioners' sugar
1 cup/6 oz. chocolate chips
2 tablespoons vegetable shortening
Maldon flake salt, optional

Line a 12x8 or 13x9-inch dish with parchment paper with two sides overhanging, or butter the pan generously.
In a 2 quart microwave-safe mixing bowl, combine the butter and peanut butter. Microwave at full power for 2 to 2 1/2 minutes, or until melted. Blend together. Mix in crumbs, peanuts and sugar until the mixture is stiff. Press firmly into the prepared pan.

In a small bowl, combine chips, and shortening. Microwave at full power at 30 second intervals, until the chips and shortening are melted and can be stirred smooth. Pour over the peanut layer and smooth the chocolate evenly with an off-set spatula. Refrigerate until set, about 40 minutes.

Lift the candy from the pan by the two overhanging parchment edges. Sprinkle the chocolate with two or three pinches of Maldon flake salt, if using. Cut the bars into pieces and store in a container that seals air-tight.

Stove-top directions: If you don't have a microwave, then this candy may be prepared on the stove-top instead. Melt the butter and peanut butter in a small saucepan over medium heat until smooth. Melt the chocolate chips and shortening in a small saucepan over medium-low until smooth.

Almond Florentine Cigar Cookies

$
0
0

As far as cookies go, Florentines are high on my list of favorites. They're just so darn pretty and crunchable. It's hard to eat just one!

For those not familiar, Florentine cookies are lacy, delicate cookies that are pliable when taken from the oven, so they can be rolled into tubes or kept flat. My usual practice for making these is to sandwich two flat Forentines with melted chocolate, but this time I rolled them around a chopstick to make cigars. This method takes a little patience and dexterity, not to mention careful handling of the hot cookies, but the added crunch is so worth the effort!


I dipped one end of the cookies in melted chocolate and chocolate vermicelli, and then added a sprinkle of black pepper over the unset chocolate. This brings a little heat to the "lit" end of the cigar. You don't need much! Just enough to be playful.


After the chocolate firms, place them on pastry liners (sometimes called eclair liners) and seal them up tight in a holiday tin. This makes a nice gift and keeps them delectably fresh and crisp.


Almond Florentine Cigars
[click for printable recipe]

Yields about 16 cookies

1/2 cup/113g unsalted butter
3/4 cup almond flour
1/2 cup/100 g granulated sugar
1 tablespoon all purpose flour
1 tablespoon milk or heavy cream
Pinch of salt
4 ounces semisweet chocolate, evenly chopped
1/3 cup chocolate sprinkles
Ground black pepper for sprinkling (optional)

Melt the butter in a small saucepan over low heat. Add the almond flour, sugar, flour, cream and salt. Increase the heat to medium and cook until hot, about 5 minutes. Let the mixture cool for 10 minutes, or until the it thickens slightly.

Preheat the oven to 350 F.
Line two baking sheets with parchment paper. Drop the batter onto the parchment paper by the heaping teaspoonfuls spaced well apart, baking about 4 cookies to a cookie sheet.
Bake for 7 to 9 minutes, or until cookies are well spread and bubbling.

Slowly peel up the edge of a cookie after it has sat on the cookie sheet for about 2 minutes.
Using a chopstick or wooden spoon handle, quickly wrap the cookie around the form. Hold for 30 seconds and then slide the cookie off the form. Repeat with remaining cookies. If cookies become too rigid from cooling, place them back in the oven for 2 minutes and try rolling again.

Repeat with remaining cookie batter. Allow the cigars to cool completely before dipping them in chocolate.

Cover a work surface with waxed paper or parchment paper. Melt the 4 ounces of chocolate in the microwave at 30 second intervals until smooth (or melt over low heat on the stove top). Place the sprinkles in a small bowl. Dip one end of each cigar into the chocolate and then into the sprinkles.
Sprinkle a pinch of black pepper over the chocolate-dipped end. Place the cookies on the prepared work surface and allow the chocolate to set, about 2 hours.

Store the cookies in an air-tight container to keep them crisp.

Note: Be extra careful when peeling the cookies from the hot cookie sheet and and rolling the hot cookies onto the chopstick or spoon handle.


Ugly Christmas Sweater Cake

$
0
0

If the sweater above was real and not made of cake and buttercream, would you wear it? (I hope you said no!) Would you wear it to an ugly Christmas sweater party? (I  hope you said yes!)

A few weeks ago Wilton sent me a sample of their Decorator's Choice cake mix, and I've been ruminating on what to make with it ever since. Then recently, their Christmas product box arrived at my front doorstep with a Sweater Cake Pan inside. It was a done deal, folks. I giggled all the way to the kitchen.


The pan holds exactly 1 box of cake mix (convenient!), and what's better, the baked cake releases from the non-stick pan beautifully! The cake mix is designed to have a sturdy texture and yields less crumbs on the outside - and that's exactly what I experienced. I don't think I've ever had a cake that turned out of the pan with such a flawless surface! It's tasty, too, and not at all dense or tough.


As for the decorating, I covered the cake in buttercream tinted with Wilton's No-Taste Red gel food color. The rest of the decorations were made with ready-made fondant and sprinkles. I had no template or plan for the ugly sweater - I just listened to my inner ugly sweater-designer (smile).

Decorating the cake with the fondant pieces was so easy. I just placed the shapes on top of the buttercream and they adhered well without the addition of water or corn syrup. I tooled around each fondant cut-out with a gum paste quilting wand, and that really transformed the cake and made it look "sewn". You can find a link to this tool at the end of the post - I loved the effect!


Below you'll find links to all the items you'll need to make the sweater cake. In hindsight, I wish I'd had some mini ornament or snowflake cookie cutters.That would have made life a little simpler, but still, I think the cake turned out pretty cute.
And pretty ugly!


Ugly Sweater Cake Materials:
Sweater Cake Pan
Wilton's Decorator Preferred Cake Mix, baked as directed in the Sweater Cake Pan
Wilton's Decorator Preferred Fondant in green, yellow and white
Wilton No-Taste Red Gel Food Color
Fondant quilting tool
Jumbo Christmas Nonpareils
Jumbo quins
Silver sprinkles

You can find my buttercream recipe here, and my button-making technique at the very bottom of this post.


Viewing all 914 articles
Browse latest View live